Stihl MF-MM Instruction Manual
Hide thumbs
Also See for MF-MM:
- Instruction manual (36 pages) ,
- Instruction manual (16 pages) ,
- Instruction manual (38 pages)
Table of Contents
Advertisement
Quick Links
Advertisement
Table of Contents

Related Manuals for Stihl MF-MM


Summary of Contents for Stihl MF-MM
- Page 1 STIH) STIHL MF-MM Instruction Manual...
-
Page 2: Table Of Contents
MultiSystem ........2 Guide to Using this Manual ....2 Thank you for choosing a quality Safety Precautions ......3 engineered STIHL product. Using the Dethatcher ......9 This machine has been built using Approved MultiEngines ....10 modern production techniques and Mounting the MultiTool .... -
Page 3: Multisystem
Note or hint on correct procedure in contain item numbers that appear in the order to avoid damage to the illustration. environment. In the STIHL MultiSystem the Example: MultiEngine can be combined with a Loosen the screw (1) number of different MultiTools to produce a power tool. -
Page 4: Safety Precautions
STIHL dealer for Only attachments supplied by STIHL or Always observe local safety regulations, assistance. expressly approved by STIHL for use standards and ordinances. - Page 5 The spring tines might break. leather. become caught on wood or brush. See also notes on "Transporting the Power Tool" in the MultiEngine instruction manual. STIHL has a full line of safety clothing and equipment. MF-MM...
- Page 6 Mount both deflector extensions shaft (2) so that the MultiTool rotates in and the mud flap. the direction of the arrow (3). – Never attempt to modify the controls or safety devices. – Keep the handles dry and clean for safe control. MF-MM...
- Page 7 Do not operate using the starting throttle lock as you do not have control of the engine speed. To reduce the risk of injury from contact with the attachment, never operate a dethatcher without a properly mounted deflector. MF-MM...
- Page 8 Do not continue using the of the dethatcher. dethatcher if the spring tines are To reduce the risk of damaged. injury, keep your hands and feet well away from the attachment. Never touch a rotating attachment. MF-MM...
- Page 9 Wear gloves to reduce the risk chapter on "Storing the Machine". manuals. Have all other worked of injury. performed by your STIHL servicing See also notes on "During Operation" in dealer. the MultiEngine instruction manual. Only use original STlHL replacement When the machine is not in use, put it parts for repairs to the machine.
-
Page 10: Using The Dethatcher
To reduce the risk of accidents or injury, remove all obstacles and objects from the work area. Plan the route to be taken. The MF-MM dethatcher is operated in the forward direction only. To reduce the risk of damage and breakage, the dethatcher may only... -
Page 11: Approved Multiengines
Approved MultiEngines Operation Cleaning the Dethatcher Only MultiEngines which have been supplied by STIHL or specially approved Start the engine. Parts of plants, such as grass or roots, for use with this MultiTool may be used. may become tightly wound around the... -
Page 12: Mounting The Multitool
(3). sequence: – Tighten first screw moderately. See also "Mounting the MultiTool" in the – Tighten second screw moderately. instruction manual of the other MultiTool. – Tighten down first screw firmly. – Tighten down second screw firmly. MF-MM... - Page 13 Insert hitch pin (5) in hole in shaft Never work without properly fitted and snap it into position. deflector extensions. Mount the right-hand dethatcher in the same way. MF-MM...
-
Page 14: Starting / Stopping The Engine
Fit the flange (2). injury from contact with rotating Tighten down the screws (1) firmly. attachments, always stand to the side of the power tool, never in front Mount the dethatcher – see of or near the attachments. "Mounting the MultiTool". MF-MM... -
Page 15: Minimize Wear And Avoid Damage
STIHL and attention described in these in good time. Among other parts, this servicing dealer. -
Page 16: Main Parts
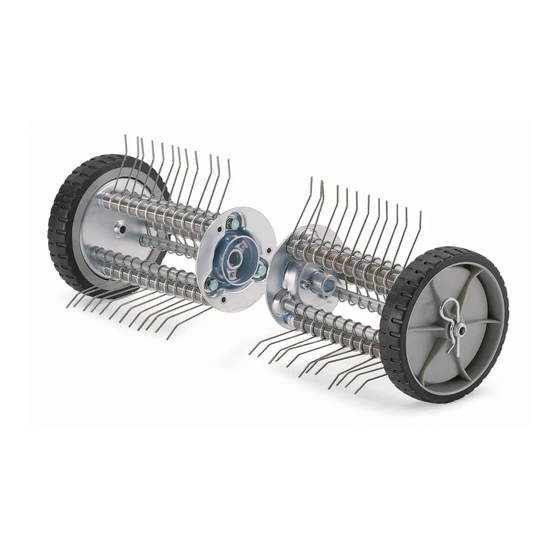
Dethatcher, left, right Working width: 550 mm Weight Dethatcher with deflector extensions and mud flap 6.1 kg Right-hand wheel Left-hand wheel Inner hitch pin, left Deflector extension, right Deflector extension, left Mud flap Outer hitch pin, left Spring tines MF-MM... -
Page 17: Maintenance And Repairs
4106 When repairing the machine, only use replacement parts which have been conforms to the specifications of approved by STIHL for this power tool Directive 98/37/EC. or are technically equivalent. Only use The product has been developed and high-quality replacement parts in order... - Page 18 0458 483 0121 englisch / English...
Need help?
Do you have a question about the MF-MM and is the answer not in the manual?
Questions and answers