Table of Contents
Advertisement
Quick Links
WINE / BEVERAGE CENTER
BEFORE USE, PLEASE READ AND FOLLOW ALL SAFETY RULES AND OPERATING INSTRUCTIONS.
Write Serial Number (on lower left corner of
inside cabinet) here:
_______________________
Serial No.:
Model Nos.: CLFD243WBV
Instruction Manual
Felix Storch, Inc.
An ISO 9001:2015 registered company
770 Garrison Avenue
Bronx, NY 10474
www.summitappliance.com
Advertisement
Table of Contents

Related Manuals for Summit Classic Collection CLFD243WBV


Summary of Contents for Summit Classic Collection CLFD243WBV
- Page 1 WINE / BEVERAGE CENTER Model Nos.: CLFD243WBV Instruction Manual BEFORE USE, PLEASE READ AND FOLLOW ALL SAFETY RULES AND OPERATING INSTRUCTIONS. Felix Storch, Inc. Write Serial Number (on lower left corner of An ISO 9001:2015 registered company inside cabinet) here:...
-
Page 2: Table Of Contents
TABLE OF CONTENTS Appliance Safety Important Safeguards Location of Parts Installation Instructions Before Using Your Appliance Installation of Your Appliance Electrical Connection Extension Cord Anti-tip Bracket Installation Installing the Stainless Steel Handles Operating Your Appliance 8-11 Recommended Temperature Settings Control Panel Interior Light Sabbath Mode Temperature Memory Function... -
Page 3: Appliance Safety
APPLIANCE SAFETY Your safety and the safety of others are very important. We have provided many important safety messages in this manual and on your appliance. Always read and obey all safety messages. This is the Safety Alert Symbol. The symbol alerts you to potential hazards that can kill or injure you and others. - Page 4 • In the event of any damage: - Avoid open flames and anything that creates a spark, - Disconnect from the electrical power line, - Air the room in which the appliance is located for several minutes, and - Contact the Service Department for advice. •...
-
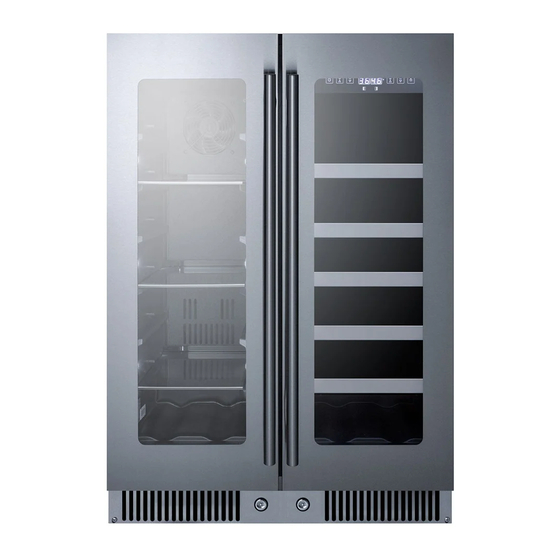
Page 5: Location Of Parts
LOCATION OF PARTS Handle Digital Control Panel Left Zone (Beverage Center) Right Zone (Wine Chiller) Glass Shelves(3) Wood Shelves(5) Glass Door Security Lock Adjustable Legs Kick-plate... -
Page 6: Installation Instructions
INSTALLATION INSTRUCTIONS BEFORE USING YOUR APPLIANCE • Remove the exterior and interior packing. • CAUTION: After unpacking you MUST allow this appliance to stand upright for at least 2 hours to allow the lubricant and refrigerant to drain back into the compressor and stabilize. Failure to do so may adversely affect performance and the lifetime of the unit. -
Page 7: Extension Cord
When a standard 2-prong wall outlet is encountered, it is your responsibility and obligation to have it replaced with a properly grounded 3-prong wall outlet. To prevent accidental injury, the cord should be secured behind the appliance and not left exposed or dangling. -
Page 8: Installing The Stainless Steel Handles
INSTALLING THE STAINLESS STEEL HANDLE This appliance includes a stainless steel handle that is not required to operate the unit. To install the handle, follow the instructions below: Locate the handle (1) over the mounting stub (3) of the door and using the supplied Allen key, tighten the securing grub screws (2) to fix the handle. - Page 9 DOWN Used to decrease (cool) the set temperature by 1°C/1ºF. Indicator Light The indicator light is the decimal point located at the right lower corner of the display. The indicator light will be on when a multi-key function is selected. To perform a multi-key function, press and hold the first key, then press the second key for at least 5 seconds and then release both keys ºF/ºCSelector Select the temperature display setting in Fahrenheit or Celsius degree.
-
Page 10: Interior Light
INTERIOR LIGHT The interior light makes it easy to view your wine labels and enhances the display of your collection. The LIGHT switch allows you to toggle between 2 modes of operation for the internal lights: functional (default) mode and showcase mode. If you are in functional (default) mode (also named Energy Saving Mode), the lights will turn on only when the door is open. -
Page 11: Door Lock
DOOR LOCK Your unit is provided with a lock and key combination. The keys are located inside the plastic bag that contains the Instruction Manual. Insert the key into the lock and turn it counter-clockwise to unlock the door. To lock the door, do the reverse operation, making sure the metal pin is engaged completely. -
Page 12: Care And Maintenance
CARE AND MAINTENANCE CLEANING YOUR APPLIANCE • Turn off the power, unplug the appliance, and remove all items, including shelves. • Wash the inside surfaces with a solution of warm water and baking soda (about 2 tablespoons of baking soda to a quart of water). •... -
Page 13: Troubleshooting
TROUBLESHOOTING You can solve many common appliance problems easily, saving you the cost of a possible service call. Try the suggestions below to see if you can solve the problem before calling the servicer. Troubleshooting Guide PROBLEM POSSIBLE CAUSE REMEDY •... - Page 14 • The appliance is not properly leveled. • Level the appliance with the The doors will adjustable feet. not close • Clean the door gaskets. • The gaskets are dirty. properly. • Check the shelves and refit correctly. • The shelves are out of position. •...
- Page 15 NOTES...
-
Page 16: Limited Warranty
LIMITED WARRANTY ONE-YEAR LIMITED WARRANTY Within the 48 contiguous United States, for one year from the date of purchase, when this appliance is operated and maintained according to instructions attached to or furnished with the product, warrantor will pay for factory-specified parts and repair labor to correct defects in materials or workmanship. Service must be provided by a designated service company.
Need help?
Do you have a question about the CLFD243WBV and is the answer not in the manual?
Questions and answers