Table of Contents

Related Manuals for Siemens IQ500 LR97CAP21B


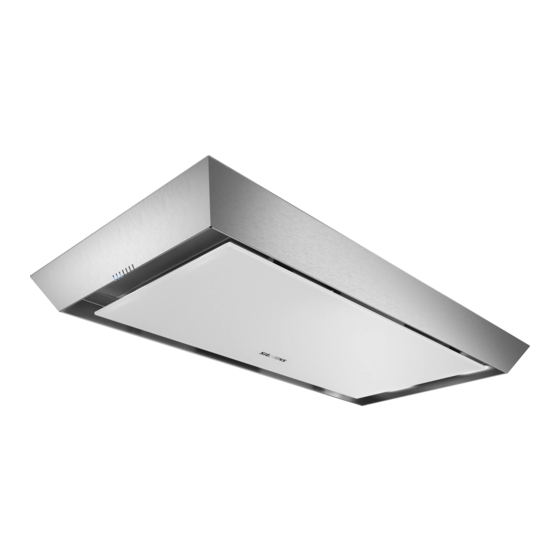
Summary of Contents for Siemens IQ500 LR97CAP21B
- Page 1 Extractor hood LR97CAP21B User manual and installation instructions Register your product on My Siemens and discover exclusive ser- vices and offers. siemens-home.bsh-group.com/welcome The future moving in. Siemens Home Appliances...
-
Page 2: Table Of Contents
en Safety ¡ Up to an altitude of max. 2000 m above Table of contents sea level. Do not use the appliance: ¡ With an external timer. USER MANUAL 1.3 Restriction on user group Safety .............. 2 This appliance may be used by children aged Preventing material damage ....... -
Page 3: Safety
Safety en shaft are sucked back into the living space. flames carefully using a lid, fire blanket or something similar. When gas burners are in operation without any cookware placed on them, they can build up a lot of heat. A ventilation appliance in- stalled above the cooker may become dam- aged or catch fire. -
Page 4: Preventing Material Damage
en Preventing material damage ▶ Never pull on the power cord to unplug the The light emitted by LED lights is very appliance. Always unplug the appliance at dazzling, and can damage the eyes (risk the mains. group 1). ▶ If the appliance or the power cord is dam- ▶... -
Page 5: Environmental Protection And Saving En- Ergy
Environmental protection and saving energy en 3 Environmental protection and saving energy Help protect the environment by using your appliance Adjust the fan speed to the amount of steam pro- in a way that conserves resources and by disposing of duced during cooking. reusable materials properly. -
Page 6: Familiarising Yourself With Your Appliance
LZ21JXC21 your appliance in our catalogue, in the online shop or module, white from our after-sales service. www.siemens-home.bsh-group.com 7 Before using for the first time Configure the settings for initial start-up. Clean the ap- Press and hold for four seconds. -
Page 7: Basic Operation
Basic operation en Requirement: The appliance is switched off. 7.2 Setting the appliance to air extraction mode Press and hold for four seconds. ▶ a Two audible signals sound. Your appliance is set to air extraction mode by default. a The LEDs for fan speeds 1 and 2 and the LED for To use it in air extraction mode, you do not need to set the saturation indicator light up in the LED display. - Page 8 en Cleaning and servicing 9 Cleaning and servicing To keep your appliance working efficiently for a long Observe the information regarding the cleaning time, it is important to clean and maintain it carefully. agents. Clean using a damp sponge cloth and hot soapy water.
-
Page 9: Cleaning And Servicing
Cleaning and servicing en Place the grease filters loosely into the dishwasher. ATTENTION! Falling grease filters may damage the hob below. Do not clean heavily soiled grease filters with Grip below the grease filter with one hand. utensils. ▶ Use special grease solvent for stubborn dirt. You Open the locks on the grease filters. -
Page 10: Troubleshooting
en Troubleshooting ATTENTION! 9.10 Odour filter for recirculating air mode Falling grease filters may damage the hob below. Odour filters bind odorous substances in air recircula- Reach under the filter cover with one hand. ▶ tion mode. Regularly replaced odour filters guarantee a Loosen the screws on the filter cover. -
Page 11: Disposal
Disposal en Fault Cause and troubleshooting The lighting does not work. Different causes are possible. Call the after-sales service. ▶ → "Customer Service", Page 12 Remote control not working. The batteries are flat. → "Replacing the batteries in the remote control", Page 11 ▶ General malfunctions occur. Malfunction Switch off the fuse in the fuse box. - Page 12 en Customer Service 12 Customer Service If you have any queries on use, are unable to rectify 12.1 Product number (E-Nr.) and production faults on the appliance yourself or if your appliance number (FD) needs to be repaired, contact Customer Service. You can find the product number (E-Nr.) and the pro- Function-relevant genuine spare parts according to the duction number (FD) on the appliance's rating plate.
-
Page 13: Installation Instructions
Installation instructions en be sealed, for example in doors, windows, 13.3 Safety clearances incoming/exhaust air wall boxes or by Comply with the safety clearances for the appliance. other technical means. An incoming/ex- haust air wall box alone does not ensure compliance with the limit. ▶... - Page 14 en Installation instructions Grease deposits in the grease filter may catch Risk of injury when opening and closing the fire. hinges. ▶ Never work with naked flames close to the ▶ Keep your hands away from the hinges. appliance (e.g. flambéing). WARNING ‒ Risk of electric shock! ▶...
- Page 15 Installation instructions en ¡ To optimally detect the cooking vapours, install the 13.5 General information appliance in the middle of the hob. Follow these general instructions during the installation. ¡ For the installation, observe the currently valid build- 13.8 Instructions for the exhaust air pipe ing regulations and the regulations of the local elec- tricity and gas suppliers.
- Page 16 en Installation instructions Preparing the appliance Remove the cable cover. Push the locking mechanism together with two hands , take hold of the filter cover and open it Loosen both plug connections and release the cables from the cable holders. Remove the filter cover. Remove the view frame.
- Page 17 Installation instructions en Disconnect the power supply from the motor. Installing the appliance Disconnect the appliance from the power supply. Unplug the appliance from the mains or switch off the circuit breaker in the fuse box. Insert the motor block in the ceiling. Remove the air pipe connector.
- Page 18 en Installation instructions Hook the motor block into the central screw and Align the motor block and tighten all of the screws. tighten the screw. Connect the exhaust air pipe. Tighten the second central screw. Fit the air pipe connector. Screw in the remaining four screws loosely; do not Insert the power cable into the motor.
- Page 19 Installation instructions en Secure the screw for the elongated hole in the view Fit the motor cover. frame on the motor block, but do not screw it in completely. Fit the grease filters. Hook the view frame onto the elongated hole and tighten all of the screws.
- Page 20 en Installation instructions Open the filter cover. Remove the filter cover. Remove the grease filters. To avoid causing damage, do not bend the grease filters. Remove the motor cover. Disconnect the power connections between the view frame and motor. Remove the view frame. Remove the motor.
- Page 24 Valid within Great Britain: Imported to Great Britain by BSH Home Appliances Ltd. Grand Union House Old Wolverton Road Wolverton, Milton Keynes MK12 5PT United Kingdom Manufactured by BSH Hausgeräte GmbH under the trademark licence of Siemens AG *9001468175* 9001468175 (010503)
Need help?
Do you have a question about the IQ500 LR97CAP21B and is the answer not in the manual?
Questions and answers