Table of Contents
Advertisement
Quick Links
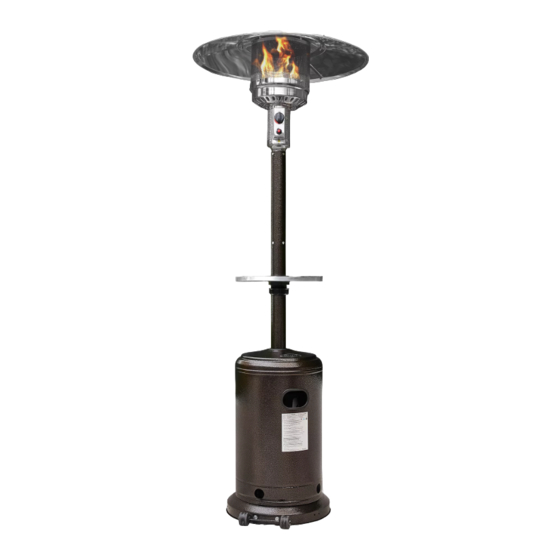
48000 BTU Stand Patio Heater w/ Table
FOLLOW US:
@bellezefurniture
item no. 014-HG-PH01 / 014-HG-PH02 / 014-HG-PH03
www.bellezefurniture.com
www.bellezefurniture.com
CONTACT INFO:
support@bellezefurniture.com
1-800-682-6376
R
R
R
US
NOTE:
The instruction booklet contains IMPORTANT safety
information Please read and keep for future reference.
Advertisement
Table of Contents

Related Manuals for Belleze 014-HG-PH01


Summary of Contents for Belleze 014-HG-PH01
- Page 1 48000 BTU Stand Patio Heater w/ Table item no. 014-HG-PH01 / 014-HG-PH02 / 014-HG-PH03 www.bellezefurniture.com www.bellezefurniture.com FOLLOW US: CONTACT INFO: NOTE: The instruction booklet contains IMPORTANT safety support@bellezefurniture.com @bellezefurniture information Please read and keep for future reference. 1-800-682-6376...
-
Page 2: Our Brand
Every Belleze product is carefully selected to ensure they meet our standards as well as your standards. We believe quality should never be determined by price which is why Belleze is committed to providing high end merchandise at the absolute lowest cost. PLEASE LIKE, COMMENT AND FOLLOW. -
Page 3: Carbon Monoxide Hazard
DANGER If you smell gas: 1. Shut off gas to the appliance. 2. Extinguish any open flame. 3. If odor continues, keep away from the appliance and immediately call your gas supplier or fire department. WARNING Do not store or use gasoline or other flammable vapors and liquids in the vicinity of this or any other appliance. -
Page 4: Package Contents
PACKAGE CONTENT PACKAGE CONTENTS QUANTITY Reflector Panel Reflector Plate Head Assembly Screw Coupler Table Tightening Spacer Fastening Nut Cylinder Housing Door (preassembled) Post Gas Hose Regulator Base Bucket (preassembled) Wheel Kit... - Page 5 HANDWARE CONTENTS(shown actual size) Φ6 M8 x 16 mm Small Flat Flange M5 x 8 mm Reflector M6 x 10 mm Bolt Washer Screw Spacer Φ8 Washer Φ6 Washer Bolt Reinforced Deck Ring M6 x 10 mm Ring Stainless Wrench Screw Cap Nut Wing Nut...
-
Page 6: Safety Information
SAFETY INFORMATION SAFETY INFORMATION SAFETY INFORMATION DANGER DANGER combustion appliances produce carbon materials, paper or cardboard, a safe distance monoxide (CO) during the combustion away from the heater as recommended by the process. This product is designed to instructions. produce extremely minute, non-hazardous amounts of CO if used and maintained in openings into the combustion chamber. -
Page 7: Burn Hazard
SAFETY INFORMATION SAFETY INFORMATION WARNING WARNING We cannot foresee every use that may be Do not store or use gasoline or other flammable made of our heaters. vapors and liquids in the vicinity of this or any Check with your local fire safety authority if you other appliance.An LP-cylinder not connected have questions about heater use. -
Page 8: Service Safety
SAFETY INFORMATION WARNING WARNING gas is invisible, odorless, and flammable. An high surface temperatures. Stay away from odorant is normally added to help detect leaks these surfaces to avoid burning skin or igniting clothing. The odorant can fade over time so leaking gas is not always detectable by smell alone. - Page 9 ASSEMBLY INSTRUCTIONS ASSEMBLY INSTRUCTIONS ASSEMBLY INSTRUCTIONS Line up holes on the bracket of wheel assembly (O) ,with the corresponding holes on base (M), then insert M8 x 16 mm bolts (BB) through holes. Hand tighten with M8 flange nuts (AA). Be sure the wheel Fill sand assembly (O) is parallel to the base (M).
- Page 10 ASSEMBLY INSTRUCTIONS ASSEMBLY INSTRUCTIONS ASSEMBLY INSTRUCTIONS 4. Secure post (J) to cylinder housing (H) using the reinforced ring (NN), M6 x 10 mm bolts (DD) and Φ6 small flat washers (EE). Fasten and cover with the deck ring (OO). Hardware Used M6 x 10 mm Bolt Φ6 Small Flat Washer Reinforced Ring...
- Page 11 ASSEMBLY INSTRUCTIONS ASSEMBLY INSTRUCTIONS ASSEMBLY INSTRUCTIONS (GG) to the top of head assembly (C). Tighten the reflector spacers (FF). Hardware Used Reflector Spacer Φ8 Washer 8. Unscrew stainless steel bolts (LL) from head assembly (C). Hardware Used Stainless Steel Bolt 9.
- Page 12 ASSEMBLY INSTRUCTIONS ASSEMBLY INSTRUCTIONS ASSEMBLY INSTRUCTIONS 10. Remove protective cover from reflector panel (A) and reflector plate (B). Note: In order to achieve proper alignment of reflector sections, it may be necessary to loosen the preassembled bolts prior to assembly and retighten once complete.
- Page 13 ASSEMBLY INSTRUCTIONS ASSEMBLY INSTRUCTIONS LY INSTRUCTIONS Slide Φ8 washers (GG) over the threaded ends of reflectors spacers (FF). Attach reflector assembly to head assembly (C). Place Φ8 washers (GG) over threaded ends of reflector spacers (FF) sticking out through reflector assembly and secure with wing nuts (KK).
- Page 14 ASSEMBLY INSTRUCTIONS ASSEMBLY INSTRUCTIONS ASSEMBLY INSTRUCTIONS A dented, rusted or damaged propane cylinder may be hazardous and should be checked by your cylinder supplier. Never use a propane cylinder with a damaged valve connection. The propane cylinder must be constructed and marked in accordance with the specifications for LP gas cylinders of the U.S.
- Page 15 OPERATION INSTRUCTIONS OPERATION INSTRUCTIONS OPERATION INSTRUCTIONS To check for a leak: WARNING 1. Make 2-3 oz. leak check solution (one part liquid dishwashing detergent and three parts water). 2. Apply several drops of solution where regulator connects to cylinder and to all hose and valve connections leak tested and do not leak.
- Page 16 OPERATION INSTRUCTIONS DANGER unventilated or enclosed areas. This heater consumes air (oxygen). Do not use in unventilated or enclosed areas to avoid endangering your life. Caution: Do not attempt to operate until you have read and understand all General Safety Information in this manual and all assembly is complete and leak checks have been performed.
- Page 17 OPERATION INSTRUCTIONS OPERATION INSTRUCTIONS OPERATION INSTRUCTIONS 5. Push and release the igniter button until pilot flame is visible through viewing hole. 6. Once the pilot is lit, continue to depress the control knob for 30 seconds. 7. If the pilot does not stay lit, repeat steps 4 to 6. 8.
-
Page 18: Care And Maintenance
OPERATION INSTRUCTIONS OPERATION INSTRUCTIONS OPERATION INSTRUCTIONS Heater is away from gasoline or other flammable liquids or vapors. Heater is away from windows, air intake openings, sprinklers and other water sources. Heater is at least 36 in. on top and at least 36 in. on sides from combustible materials. Heater is on a hard and level surface. - Page 19 CARE AND MAINTENANCE CARE AND MAINTENANCE Visually checking portions of the hose assembly located within the confines of the heater post. Inspect the entire hose assembly at least annually, disassembling the reflector and burner. Inspect the hose assembly for evidence of excessive abrasion, cuts, or wear. Suspected areas should be leak tested. Then assembling the reflector and burner again following with step 9 and 14.
-
Page 20: Troubleshooting
TROUBLESHOOTING TROUBLESHOOTING PROBLEM POSSIBLE CAUSE SOLUTION 1. Cylinder valve is closed 1. Open valve 2. Blockage in orifice or pilot tube 2. Clean or replace orifice or pilot tube 3. Air in gas line 3. Open gas line and bleed it (pressing control knob in) for not more than 1 - 2 minutes or until you smell gas... -
Page 21: Contact Info
Warranty Belleze products come with a 1 year warranty from the date of purchase. In any event that the product arrives damaged or missing parts, we are more than happy to provide you with replacement part(s). Register your product on our website to enjoy extended warranty!!
Need help?
Do you have a question about the 014-HG-PH01 and is the answer not in the manual?
Questions and answers