
Related Manuals for Witt WIP60SQ


Summary of Contents for Witt WIP60SQ
- Page 1 INSTRUCTION OF USE WIP60SQ / WIF60SQ WIP70SQ / WIF70SQ WIP78SQ / WIF78SQ WIP90SQ / WIF90SQ WIP100SQ / WIF100SQ...
-
Page 2: Table Of Contents
Dear customer, Thank you for having chosen our induction ceramic hob. In order to make the best use of your appliance, we would advise you to read carefully the following notes and to keep them for a later consulting. SUMMARY SAFETY............................ -
Page 3: Safety
SAFETY Precautions before using Unpack all the materials. The installation and connecting of the appliance have to be done by approved specialists. The manufacturer can not be responsible for damage caused by building-in or connecting errors. To be used, the appliance must be well-equipped and installed in a kitchen unit and an adapted and approved work surface. -
Page 4: Precautions Not To Damage The Appliance
Precautions not to damage the appliance Raw pan bottoms or damaged saucepans (not enamelled cast iron pots,) may damage the ceramic glass. Sand or other abrasive materials may damage ceramic glass. Avoid dropping objects, even little ones, on the vitroceramic. ... -
Page 5: Description Of The Appliance
Total Position of the Nominal Booster Booster diameter Type Power heating zone Power* Power* Power* detection WIP60SQ 4 zones 7400 W 2100 W 2600 W 3700 W 100 mm WIF60SQ 180x220mm WIP70SQ 4 zones 7400 W 2100 W 2600 W... -
Page 6: Control Panel
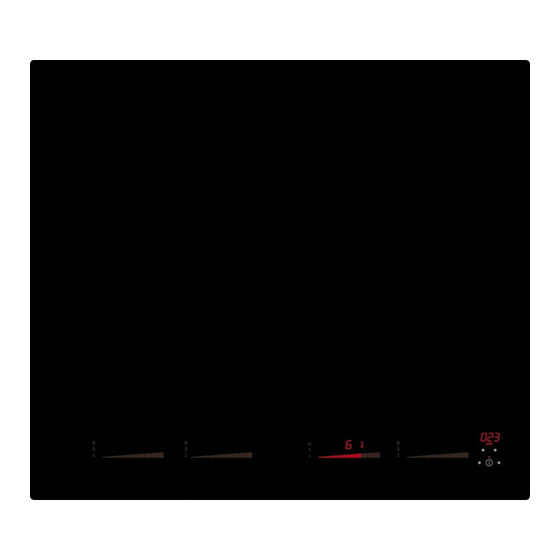
Control panel Timer display Bridge Timer Power display Timer keys Keep warm display display displays Power selection zone Power selection zone “Slider” (rear zone) “Slider” (front zone) Keep warm key Locking key On/Off key Pause/ Recal USE OF THE APPLIANCE Display Display Designation... -
Page 7: Starting-Up And Appliance Management
STARTING-UP AND APPLIANCE MANAGEMENT Before the first use Clean your hob with a damp cloth, and then dry the surface thoroughly. Do not use detergent which risks causing blue-tinted colour on the glass surface. Induction principle An induction coil is located under each heating zone. When it is engaged, it produces a variable electromagnetic field which produces inductive currents in the ferromagnetic bottom plate of the pan. -
Page 8: Starting-Up
Starting-up Start up / switch off the hob: Action Control panel Display To start press key [ [ 0 ] To stop press key [ nothing or [ H ] Start up / switch off a heating zone: Action Control panel Display... -
Page 9: Timer
Start up / Stop Double Booster: Action Control panel Display Slide to the end of the “SLIDER” Start up the Booster [ P ] Or press directly on the end of the “SLIDER” Start up Double Booster Re-press key [ P ] and P ] Slide on the “SLIDER“... -
Page 10: Automatic Cooking
Automatic stop at the end of the cooking time: As soon as the selected cooking time is finished the timer displays blinking [ 000 ] and a sound rings. To stop the sound and the blinking, press the key [ - ] and [ + ]. Automatic cooking All the cooking zones are equipped with an automatic cooking device. -
Page 11: "Keep Warm" Function
“Keep warm” Function This function allows the reach and automatically maintains at the temperature of 42, 70 or 94°C. This will avoid liquids overflowing and fast burning at the bottom of the pan. To engage, to start the function « Keep warm » : Action Control panel Display... -
Page 12: Cooking Advices
COOKING ADVICES Pan quality Adapted materials: steel, enamelled steel, cast iron, ferromagnetic stainless-steel, aluminium with ferromagnetic bottom. Not adapted materials: aluminium and stainless-steel without ferromagnetic bottom, cupper, brass, glass, ceramic, porcelain. The manufacturers specify if their products are compatible induction. To check if pans are compatibles: ... -
Page 13: Examples Of Cooking Power Setting
Examples of cooking power setting (the values below are indicative) 1 to 2 Melting Sauces, butter, chocolate, gelatine Reheating Dishes prepared beforehand 2 to 3 Simmering Rice, pudding, sugar syrup Defrosting Dried vegetables, fish, frozen products 3 to 4 Steam Vegetables, fish, meat 4 to 5 Water... -
Page 14: Environment Preservation
One or all cooking zone cut-off: The safety system functioned. You forgot to cut-off the cooking zone for a long time. One or more sensitive keys are covered. The pan is empty and its bottom overheated. ... - Page 15 Cut size Glass size Cut size of flush mouting Type Width Depth Width Depth Width Depth Radius Thickness Thickness WIP60SQ WIF60SQ WIP70SQ WIF70SQ WIP78SQ WIF78SQ WIP90SQ WIF90SQ WIP100SQ 1000 1006 WIF100SQ 1000 Ensure that there is a distance of 50 mm between the hob and the wall or sides.
-
Page 16: Electrical Connection
ELECTRICAL CONNECTION The installation of this appliance and the connection to the electrical network should be entrusted only to an electrician perfectly to the fact of the normative regulations and which respects them scrupulously. Protection against the parts under tension must be ensured after the building-in. ... - Page 17 5 -6 Zones Protection Land Mains Connection Cable diameter Cable calibre H 05 VV - F DK-S-FIN 400V~ 50/60Hz 3 Ph + N 5 x 1.5 mm² 16 A * H 05 RR - F H 05 VV - F DK-S-FIN 400V~ 50/60Hz 2 Ph + N...
Need help?
Do you have a question about the WIP60SQ and is the answer not in the manual?
Questions and answers