
Related Manuals for Ericsson R290SAT


Summary of Contents for Ericsson R290SAT
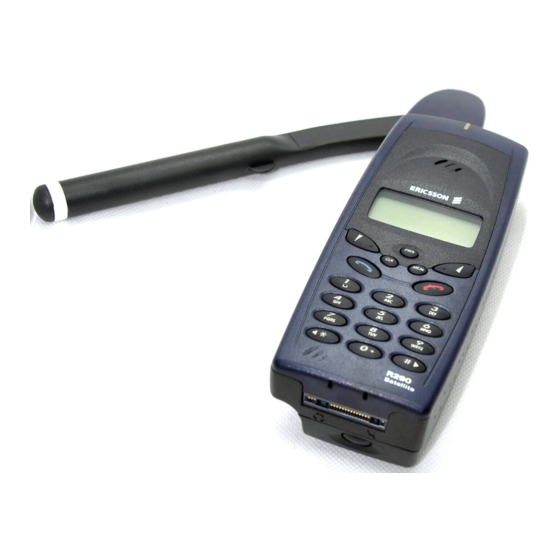
- Page 1 Ericsson R290 Satellite Mobile Phone for the Globalstar/GSM Network 8VHU·V *XLGH EN/LZT 123 4717 R1B...
- Page 2 This manual describes Ericsson R290 Satellite First edition (December 1999) This manual is published by Ericsson Mobile Communications (UK) Limited , without any warranty. Improvements and changes to this manual necessitated by typographical errors, inaccuracies of current information, or improvements to programs and/ or equipment, may be made by Ericsson Mobile Communications (UK) Limited at any time and without notice.
- Page 3 Certified Service Partners. turned on, it receives and transmits radio frequency (RF) energy. • Only use Ericsson original accessories. Failure to do so may result in Depending on the type of mobile phone you possess, it operates on loss of performance, damage to the phone, fire, electric shock or different frequency ranges and employs commonly used modulation injury, and will void the warranty.
- Page 4 If you have any reason to suspect that interference • Give full attention to driving. is taking place, immediately turn off your phone. Contact your • Use an Ericsson Vehicle Handsfree Solution, if available. Law in cardiologist for more information. many countries requires vehicle Handsfree Solution. Read the Some hearing aids might be disturbed by mobile phones.
- Page 5 • Use only Ericsson original batteries and the AC/DC adapter supplied • The charger must not be used outdoors or in damp areas. with your battery charger. Using non original Ericsson accessories could be dangerous and will void your phone warranty.
- Page 6 • Do not attempt to take a battery apart. Please note! • Do not let the metal contacts on the battery touch another metal object. Some of the services mentioned in this manual are not supported by all This could short-circuit and damage the battery. networks or by all service agreements.
-
Page 7: Table Of Contents
Contents Answering a Call ................. 15 Rejecting a Call ................15 Unanswered Calls ................ 15 Introduction ................1 Putting a Call on Hold ..............15 About Your Phone ..............2 Calling Line Identification (CLI) ..........15 Globalstar/GSM 900 ..............2 Connected Line Identification (COLP) ........15 Operators &... - Page 8 Pause Dialling ................25 Call Barring ................. 48 Sending And Receiving Text Messages ......52 Sending DTMF Tones During a Call ...........25 One-Touch Dialling ..............26 Receiving a Message ..............52 Call Duration and Cost ..............26 To Read a Message ..............53 Personalizing Your Phone ...........
-
Page 9: Introduction
Introduction • GSM mode - providing reliable, less expensive cellular service when available. Your mobile phone sets a new standard for others to follow while meeting Thank you for choosing the R290 satellite/cellular phone, the the highest standards for durability, service and sound. It comes packed revolutionary mobile phone that helps you keep in touch with the rest of with features that help you stay in touch with the world. -
Page 10: About Your Phone
About Your Phone Your PIN Your operator will provide you with a security code or Personal Identity Globalstar/GSM 900 Number (PIN) when you receive your SIM card. This number allows you to access the network. The first time you turn on your phone you are The R290 phone operates in either Globalstar satellite or GSM 900 prompted to enter your PIN (if the PIN is activated.) Your PIN may also cellular mode. -
Page 11: The Phone
The Phone R290 User’s Guide... -
Page 12: Preparing Your Phone For Use
Preparing Your Phone for Use 2. Slide the SIM card into the holder as shown (1). Before you can use your phone for the first time you must install the SIM card (if it is not already installed), install and charge the battery, and set default parameters for the phone and networks. -
Page 13: The Battery
Operating with a GSM Standard SIM Card 2. Press the battery forward and press down on the rear of battery until you hear a click. Your phone will operate in GSM mode with a standard GSM SIM card. You can change parameters to override the default satellite parameters. This allows you to set your personal preferences for use in GSM networks. - Page 14 1. Assemble the mains plug, charger and lead. The box may contain 3. Connect the other end of the charger cable to the phone. The button more than one mains plug. In this case use the one that fits the wall on the plug must face up and the flash symbol down.
-
Page 15: The Antenna
When the battery is fully charged, the battery meter in the display shows or receive any calls until the battery is being charged or replaced with a full and the indicator on top of the phone slowly flashes a green light. charged one. -
Page 16: Turning On The Phone
Use with Portable Hands Free (Globalstar Mode) to operate at a higher power level than needed and shorten talk and standby times. Connect the Portable Hands Free unit to the phone. Rotate the antenna to the 90 degrees position. Place the phone on a flat level surface with the Turning On the Phone antenna vertical as shown below. -
Page 17: Navigating The Menu System
Navigating the Menu System Press NO key to return phone to the standby menu. The menus are arranged in a continuous loop that you move through with the YES, NO, CLR and Navigation keys. Name and Function Navigation Keys (Soft Left & Soft Right): Press right or left to activate menu mode and scroll through menus. -
Page 18: Indicators In The Display
Indicators in the Display Icon Function Phone is in satellite mode. When not illuminated, the phone is in GSM mode. Flashes for incoming call, steady when call in progress. Flashes for unread message, steady when message read. Voice mail in box. Phone is ‘Roaming’. -
Page 19: Initial Phone Settings
Initial Phone Settings Mode Switch To switch network mode from satellite to cellular or vice versa press You will need to set certain parameters before using your phone for the SOFT LEFT, then press 4. first time. You will need to set other parameters before using some of the NOTE: features. - Page 20 The Mode Menu allows you to configure the phone to cellular only mode, Selecting a Network satellite only mode or to set the preferential mode of operation to cellular Using manual selection, you can control how the phone selects which preferred or satellite preferred.
- Page 21 If there is more than one network, up/down arrow symbols will appear at The display can also be configured to show time and date. See “Clock” the bottom of the screen and the SOFT KEYS can be used to view them. on page 32.
-
Page 22: Making And Receiving Calls
Making and Receiving Calls Satellite Antenna” on page 7. Ensure the satellite antenna is kept vertical when in use. It is adjustable for left or right handed operation, and has a third position for use on a flat surface outdoors. This position is for use This chapter describes how to make and receive calls, in both Globalstar with a hands free kit or mobile office. -
Page 23: Receiving A Call
Receiving a Call Calling Line Identification (CLIP) When you receive a call, the phone rings and the indicator light on the top The Calling Line Identification service (sometimes known as Caller ID) of the phone blinks orange rapidly. The display appears similar to: shows the caller’s phone number when you receive a call (you have to order this service). -
Page 24: Handling Two Calls
Useful Information while Handling Two Calls Talking Your phone can handle two calls simultaneously, or up to 6 if you have a conference enabled SIM. This allows you to hold one call and make or receive another, then you can switch between the two calls. To be able to During a call, you can: change the volume of the ear piece;... -
Page 25: To "Mute" Or "Unmute" The Microphone
To “Mute” or “Unmute” the Microphone For the call duration and cost, the display will show: Press the SOFT RIGHT key during the call to ‘mute’ or ‘unmute’ the microphone. When muting is on, the earpiece and alerter is still active together with the In-call Menu, stores and scratch-pad. -
Page 26: To Change Key Tone Volume
To Change Key Tone Volume return to standby. If a supplementary service request is made, including call hold and call wait, auto-redialling will be terminated. To increase or decrease the key tone volume from standby, press the up If you reject an incoming call by pressing NO, the auto-redial will not be or down key on the side of the phone when no calls are in progress. -
Page 27: Missed Calls
Missed Calls The phone to which the call is diverted will display the message Diverted Incom’g Call (and the caller’s phone number if the CLIP information is If you do not answer a call, the phone indicates a missed call by present). -
Page 28: Using The Phone Book
Using the Phone Book To Store a Name and a Number into a Selected Memory Store This chapter describes how you can store phone numbers both on your 1. Press and hold MEM for at least half a second. The display will be: SIM Card and in your phone’s own memory. - Page 29 £ ¥ ¡ ¿ % & § For example, to enter the name Ericsson, press the following keys: E (33), SOFT RIGHT, r (777), i (444), c (222), s (7777), s (7777), o (666) AND n (66). R290 User’s Guide...
-
Page 30: To Store Your Own Telephone Number
To Store Your Own Telephone Number Table 4: Greek Mode The phone can store up to 5 of your own numbers, this is SIM dependant. Number of Key presses Normally only 1 is required, which is the number used to make speech calls with the phone. -
Page 31: To Edit A Number From Memory Store
To recall by the name associated with the desired number, enter the name, To return to standby and retain and recall the number for dialling or or part of it, in the ‘Name?’ line and press either MEM or YES. To recall editing, press NO. - Page 32 time. To change the store, hold down SOFT RIGHT for at least half a When the Dialled store is active, the last number can be recalled by pressing SOFT RIGHT in standby. The display will be: second. The display will be: To select the Dialled store, press either 1 or move the cursor to this option If there is a name associated with this number, this will be recalled from and press YES.
-
Page 33: Last Number Redial
Discrete presses of SOFT RIGHT will scroll through the list of received The digits that you add after the PAUSE will be transmitted as DTMF numbers. tones across the network. For example: The Missed Store The Last Number Missed store holds up to ten numbers. When the Missed store is active, the last number can be recalled by pressing SOFT RIGHT. -
Page 34: One-Touch Dialling
If the DTMF tones have been disabled and you need to send DTMF tones All Calls during a call, you can enable them using the In-call Menu. 1. Press SOFT LEFT, 2, to enter the Call Time Menu. When enabled, any numerical key press, including <* and #>, will cause DTMF tones to be signalled across the network. - Page 35 SUPER PIN 3. Press 1 to display the Unit Cost screen. If you are using a Phase 2 SIM, you may be required to enter the Super PIN. Enter it (if you do not have this, you can get it from your service provider).
- Page 36 If the maximum number of units has been reached (the Accumulative Call 3. Press 2 to display the Unit Time screen. Meter Maximum), you will only be able to make emergency calls. If you are currently in an outgoing chargeable call, this will be shut down. If the unit cost has not been set up, the total number of call units will still be stored so that the unit cost may be added later in order to calculate the costing information.
- Page 37 You will now only be able to make emergency calls and receive non- If using a non-Advice of Charge SIM, any attempt to access the Cost chargeable calls (some incoming calls are chargeable) until the cost limit results in the message ‘Request Rejected’ being displayed. is reset.
-
Page 38: Personalizing Your Phone
Personalizing Your Phone 4. Select required function: • To enable Standard Tone, press 1. • To enable Dual Tone, press 2. Autoredial • To enable Long Tone, press 3. The phone will then return to the Call Setup menu. This menu allows you to select the action the phone will take if you dial a number that is busy or unobtainable. -
Page 39: Caller Id
3. Press 3 for Escalating Ring Volume. 2. Press 4 to show Connect ID menu. 4. To enable the escalating ring volume, press 1 or YES. To disable it, 3. To enable Connect ID, press 1 or YES. To disable it, press 2. press 2. -
Page 40: Greetings
1. Press SOFT LEFT, 1, 1 to enter Call Setup menu. For example, to enter the text: ‘World’, press the following keys: W (9), 2. Press 7 to show Auto Answer menu. SOFT RIGHT, o (666), r (777), l (555), d (3). The display will show: 3. - Page 41 Set Date 2. Press 3 to set Clock Mode, current mode is shown with asterix. 1. Press SOFT LEFT, 1, 4 to enter the Clock Menu. 3. Press 1 to select AM/PM mode or press 2 for 24 hour mode. A confirmation message ‘Clock Mode enabled’...
-
Page 42: Language
4. Press YES to select an option. 2. Press 5 to show Language menu. The current date is displayed in the appropriate confirmation mode for 4 seconds before returning to the Clock menu. Satellite Synchronisation Mode 1. Press SOFT LEFT, 1, 4 to enter the Clock menu. 2. -
Page 43: Power Save
Power Save etc.) before the backlighting is switched-off, in seconds. The display will show: The phone has a power saving features that allow you to enable or disable the visual indicator and Keypad backlighting. Backlight Operation 1. Press SOFT LEFT, 1 to enter Setup menu. 2. -
Page 44: Fixed Dialled Number Store
1. Press SOFT LEFT, 1, 8 to enter Timer menu. Voice Mail 1. Press SOFT LEFT, 1, 9 to enter Voice Mail setup. 2. Enter a 1 to 3 digit number and press YES to save. A confirmation message ‘Request Accepted’ will be displayed on the 2. -
Page 45: Protecting Your Phone
Protecting Your Phone 1. Press SOFT LEFT, 7. The display will show: This chapter describes the different locks that you can use to protect your phone. These are the only ways of protecting your phone in case of theft. About Locks While the keypad lock is on, emergency calls can be made by pressing 1, Your phone has three types of locks: 1, 2. -
Page 46: Phone Lock (Pin)
Phone Lock (PIN) The message ‘Phone PIN Enabled’ will be shown on the screen and the phone will return to the Setup menu. The phone lock protects the phone against unauthorized use of the phone To Disable the Phone PIN if there is a theft. -
Page 47: Unblocking With Personal Unblocking Key (Puk)
4. Enter the new PIN digits again to confirm and press YES. The * New SIM PIN1 display will show ‘New Phone PIN Accepted’ before returning to the Enter the new number again to confirm. Setup Menu. * New SIM PIN1 # NOTE: •... - Page 48 1. Press YES from the SIM PIN Options Menu to enter a new PIN. The NOTE: display will show the message ‘Enter Old SIM PIN’. If you enter the SIM PIN incorrectly, you will be notified of this and 2. Enter the old PIN digits and press YES. The display will show ‘Enter asked to re-enter it.
-
Page 49: Controlling Your Calls
Controlling Your Calls Data Call Divert If Busy To Fax Call Divert If Busy To Divert All Voice Calls To This section deals with controlling your calls by diverting, call waiting, Divert All Data Calls To conferencing or barring. Divert All Fax Calls To Divert All Calls To Call Divert The network may respond with a notification message for an unsupported... - Page 50 3. Press 2 for Set. accompanied by the RADIO PATH ACKNOWLEDGEMENT TONE in the earpiece. The phone will then return to the standby display. It is possible to have more than one call diversion option set at any one time, i.e. each option can be set and cancelled individually (including Divert All Calls).
-
Page 51: Call Waiting
5. Select the basic service group for which the call diversion is to be Only a voice call or voice calls may be placed on hold. cancelled. The display will show: To Check the Call Wait Status 1. Press SOFT LEFT, 5 to enter Advanced menu. 2. -
Page 52: Call Waiting In-Call Menu
3. Press 2 for Set. 4. Select the basic service group for which the call wait is to be cancelled. The display will show: 4. Select the basic service group for which the Call Wait is to be set. The display will show: 5. -
Page 53: Dealing With Multiple Calls
If you do not wish to accept the waiting call but you have not explicitly 1. Press SOFT LEFT from within the current call and the Call Hold In- rejected it, it will time-out and go away. Call Menu will appear: Dealing with Multiple Calls Placing a Second Call and holding the Current Call If you are engaged in a call and wish to make or accept a second call... -
Page 54: Conference Calls
Conference Calls You can repeat the procedure to add up to a total of five remote parties to the conference call. Press SOFT LEFT and 5 to enter the Conference Call conferencing is a network subscription option that allows you to Menu, press 1 to add new member. - Page 55 The bottom line of the display shows the state of the call, this is either The extraction operation also cannot be performed if a call has already ‘Connected’, ‘On Hold’, ‘Call Held’ or ‘Hung Up’. If ‘On Hold’ is been put on hold, the message ‘Call Already On Hold’ will be displayed displayed, the remote party has placed the call on hold.
-
Page 56: Call Barring
List, accessed by using option 4 in the Conference Menu, to identify 2 YES Places all active calls (if any exist) on hold and accepts which remote party has put their call on hold. If, while reviewing the Call the held or waiting call. List, a remote party places their call on hold, the message ‘Conference 2X YES Places all active calls on hold except call X with which... - Page 57 Voice Calls Barred Emergency Calls Only To Set Outgoing Call Barring Messages Barred 1. Press SOFT LEFT, 5 to enter Advanced menu. Data Calls Barred 2. Press 3 for Call Bar menu. Fax Calls Barred Internat’l Services Barred Internat’l Voice Calls Barred Internat’l Messages Barred Internat’l Data Calls Barred Internat’l Fax Calls Barred...
- Page 58 7. Enter network password and press YES. 5. Press a number to select the Call Bar option required. The display If you do not have the password, contact your service provider for it. The will show: display will show the message ‘Request Accepted’, before returning to standby.
- Page 59 4. Press 1 or YES to Cancel Outgoing Call Bar. The display will show: 4. Press 2 to Cancel Incoming Call Bar. The display will show: 5. Press 1 for All Calls, 2 for Voice Only, 3 for Data Only, 4 for Fax 5.
-
Page 60: Sending And Receiving Text Messages
Sending And Receiving Text 3. Press 4 for Password, the display will show: Messages The Short Message Service (SMS) function allows you to send and receive text messages that contain up to 160 characters. Text messages can be received when the phone is in standby mode, when you are 4. -
Page 61: To Read A Message
icon appear on the display and the phone’s alerter emits the message alert To Read a Message tone. If you are engaged in a call, the message alert tone is heard in the 1. Press SOFT LEFT, 3 to enter Messages menu. earpiece and the Message Icon will be displayed. -
Page 62: Deleting A Message
NOTE: Scroll to the message you wish to delete using the SOFT keys and press long CLR. ‘Delete Message?’ is displayed. Press YES to delete this When you reach the end of the message, you can display the sender’s telephone number by pressing SOFT LEFT. Pressing SOFT LEFT one message and your phone will return to the store. -
Page 63: Clearing Messages Automatically
Clearing Messages Automatically If your phone is busy, a priority message will be stored in the same way as any ordinary message you may receive. The memory space allocated for messages is limited, and you may not 1. Press SOFT LEFT, 3 to enter Messages menu. wish to spend time periodically deleting old messages. - Page 64 2. Press 2 to show the Originate menu. NOTE: You can now enter up to 160 alphanumeric characters (or spaces) to create a message. Additional characters will result in a warning tone and the message ‘Message Too Long’ being produced. To move through the text, hold the <* #>...
- Page 65 To delete a character, press CLR. If you want to delete all of the text (but To Enter the Validity Period not the destination, service centre, validity or type information), press and You can enter a period of time which tells the service centre how long to hold CLR.
- Page 66 3. Press 1 or YES to display the Create Message Menu. To Send the Completed Message 1. Press YES to send message. 2. You will now be asked to confirm the destination address of your message. If you are not happy with it, then you can edit the number. Otherwise press YES again to confirm the destination address.
- Page 67 To Delete a Message 5. You can use the <* and #> keys to scroll through the other messages and the SOFT keys to scroll through the message text. 1. Press SOFT LEFT, 3 to enter Messages menu. 6. Press YES and a copy of the message text is created. You then 2.
-
Page 68: Warranty
2. If Ericsson repairs or replaces the Product, the repaired or replaced Thank you for purchasing this Ericsson Product. To get maximum use of... - Page 69 This product is manufactured under licence to one or more patents of QUALCOMM Incorporated, other patents pending. 4,901,307 5,416,797 5,566,357 5,627,857 The Ericsson Policy is one of continuous development and consequently 5,056,109 5,426,392 5,568,483 5,629,955 the information contained within this publication may vary in detail. All...
- Page 70 Index Deleting a Message ............54 Deploying ................7 Edit a Number ..............23 Alarm .................. 7 Emergency Call ..............14 Antenna ................7 Ending a Call ..............14 Auto ................... 18 Enter ................... 9 Auto Answer ..............31 Enter Message Text ............56 Backlight ................
- Page 71 Mode ................. 11 Searching ................12 Multiple Calls ..............45 Select ................... 9 Mute .................. 17 Select the Message Type ........... 57 Selecting ................12 Sending a Message ............55 Network ................11 Sending DTMF Tones ............25 NO ..................9 Set Date ................
Need help?
Do you have a question about the R290SAT and is the answer not in the manual?
Questions and answers