Table of Contents
Advertisement
Installation & User Instructions - Please keep for future reference
I
Important
These instructions contain important information which will help you get the best from
your appliance and ensure safe and correct installation, use and maintenance.
Dual Fuel Range Cooker
TKRC100B
TKRC100S
TKRC100W
– Please read these instructions fully before installing or using
Cat no
Advertisement
Table of Contents

Related Manuals for TEKNIX TKRC100B


Summary of Contents for TEKNIX TKRC100B
- Page 1 Dual Fuel Range Cooker Installation & User Instructions - Please keep for future reference Cat no TKRC100B TKRC100S TKRC100W Important – Please read these instructions fully before installing or using These instructions contain important information which will help you get the best from...
-
Page 3: Table Of Contents
Contents Safety Information Parts Installation Positioning Fixing to the wall Electrical connection User Instructions 9-15 Using the hob Cookware selection Using the fan ovens Programmable timer 12-13 Using the conventional oven and grill Storage compartment Cleaning and Maintenance Troubleshooting Technical Specifications Disposal information A Guide to Wall Mounting &... -
Page 4: Safety Information
Safety Information Important – Please read these instructions fully before installation INSTALLATION WARNINGS DURING USAGE IMPORTANT: This product MUST be installed IMPORTANT: Children and persons with by a qualified Gas Safe registered installer in reduced physical, sensory or mental capabilities accordance with local regulations. - Page 5 Safety Information Important – Please read these instructions fully before installation IMPORTANT: Make sure the cooker control IMPORTANT: When the door of the oven is knobs are all in the off position when not in use. open, do not hang or lean anything on it. You may unbalance your appliance or damage the IMPORTANT: If you do not intend to use your door or door hinges.
-
Page 6: Parts
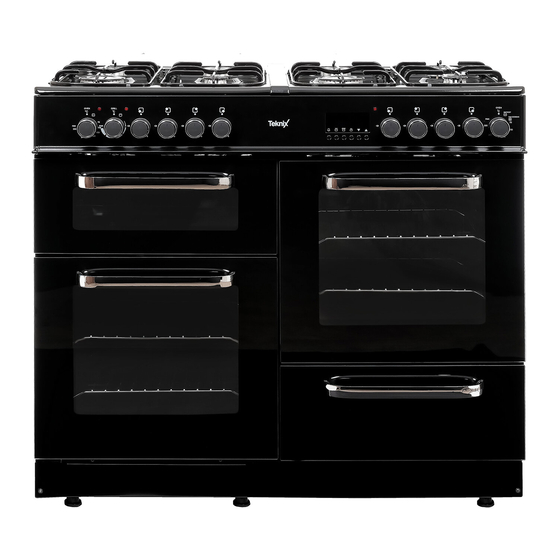
Parts Please familiarise yourself with the parts and accessories listed below 1- Control panel 2- Oven door 3- Big burner 4- Middle burner 5- Middle burner 6- Small burner 7- Temperature indicator light 8- Grill pan with removable handle 9- Wire shelves 10- Grill and conventional oven door 11- Fan oven 12- Second fan oven... -
Page 7: Installation
Installation Installation gas THIS COOKER MUST BE INSTALLED ACCORDING TO BS 6172: 2010 BY There must be enough natural ventilation to A SUITABLY QUALIFIED GAS SAFE provide the gas to be used in the environment. REGISTERED INSTALLER The average air flow must directly come in through ventilation from the outside. -
Page 8: Positioning
Installation Installation gas Installation of cooker IMPORTANT - All Gas installations must be carried out by a suitably qualified person. For information on choosing a gas installer contact the ‘Gas Safe Register’. www.gassaferegister.co.uk The appliance can be placed close to other furniture on condition that the furniture’s height does not exceed the height of the cooker panel Make sure that there are no combustible or... -
Page 9: Fixing To The Wall
Installation Installation gas Gas Connection THIS COOKER MUST BE INSTALLED ACCORDING TO BS 6172: 2010 BY A SUITABLY QUALIFIED GAS SAFE REGISTERED INSTALLER ! Failure to do this will void your warranty Fixing to the wall Before using the appliance fix it securely to the wall using the chain kit provided. -
Page 10: Electrical Connection
Installation Electrical connection IMPORTANT: Electrical connections 3. The electrical cable should not touch the must be carried out by a suitably hot parts of the appliance. qualified person and in accordance with The electrical cable (not supplied) all relevant local building and installation regulations. -
Page 11: User Instructions
User Instructions Using the Hob Ignition Button Hob Burner Control Press and turn the control knob towards Left front burner Left rear burner the large flame position. Pressing the control knob down will engage the electronic ignition and allow the gas to flow. Manual Ignition of the Gas Burners In the case of electricity failure resulting in loss of electronic ignition follow this... -
Page 12: Cookware Selection
User Instructions Using the Hob When turning the hob off, turn the knob in the clockwise direction so that the knob shows “ ” position or the marker on the knob points upwards. Your hob has burners of different diameters. The most economic way of using gas is to choose the correct size gas burners for your cooking pan size and to bring the flame to... -
Page 13: Using The Fan Ovens
User Instructions Using the fan ovens Using the Fan Ovens Turn the Fan Oven knob clockwise and align the marker on the control knob with the required temperature (°C) The indicator light on the control panel will go out and the thermostat will turn the element off when the selected temperature has been reached inside the oven. -
Page 14: Programmable Timer
User Instructions Using the programmable timer Setting the timer (alarm) With this feature you can set the alarm to sound after lapsed period of time. 2) Input the period of time to be counted down. Cancelling the timer (alarm) Buttons The electronic timer functions 1. - Page 15 User Instructions Using the programmable timer (continued) Delayed cooking program Alarm volume Once you have set the length of cooking Press and hold the key to hear the current time, you can use this feature to have your alarm tone. Releasing and pressing the food ready at a set given time.
-
Page 16: Using The Conventional Oven And Grill
User Instructions Using the conventional oven and grill (Top left) Using the Conventional Oven and Grill Turn the control knob (TOP OVEN) clockwise and align the marker on the knob with the required temperature. The indicator light on the control panel will go out when the selected temperature has been reached inside the oven. -
Page 17: Storage Compartment
User Instructions Storage compartment (lower right) Storage compartment This range cooker incorporates a storage compartment. This compartment is for pans, oven trays and other non flammable cooking equipment. Do not store anything flammable in this compartment. Please note this compartment may get hot. -
Page 18: Cleaning And Maintenance
Cleaning and Maintenance Cleaning WARNING! Isolate the power supply to the cooker and make sure that the oven is cool. Do not clean using caustic creams, abrasive cleaning powders, thick wire wool or hard tools. Enamelled parts of the oven can be damaged if excess cleaning liquids are not immediately removed. -
Page 19: Troubleshooting
Troubleshooting If your cooker does not appear to function correctly 1. If no electrical functions appear to work, 3. DO NOT attempt to repair this cooker check the cooker isolation switch has not yourself. Call Product Support on the been turned off also check the fuse in number above or consult a qualified person. -
Page 20: Technical Specifications
Technical Specifications BCYU100DFSS S/STEEL Power supply 230V~50 Hz Maximum power 5550W Size (H x W x D) 900 x 1003 x 600 Net Weight 91 kg Grill/Oven compartment volume 25 lt Fan oven volume (upper right) 49 lt Lower left oven 54 lt Energy rating We apologise for any inconvenience caused by minor inconstancies within these instructions that... -
Page 21: A Guide To Wall Mounting & Fixings
Wall Fixing Guide Important: When drilling into walls always Important note: check that there are no hidden wires or pipes etc. If plastic wall plugs Make sure that the screws and wall plugs being used are supplied with your product: tradesperson if you are unsure. - Page 24 We apologise for any inconvenience caused by minor inconstancies within these instructions that may occur due to product improvements and development. All images and drawing are for illustration purposes only. This appliance/fitting is marked according to the European directive 2002/96/EC on Waste Electrical and Electronic Equipment (WEEE).
Need help?
Do you have a question about the TKRC100B and is the answer not in the manual?
Questions and answers
How to switch the grill on