
Related Manuals for TEKNIX TKGF91SS


Summary of Contents for TEKNIX TKGF91SS
- Page 1 FREE STANDING OVEN 90CM RANGE COOKER 90x60 Professional SINGLE CAVITY Gas & Electrical Oven MODEL CODE USER MANUAL TKGF91SS V1.0 USER MANUAL...
- Page 2 THIS PAGE IS INTENTIONALLY LEFT BLANK...
-
Page 3: Table Of Contents
CONTENTS SAFETY INSTRUCTIONS GAS CONNECTION ELECTRICAL CONNECTION YOUR RANGE COOKER INSTALLATION INSTRUCTIONS OPERATION INSTRUCTIONS CLEANING AND MAINTENANCE TROUBLESHOOTING PRODUCT SPECIFICATIONS WARRANTY... -
Page 4: Safety Instructions
SAFETY INSTRUCTIONS GENERAL SAFETY INSTRUCTIONS 21. Put curtains, tulles, paper or any flammable 1. Installation and repair should always be performed (ignitable) material away from the appliance before by “AUTHORIZED SERVICE”. Manufacturer shall not starting to use the appliance. Do not put ignitable be held responsible for operations performed by or flammable materials on or in the appliance. - Page 5 SAFETY INSTRUCTIONS (CONT.) 39. When the door is open, do not place any heavy 56. Cable fixing point shall be protected. object on the door or allow children to sit on it. You 57. WARNING: Don’t use oven and grill burners at may cause the oven to overturn or the door hinges same time.
- Page 6 SAFETY INSTRUCTIONS (CONT.) ELECTRICAL SAFETY (CONT.) 7. All kinds of operations to be performed on gas 15. If the power supply cable is damaged, it must installation must be performed by authorized be replaced by its manufacturer or authorized and competent people. technical service or any other personnel 8.
- Page 7 SAFETY INSTRUCTIONS (CONT.) INTENDED USE 1. This product is designed for home use. Commercial use of the appliance is not permitted. 2. This appliance may only be used for cooking purposes. It shall not be used for other purposes like heating a room. 3.
-
Page 8: Gas Connection
GAS CONNECTION WARNING: Before starting any work related FOR NATURAL GAS CONNECTION with gas installation, turn off gas supply. Risk WARNING: Natural gas connection should be done of explosion. Please operate your oven in dry by an authorized service person. For natural gas atmosphere. - Page 9 GAS CONNECTION (CONT.) Reduced gas flow rate setting for hob taps 1. Ignite the burner that is to be adjustment and turn the kno NOZZLE CHANGE OPERATION REDUCED GAS FLOW RATE SETTING FOR HOB TAPS reduced position. nge operation zzle change operation Nozzle change operation 1.
-
Page 10: Electrical Connection
2. Your oven is adjusted in compliance with 220-240V AC/380-415V AC 50/60Hz.electric supply. If the mains are different from this specified value, contact your authorized service. 3. Electrical connection of the oven should only be made by the sockets ELECTRICAL CONNECTION with earth system installed in compliance with the regulations. - Page 11 THIS PAGE IS INTENTIONALLY LEFT BLANK...
-
Page 12: Your Range Cooker
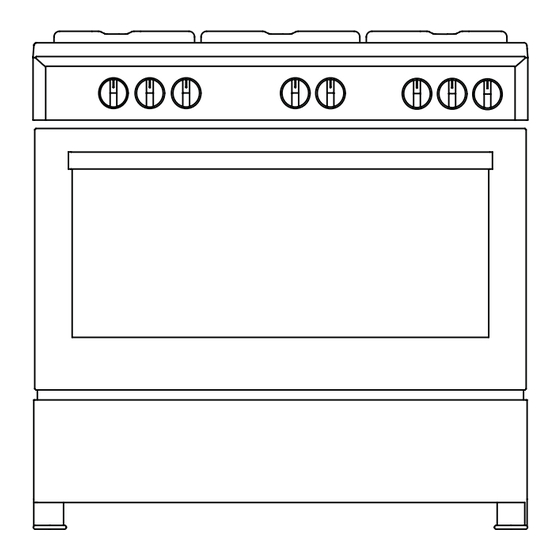
YOUR RANGE COOKER INTRODUCTION OF THE APPLIANCE 1. Oven control knobs 7. Lower cabinetdoor 13. Middle burner 1. Oven control knobs 9. Lamp 2. Hob control knobs 8. Plastic legs 14. Auxilary burner 2. Hob control knobs 10. Grill 3. Wire grill 9. - Page 13 YOUR RANGE COOKER (CONT.) Accesories Deep tray Used for pastries, deep fried foods and s In case of frying directly on the grill for c Accesories foods and meat dishes, it can be used of tray. Deep tray ACCESSORIES Used for pastries, deep fried foods and s 1.
- Page 14 YOUR RANGE COOKER (CONT.) INSTALLATION OF YOUR OVEN 1. Lamp 2. Oven Temperature Controls 3. Display Screen 4. Front Left burner 5. Rear Left burner 6. Central burner 7. Rear Right burner 8. Front Right burner WARNING: The control panel above is only for illustration purposes. Consider the control panel on your device.
-
Page 15: Installation Instructions
INSTALLATION INSTRUCTIONS INSTALLATION OF YOUR OVEN RIGHT PLACE FOR INSTALLATION AND Check if the electrical installation is proper to bring IMPORTANT WARNINGS the appliance in operating condition. If electricity Appliance feet should not stay on soft surfaces installation is not suitable, call an electrician and such as carpets. - Page 16 INSTALLATION INSTRUCTIONS (CONT.) Feet Installation Of The Oven Feet en feet; In order to install the oven feet; h is installed on the oven from the bottom of the 1. Foot attachment lath is installed on the oven from the bottom of the 10).Nuts are centered on these lathes in order oven as shown in (figure 10).Nuts are centered on these lathes in order INSTALLATION OF THE OVEN FEET...
- Page 17 INSTALLATION INSTRUCTIONS (CONT.) Installation Of The Oven Door INSTALLING THE OVEN DOOR Figure 19 Figure 20 Figure 19.1 Figure 19.2 Figure 20.1 Figure 20.2 Completely open Bring the hinge Afterwards, close To remove the the oven door by lock to the widest the oven door as to oven door, pull it pulling it to your-...
-
Page 18: Operation Instructions
OPERATION INSTRUCTIONS TIME OF DAY ADJUSTMENT Press to the “clock” button. The “•” icon between the hours and minutes will start to flash. Using the “–” and “+” buttons, you can adjust the current time of day. Long presses of those buttons will enable fast adjustments. - Page 19 PROGRAM TYPES OPERATION INSTRUCTIONS (CONT.) Function Button: Used for determining the heaters to be used for cooking the dish to be cooked in the oven. Heater program types in this button and their functions are described below. All heater types and FUNCTION BUTTON Used for determining the heaters to be used for cooking the dish to be cooked in the oven.
- Page 20 OPERATION INSTRUCTIONS (CONT.) USING OVEN BURNERS USING THE GRILL 1. If your oven equipped with burners that 1. When you place the grill on the top rack, the operates with gas, appropriate knob should food on the grill shall not touch the grill. be used in order to ignite the burners.
- Page 21 OPERATION INSTRUCTIONS (CONT.) USING GAS BURNERS COOKING TIME TABLE Flame cut-off safety device (FFD); operates instantly Using Cooker Section Food Cooking Cooking Cooking Cooking when safety mechanism activates due to overflown Function Temp (°C) Rack Time (min) Using Gas Burners liquid over upper hobs.
-
Page 22: Cleaning And Maintenance
CLEANING AND MAINTENANCE MAINTENANCE AND CLEANING 1. Disconnect the plug supplying electricity for the CLEANING AND MAINTENANCE OF THE OVEN’S 1. Disconnect the plug supplying electricity for the oven from the socket. oven from the socket. FRONT DOOR GLASS 2. While oven is operating or shortly after it starts operating, it is 2. - Page 23 Figure 21 Figure 22 Figure 23 Catalytic Walls * CLEANING AND MAINTENANCE (CONT.) Catalytic walls are located on the left and the right side of cavity under the guides. Catalytic walls banish the bad smell and obtain the best performance from the cooker.
-
Page 24: Troubleshooting
TROUBLESHOOTING In case you experience a problem with your oven, first check the table below and try the suggestions before calling the technical service. Problem Possible Cause What to do Power Supply not available Check for power supply Gas Supply not available Check if main gas valve is open. - Page 25 TROUBLESHOOTING (CONT.) When operating the oven for the Smoke comes out from the heaters. first time. This is not a fault. After 2-3 cycles, there will be no more smoke. Smoke coming out during operation. Food on heater. Let the oven to cool down and clean food residues from the heater.
-
Page 26: Product Specifications
Comply with Energy Label Directive Eu 2010/30/EU - Regulation No 65/2014 of ovens according to EN 60350- 1 or EN 15181 Comply with EU directive 2009/125/EC - regulation No 66/2014 according to EN 60350-1 or EN 15181 Brand TEKNIX Model TKGF91SS Free Standing Type of oven Built-in Mass of the appliance(M)(Net weight)kg Number of cavities... -
Page 27: Warranty
We, Teknix, undertake that if within 24 months of the date of purchase this appliance or any part thereof is proven to be defective by •... - Page 28 90CM RANGE COOKER SINGLE CAVITY TKGF91SS WWW.TEKNIX.CO.UK USER MANUAL...
Need help?
Do you have a question about the TKGF91SS and is the answer not in the manual?
Questions and answers