
Subscribe to Our Youtube Channel
Related Manuals for Team Electronic TeCom PS 16K PMR446


Summary of Contents for Team Electronic TeCom PS 16K PMR446
- Page 1 Handfunkgerät Handheld Transceiver Ricetrasmettitore Palmare Transceptor Portátil Bedienungsanleitung Manual Manual d’Uso Manual Instrucciones de Uso...
-
Page 2: Table Of Contents
Deutsch Deutsch Inhaltsverzeichnis Seite ALLGEMEIN Sehr geehrte Kundin, sehr geehrter Kunde, Vor Inbetriebnahme Pflege es freut uns, dass Sie sich für den Kauf eines TEAM TeCom- Übersicht der Funktionen PS entschieden haben. Um einen einwandfreien Betrieb zu Anzeigesymbole und Bedienelemente 5 - 6 gewährleisten und um die verfügbaren Funktionen im vollen GRUNDFUNKTIONEN... -
Page 3: Allgemein
Deutsch Deutsch Übersicht der Funktionen ALLGEMEIN > Max. Ausgangsleistung : 500 mW : 2 W * Vor Inbetriebnahme > 128 Kanäle verfügbar Bitte überprüfen Sie die Ware sofort beim Empfang auf : 400 - 470 MHz Vollständigkeit gemäß der folgenden Liste. Informieren Sie Ihren : 8 Kanäle PMR 446 MHz Händler sofort bei fehlenden oder mangelhaften Teilen. -
Page 4: Anschluss Der Antenne
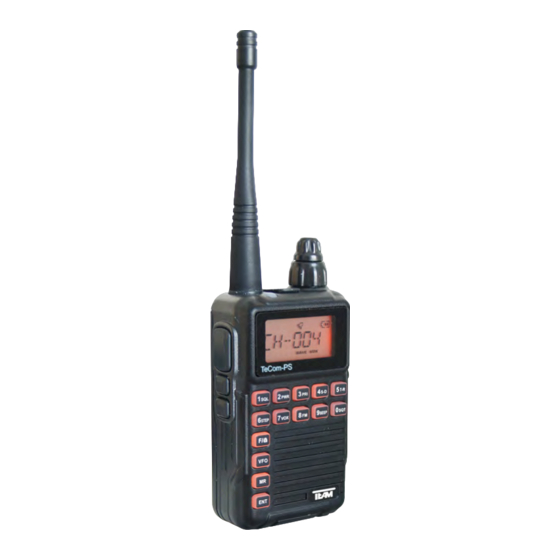
Deutsch Deutsch 1 Antenne GRUNDFUNKTIONEN 2 LCD 3 Kanalwahlregler Anschluss der Antenne 4 Mikrofon Hinweis: In der PMR-Version ist die Antenne fest mit dem Gerät 5 Ein/Aus - Lautstärkeregler verbunden. 6 Kontroll-LED Zum Befestigen der Antenne vorsichtig das SMA 7 Lautsprecher Antennen-Innengewinde auf die das Außengewinde setzen 8 Tastatur und im Uhrzeigersinn festdrehen. -
Page 5: Laden Des Akkupacks
Deutsch Deutsch Laden des Akkupacks Senden Vor dem ersten Betrieb sollte der Akkupack komplett geladen wer- Zum Senden halten Sie bitte die Sendetaste (9) bis kurz nach Be- den. Die durchschnittliche Ladedauer beträgt etwa 3 - 4 Stunden. endigung Ihrer Nachricht gedrückt. Für eine optimale Signalüber- Verbinden Sie den USB-Stecker des Ladekabels mit dem tragung sprechen Sie bitte mit mittellauter Stimme in einem Abstand Ladeadapter und schließen Sie diesen an eine 220V Steckdose an. -
Page 6: Sql (Rauschsperre)
Deutsch Deutsch 02 POW MENÜ Sendeleistung Umschaltung; LOW (niedrig) / HIGH (hoch) In der PMR Version sind folgende Werte eingestellt : Allgemeine Funktionseinstellungen, welche direkt am Gerät verän- LOW (niedrig): ca. 300 mW / HIGH (hoch): 500 mW dert werden können, sind im Menü zusammengefasst. In der Betriebsfunkversion können die Werte LOW und HIGH per Folgende Schritte sind für die Einstellungsänderung einer Funktion Software indivuell, gemäß... - Page 7 English English Drehen des Kanalwahldrehschalters. Um in den manuellen CO - Carrier Operated Kanalmodus zurückzukehren, drücken Sie erneut die MR-Taste. Die Suchfunktion stoppt sobald ein besetzter Kanal gefunden wurde und verweilt solange bis das Signal auf diesem Kanal endet. Erst 06 BEEP dann wird die weitere Suche fortgesetzt.
- Page 8 English English Contents Dear Customers, page GENERAL Congratulations to your purchase of a TeCom-PS. Scope of Delivery Please read the manual carefully prior to your first use of the Maintenance TeCom-PS to learn about the various functions of your radio Features and to ensure proper operation.
-
Page 9: Scope Of Delivery
English English Features > max. tx power GENERAL : 500 mW : 2 W * Scope of Delivery > 128 channels available Unpack the equipment carefully. We recommend you to identify the : 400 - 470 MHz listed items before discarding the packing material. If any items are : 8 channels PMR 446 MHz missing or have been damaged during shipment, please contact >... -
Page 10: Basic Functions Antenna Connection
English English 1 antenna BASIC FUNCTIONS 2 LCD Antenna Connection 3 channel selector In the PMR- version, the antenna is fixed due to regulati- 4 microphone ons. 5 On/Off - volume control To connect the antenna, place the base of the antenna onto 6 control LED the SMA thread at the top of the radio and turn the antenna 7 speaker... -
Page 11: Charging The Battery Pack
English English Charging the Battery Pack Scan Prior to the first use, the battery pack should be charged complete- The scan function is started and stopped with the key MR. ly. A full charging cycle takes approximately 3 - 4 hours. Connect the USB plug of the cable with the charging adapter and Reception connect the adapter with a 220 V socket. -
Page 12: Sql (Squelch)
English English In dependence of the selected key illumination mode (menu #11 - 01 SQL LAMP) the status of the function key is either On/Off (modes: Squelch; level 0 - 9 CONT and OFF) or just On (in the mode KEY, the illumination goes The lower the value the more sensitive the squelch. -
Page 13: Name (Display Mode)
English English 06 BEEP SE - Search Beep tone; ON / OFF The scan function stops as soon as an occupied channel is detected. All entries via keypad are acoustically confirmed except for trans- mission and monitor. 11 TOT Time-Out-Timer; OFF / 1-7 min 07 C-CDC To avoid overly, constant transmission, which may cause overhea- CTCSS/DCS code for actual channel;... - Page 14 Italiano Italiano Contenuto confezione Gentile cliente, page GENERALE Contenuto confezione Grazie per l’acquisto del TeCom-PS. Manutenzione Si prega di leggere attentamente il manuale prima i utilizzare il Caratteristiche TeCom-PS per conoscere le varie funzioni della radio e di garantire Simboli Display ed elementi 17 - 18 un funzionamento corretto.
- Page 15 Italiano Italiano GENERALE Contenuto confezione Caratteristiche Togliere le parti della radio con attenzione. Si raccomanda di verifi- > max. tx power care gli gli elementi prima di eliminare l’imballo, se alcuni elementi PMR : 500 mW risultano mancanti o sono stati danneggiati durante il trasporto si UHF : 2 W * prega di contattare immediatamente il rivenditore.
- Page 16 Italiano Italiano FUNZIONI DI BASE 1 antenna 2 LCD Connettore Antenna 3 selettore canale Nella versione PMR l’antenna è fissa. Per collegare l’anten- 4 microfono na, posizionarla sul connettore SMA poi ruotarla in senso 5 On/Off - controllo volume orario. 6 control LED 7 altoparlante 8 tastiera...
- Page 17 Italiano Italiano Ricarica della Batteria Durante la trasmissione il LED di controllo rosso (6) rimarrà acceso. Prima del primo utilizzo, la batteria deve essere caricata completa- Dopo il rilascio del PTT la radio tornerà in modalità di ricezione. mente. Il ciclo complete di ricarica è di circa 3 - 4 ore. Collegare il cavetto con la spina USB alla radio, poi collegare l’adat- Ricezione tatore ad una presa di corrente 220 V.
- Page 18 Italiano Italiano MENU 02 POW Potenza trasmissione; LOW / HIGH Alcun parametri possono essere modificati senza software Nella versione PMR I valori sono bassi: appr. 300 mW / HIGH : 500 mW Per modificare una funzione predefinita, seguire le seguenti funzioni: per la versione COM, I valori alta/bassa si possono impostare indi- 1.
- Page 19 Italiano Italiano 06 BEEP 11 TOT Beep tone; ON / OFF Tutte la funzioni da tastiera sono acustica- Time-Out-Timer; OFF / 1-7 min mente confermate, tranne Una trasmissione costante può provocare il surriscaldamento della le funzioni di trasmissione e monitor. radio, per evitare questo, si può...
- Page 20 Español Español Índice Estimado cliente, Página Gracias por adquirir el TeCom-PS. GENERAL Por favor, lea atentamente este manual antes de empezar a utilizar Contenido por primera vez el TeCom-PS; para así conocer todas las posibles Mantenimiento funciones y un uso adecuado de la radio. Características: Símbolos y elementos del display 17 - 18...
-
Page 21: General
Español Español GENERAL Características: Potencia máx. TX Contenido : 500 mW Desembale el equipo con mucho cuidado. Le recomendamos que : 2 W * compruebe que el material suministrado se corresponde con los > 128 Canales disponibles artículos que aparecen abajo. Si le falta alguno de los artículos o : 400 - 470 MHz han sido dañados durante el envío, póngase en contacto con su : 8 Canales PMR 446 MHz... -
Page 22: Funciones Básicas
Español Español 1 Antena 2 LCD FUNCIONES BÁSICAS 3 Selector de canal 4 Micrófono Conexión de antena 5 Encendido/Apagado (On/Off) De acuerdo con la normativa, en la versión PMR, la antena - Control de volumen es fija. 6 Control LED Para conectar la antena, coloque la base de la antena en la 7 Altavoz rosca SMA en la parte superior de la radio y gire la antena... -
Page 23: Encendido / Apagado (On / Off)
Español Español Carga de la batería Transmisión Antes de utilizar la batería por primera vez, deberá cargarla com- Para transmitir, mantenga la tecla PTT (9) pulsada hasta el final del pletamente. Un ciclo de carga completa dura de 3 a 4 horas aproxi- mensaje. - Page 24 Español Español por debajo de la tecla Monitor (10). Mediante software se puede 01 SQL asignar una de las siguientes funciones: Alarma, Lámpara o Tono Squelch; nivel 0 - 9 repetición 1450 / 1750 / 2315 Hz. Por defecto, saldrá el modo Cuanto más bajo sea el valor, más sensible será...
-
Page 25: Tecla Iluminación
Español Español En la esquina derecha, se visualizará el canal de la radio. CO - Funcionamiento portador Seleccione el canal de radio deseado (1-15) con el selector de La función escaneo se detendrá apenas que un canal ocupado sea canal rotatorio. detectado y permanecerá... -
Page 26: Especificaciones
Technische Daten / Specifications / 51 CTCSS frequency code (Hz) Especificaciones / Caratteristiche 67.0 94.8 131.8 171.3 203.5 69.3 97.4 136.5 173.8 206.5 Frequenz Bereich / Frequency Range UHF: 400 - 470 MHZ 71.9 100.0 141.3 177.3 210.7 Rango de Frecuencia / Range di Frequenza PMR: 446 MHz 74.4 103.5... - Page 27 WEEE - Reg. Nr. DE 91930360 8 ( EAR ), 50635 ( ERA ) GRS-Nr. 10001374 DSD 2617305, ARA 2284 TEAM Electronic GmbH Bolongarostrasse 88; D-65929 Frankfurt am Main, Germany phone ++49 / 69 / 300 950 0 - fax ++49 / 69 / 31 43 82 www.team-electronic.de - team-electronic@t-online.de...
Need help?
Do you have a question about the TeCom PS 16K PMR446 and is the answer not in the manual?
Questions and answers