Advertisement
Quick Links
Advertisement

Related Manuals for Cypress Hills AXCRGREY03


Summary of Contents for Cypress Hills AXCRGREY03
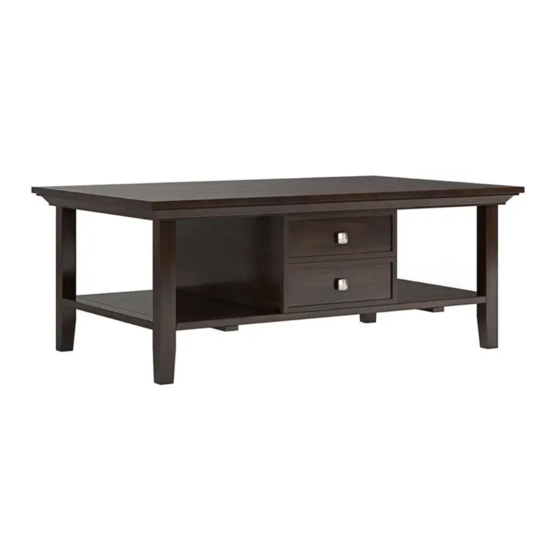
- Page 1 ASSEMBLY INSTRUCTIONS GREYSTONE COFFEE TABLE MODEL # AXCRGREY03...
- Page 2 DO NOT RETURN FOR REPLACEMENT PARTS OR OTHER INQUIRIES PLEASE CONTACT US AT: 1-800-667-8992 PLEASE ENSURE TO HAVE THE COLLECTION NAME AND DESCRIPTION FROM THE PACKAGING OR INSTRUCTION BOOKLET...
- Page 3 IMPORTANT : Please read this manual carefully before beginning assembly of this product. Keep this manual for future reference. SAFETY INFORMATION Identify all the parts and hardware. Do not discard of the packaging until you have checked that you have all of the parts and hardware required. Hardware package may have spare parts.
-
Page 4: Care And Maintenance
IMPORTANT : Please read this manual carefully before beginning assembly of this product. Keep this manual for future reference. CARE and MAINTENANCE Perhaps the greatest environmental damage to wood furniture comes from wide swings in relative humidity (RH) in our homes. Wood absorbs and desorbs water as relative humidity rises and falls, and in doing so it swells and shrinks. -
Page 5: Part Description
PRE-ASSEMBLY INFORMATION MODEL # AXCRGREY03 PART DESCRIPTION BOTTOM SHELF SIDE (L&R Same) QTY 1 QTY 1 QTY 2 DRAWER FRONT LEFT DRAWER SIDE DIVIDER (L&R Same) QTY 4 QTY 4 QTY 2 DRAWER BACK DRAWER BOTTOM RIGHT DRAWER SIDE QTY 4... -
Page 6: Hardware Description
PRE-ASSEMBLY INFORMATION MODEL # AXCRGREY03 HARDWARE DESCRIPTION ALLEN KEY SCREW CAM LOCK PIN M6 X 30mm ALLEN KEY CAM LOCK QTY 34 QTY 1 QTY 22 SETS Required - Flathead screwdriver HANDLE Phillips screwdriver M4 X 25mm Not Included QTY 4 SETS NEED HELP? For help with assembly or if you are missing a part, Please call customer service at 1-800-667-8992. - Page 7 COMPONENTS-KEY DIAGRAM MODEL # AXCRGREY03...
- Page 8 ASSEMBLY MODEL # AXCRGREY03 STEP-1 1. Attach four Cam Lock Pins 3 to back of Drawer Front E . 2. Align Cam Lock Pins with pre-drilled holes and attach Drawer Sides FL , FR . 3. Insert two Cam Locks 3 into pre-drilled holes on each Drawer Side FL , FR .
- Page 9 ASSEMBLY MODEL # AXCRGREY03 STEP-3 1. Align Drawer Back G with Drawer Bottom H and press firmly into slot. 2. Attach Drawer Back G using two Allen Key Screws 1 through pre-drilled holes on each Side FL , FR .
- Page 10 ASSEMBLY MODEL # AXCRGREY03 STEP-5 1. Attach three Cam Lock Pins 3 to each Side A using guide holes. 2. Align Cam Lock Pins with pre-drilled holes on Bottom Shelf C . 3. Insert six Cam Locks 3 into pre-drilled holes on Bottom Shelf C .
- Page 11 ASSEMBLY MODEL # AXCRGREY03 STEP-7 1. Attach Top B to Sides A and Dividers D using twelve Allen Key Screws 1 (three screws on each Side and Divider). 2. Use Allen Key 2 to tighten screws. Do not over-tighten.
- Page 12 ASSEMBLY MODEL # AXCRGREY03 STEP-8 1. Insert assembled drawers into glides on assembled table. Note: Levelers on bottom of legs can be adjusted if floor is uneven.
Need help?
Do you have a question about the AXCRGREY03 and is the answer not in the manual?
Questions and answers