
Related Manuals for Steeper Espire Elbow Pro & Hybrid


Summary of Contents for Steeper Espire Elbow Pro & Hybrid
- Page 1 Espire Elbow Pro & Hybrid Distributeur Distributeur Instruction Manual - for Prosthetist...
-
Page 3: Table Of Contents
Espire Elleboog Pro & Hybrid van Steeper Group, distributeur Loth Fabenim B.V. Contents System Overview ................................................Introduction ..........................Anatomy ....................Pre-Installation Checklist ...................... Technical Specifications Batteries and Charging ..............................................The Battery ..................Battery Installation and Removal ........................LED Indicator ........................ - Page 4 Espire Elleboog Pro & Hybrid van Steeper Group, distributeur Loth Fabenim B.V. Contents Wrist Installation ............................................Wrist Options Overview .................. Output Wires for Terminal Devices ................. Quick Disconnect Wrist Installation ........Motion Control Standard Electronic Wrist Rotator Installation ............
-
Page 5: System Overview
1.1 Introduction Thank you for purchasing the Espire Elbow system from Steeper Group. In the following document you will find information on everything from fabrication, to maintenance and care of the Espire Elbow system. Read these instructions carefully and educate the end user on all functions of this product before final delivery. -
Page 6: Anatomy
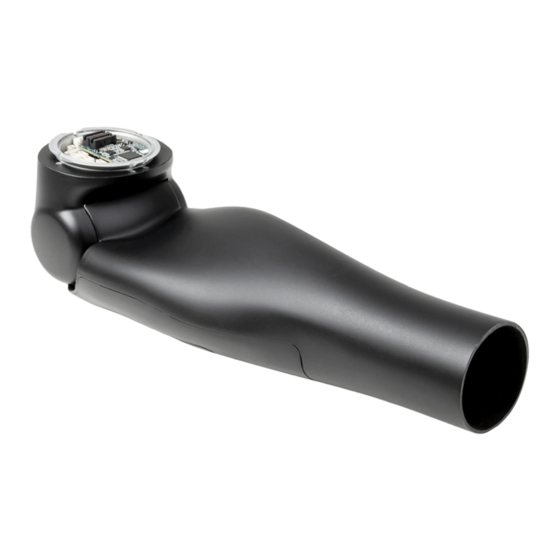
Espire Elleboog Pro & Hybrid van Steeper Group, distributeur Loth Fabenim B.V. System Overview 1.2 Anatomy Lamination Collar Lamination Clamp (Clamp Ring) Haptic Feedback Motor Strain Relief Disc Input Connector Board Drive Unit LED Indicator Forearm Forearm Cable Lift Kit Hybrid Only... -
Page 7: Pre-Installation Checklist
Espire Elleboog Pro & Hybrid van Steeper Group, distributeur Loth Fabenim B.V. System Overview 1.3 Pre-Installation Checklist The Espire Elbow Pro and Hybrid versions are fully assembled and undergo electronic testing verification before they are shipped. What’s in the box:... - Page 8 Espire Elleboog Pro & Hybrid van Steeper Group, distributeur Loth Fabenim B.V. System Overview Feature Description Power Button Press and hold for 4 seconds to turn Espire ON or OFF Elbow LED Indication - Power Colour Indicator Status Multi-Colour Blink...
-
Page 9: Technical Specifications
Espire Elleboog Pro & Hybrid van Steeper Group, distributeur Loth Fabenim B.V. System Overview 1.4 Technical Specifications Specifications Weight Limit 11.3 kg Maximum Lifting Force 13.6 N-m Flexion Angle (preset control) -5 - 135° Speed (preset control) 135°/sec Max Cable Length (AC Electrode Cable) - Page 10 Espire Elleboog Pro & Hybrid van Steeper Group, distributeur Loth Fabenim B.V. System Overview System Requirements iPad 5th generation or later Hardware Minimum Requirements with iOS 10.3 or later Download the Espire Hub App Software from the Apple App Store...
-
Page 11: Batteries And Charging
Espire Elleboog Pro & Hybrid van Steeper Group, distributeur Loth Fabenim B.V. Batteries and Charging 2.1 The Battery The Espire Elbow system is supplied with two removable lithium-ion batteries. This battery supplies 3000 mAh at 11.1 volts for the elbow and 7.4 volts for the terminal device(s). -
Page 12: Battery Installation And Removal
Espire Elleboog Pro & Hybrid van Steeper Group, distributeur Loth Fabenim B.V. Batteries and Charging Fuel Gauge Pull Tab Indicator Symbol Battery Status 5 Bars Full Charge No Bars None No Charge 2.2 Battery Installation and Removal Batteries can be removed and replaced as necessary. To remove the battery, simply push the battery cover clip and gently lift it off the elbow. -
Page 13: Led Indicator
Espire Elleboog Pro & Hybrid van Steeper Group, distributeur Loth Fabenim B.V. Batteries and Charging 2.3 LED Indicator The Espire Elbow is equipped with a state-of-charge LED indicator. This indicator tells the user how much life is left in their current battery. The Espire must be powered on to use this feature. -
Page 14: Battery Charger
Espire Elleboog Pro & Hybrid van Steeper Group, distributeur Loth Fabenim B.V. Batteries and Charging 2.4 Battery Charger Espire Elbow Pro and Hybrid systems are supplied with a Smart Charger for the lithium-ion battery. The charger is recommended for daily use and will assure that the battery will receive a full charge and provide maximum running time. -
Page 15: Charging The Battery
Espire Elleboog Pro & Hybrid van Steeper Group, distributeur Loth Fabenim B.V. Batteries and Charging 2.5 Charging the Battery Charging the Espire Elbow Battery Place the charger on a flat, level surface away from sources of heat and moisture. Plug the AC connector from the power supply into the back of the charger and connect the power supply to the main AC supply using the cable supplied. -
Page 16: Inputs
• DC Cased Electrodes (requires Espire input cable) Other Manufacturers: Note: Input components from other manufacturers will require a unique wire harness and must be installed and tested by Steeper Group prior to delivery. • Switches - Single-State, Dual-State, Bump, etc. (requires Espire input cable) •... -
Page 17: Input Connector Board
Espire Elleboog Pro & Hybrid van Steeper Group, distributeur Loth Fabenim B.V. Inputs 3.2 Input Connector Board Every Espire Elbow will be shipped with the configuration specified at the time of ordering. Your current setup can be viewed in the Espire Hub App under the diagnostics tab: Espire Hub App >... - Page 18 Espire Elleboog Pro & Hybrid van Steeper Group, distributeur Loth Fabenim B.V. Inputs Input Connector Board WITH TRUSIGNAL BOARD NO TRUSIGNAL BOARD A B C D Posterior Posterior Board Location Input Option Setup Type TruSignal AC Electrodes 1-site or 2-sites...
-
Page 19: Input Colour Coding System
Espire Elleboog Pro & Hybrid van Steeper Group, distributeur Loth Fabenim B.V. Inputs 3.3 Input Colour Coding System Coloured labels will be applied to the wires during the order fulfillment process to identify the input type and its location on the input board. -
Page 20: Haptic Feedback Motor
Espire Elleboog Pro & Hybrid van Steeper Group, distributeur Loth Fabenim B.V. Inputs 3.4 Haptic Feedback Motor A haptic feedback motor is located on the underside of the strain relief disc. It vibrates to alert the end user when a preprogrammed action occurs, such as confirmation of a successful myoelectric switching event. -
Page 21: Strain Relief Disc
Espire Elleboog Pro & Hybrid van Steeper Group, distributeur Loth Fabenim B.V. Inputs 3.6 Strain Relief Disc The strain relief disc prevents accidental disconnection of (figure 1) the input wires and acts as a seal to prevent moisture and dirt from entering the area with the receptacles. - Page 22 Espire Elleboog Pro & Hybrid van Steeper Group, distributeur Loth Fabenim B.V. Inputs Coapt Strain Relief Disc Note: Due to a taller input connector, the Coapt Gen2 system requires a specifically- shaped strain relief disc. The Coapt EMG Interface Cable Connector increases the elbow build height by 0.15”/3.8mm.
-
Page 23: Ac Myo Elektrodes With Trusignal
Espire Elleboog Pro & Hybrid van Steeper Group, distributeur Loth Fabenim B.V. AC MYO Electrodes with TruSignal Technology 4.1 Electrode Overview Steeper’s AC electrodes are an effective and convenient way to increase signal resolution. These are designed to work exclusively with the Espire Elbow; however, cased DC electrodes are also compatible. -
Page 24: Tm Technology
Espire Elleboog Pro & Hybrid van Steeper Group, distributeur Loth Fabenim B.V. AC MYO Electrodes with TruSignal Technology 4.2 Electrode Kits An electrode kit consists of a wire harness with TruSignal boards attached, and a set of metal electrodes. To order an electrode kit by part number, identify the number of myo sites (1 site, 2 site, 4 site, 6 site), wire length (6 in, 12 in, 24 in), and dome size (paediatric, medium, large). -
Page 25: Electrode Placement
Espire Elleboog Pro & Hybrid van Steeper Group, distributeur Loth Fabenim B.V. AC MYO Electrodes with TruSignal Technology Dome selection is based on the patient’s needs. Medium electrodes are most commonly used, however, if the patient has significant soft tissue over the myoelectric sites, the large electrodes are recommended. - Page 26 Espire Elleboog Pro & Hybrid van Steeper Group, distributeur Loth Fabenim B.V. AC MYO Electrodes with TruSignal Technology Example: 2-Site Myo Placement Transhumeral Electrode Type Location AC Pair 1 Bicep AC Pair 2 Tricep AC Grounds Away from muscle signal...
-
Page 27: Electrode Installation Instructions
Espire Elleboog Pro & Hybrid van Steeper Group, distributeur Loth Fabenim B.V. AC MYO Electrodes with TruSignal Technology 4.4 Electrode Installation Instructions 1. Use an awl or other small tool with a sharp point to puncture the centre of the electrode location. -
Page 28: Pattern Recognition
The COMPLETE CONTROL Gen2 must be ordered directly from Coapt but will ship from Steeper Group. The Coapt circuit board will be pre-installed to the Espire Elbow input connector board and the systems will be tested together before delivery to the customer. - Page 29 Espire Elleboog Pro & Hybrid van Steeper Group, distributeur Loth Fabenim B.V. Pattern Recognition The table below lists the location, the connection that can be used, and its setup type. INPUT CONNECTOR BOARD – WITH COAPT CIRCUIT BOARD Board Location...
-
Page 30: Infinite Biomedical Technologies (Ibt) - Sense
Espire Elleboog Pro & Hybrid van Steeper Group, distributeur Loth Fabenim B.V. Pattern Recognition 5.3 Infinite Biomedical Technologies (IBT) - Sense Kit Types for Sense System: • Espire Pro en Hybrid - with standard grip • Espire Pro en Hybrid - with advanced grip The Sense system must be ordered and shipped directly from IBT. - Page 31 Espire Elleboog Pro & Hybrid van Steeper Group, distributeur Loth Fabenim B.V. Pattern Recognition The table below lists the location, the connection that can be used, and its setup type. INPUT CONNECTOR BOARD – WITH IBT CIRCUIT BOARD Board Location...
-
Page 32: Axis Electronic Lock Actuator
Espire Elleboog Pro & Hybrid van Steeper Group, distributeur Loth Fabenim B.V. Axis Electronic Lock Actuator 6.1 Electronic Lock Actuator Overview The Axis Shoulder Joint is available with an electronic lock actuator in both exoskeletal and endoskeletal versions. The shoulder is powered by the Espire Elbow battery and controlled via the input of choice. -
Page 33: Routing Cables Through The Endoskeletal Shoulder Joint
Espire Elleboog Pro & Hybrid van Steeper Group, distributeur Loth Fabenim B.V. Axis Electronic Lock Actuator 6.3 Routing Cables Through the Endoskeletal Shoulder Joint In the endoskeletal version, both input and output wires are routed through the centre of the shoulder joint. -
Page 34: Measuring And Cutting Forearm
Espire Elleboog Pro & Hybrid van Steeper Group, distributeur Loth Fabenim B.V. Measuring and Cutting Forearm 7.1 Measuring the Forearm The Espire Elbow is available in two forearm lengths, Small (45mm Ø wrist) and Standard (50mm Ø wrist). Forearm measurement can be referenced from the centre of the elbow. -
Page 35: Protective Foam Insert
Espire Elleboog Pro & Hybrid van Steeper Group, distributeur Loth Fabenim B.V. Measuring and Cutting Forearm 7.2 Protective Foam Insert A foam insert is installed prior to shipping to protect the output wires and to prevent dust or debris from entering the circuit board. -
Page 36: Wrist Installation
Espire Elleboog Pro & Hybrid van Steeper Group, distributeur Loth Fabenim B.V. Wrist Installation 8.1 Wrist Options Overview The Espire Elbow is compatible with three wrist options. The wrist type must be specified at the time of ordering. Non-Powered Wrists... -
Page 37: Output Wires For Terminal Devices
Espire Elleboog Pro & Hybrid van Steeper Group, distributeur Loth Fabenim B.V. Wrist Installation 8.2 Output Wires for Terminal Devices Output wires will already be installed into the circuit board of the Espire Elbow. They can easily be retrieved from inside of the forearm and connected to the desired device. -
Page 38: Quick Disconnect Wrist Installation
Espire Elleboog Pro & Hybrid van Steeper Group, distributeur Loth Fabenim B.V. Wrist Installation 8.3 Quick Disconnect Wrist Installation Lamination Ring If no wrist rotator is desired, a quick disconnect wrist can be installed using the lamination ring. Bond the lamination ring into the forearm of the Espire Elbow before installing the quick disconnect wrist. -
Page 39: Motion Control Standard Electronic Wrist Rotator Installation
Espire Elleboog Pro & Hybrid van Steeper Group, distributeur Loth Fabenim B.V. Wrist Installation 8.4 Motion Control Standard Electronic Wrist Rotator Installation Note: The Motion Control Standard Electronic Wrist Rotator will only fit the standard size Espire Elbow with 50mm wrist opening. - Page 40 Espire Elleboog Pro & Hybrid van Steeper Group, distributeur Loth Fabenim B.V. Wrist Installation Wiring Connector Orientation - The curve of the socket connectors should face inward toward the centre of the wrist; however, the 2-socket wrist connector is reversible.
-
Page 41: Ottobock 10S17 Electronic Wrist Rotator Installation
Espire Elleboog Pro & Hybrid van Steeper Group, distributeur Loth Fabenim B.V. Wrist Installation 8.5 Ottobock 10S17 Electronic Wrist Rotator Installation Lamination Ring Bond the lamination ring into the forearm of the Espire Elbow before installing the electronic wrist rotator. -
Page 42: Output Wires For Pattern Recognition Systems
Espire Elleboog Pro & Hybrid van Steeper Group, distributeur Loth Fabenim B.V. Wrist Installation 8.6 Output Wires for Pattern Recognition Systems When the Espire is configured with pattern recognition (Coapt or IBT), additional output passthrough wires will be installed to accommodate advanced grip control. If advanced grip control is not being used, wires that are not needed will be tucked away into the forearm. -
Page 43: Advanced Grip Control Installation
Espire Elleboog Pro & Hybrid van Steeper Group, distributeur Loth Fabenim B.V. Wrist Installation Wiring Option 3 – Hands with Advanced Grip and 6-Band Coaxial Plugs Colour Output Type (Orange) Hand-Open (Green) Hand-Close (Grey) Wrist (Red) Power Bus Communication (Blue) - Page 44 Espire Elleboog Pro & Hybrid van Steeper Group, distributeur Loth Fabenim B.V. Wrist Installation Non-Powered Wrists Type Manufacturer Small Elbow Standard Elbow Quick Disconnect Steeper 45 mm 50 mm Wrist *QD Wrists wrist wrist from other manufacturers also compatible Connector Orientation - The curve of the socket connectors should face inward towards the centre of the wrist.
- Page 45 Espire Elleboog Pro & Hybrid van Steeper Group, distributeur Loth Fabenim B.V. Wrist Installation Powered Wrists Type Manufacturer Small Elbow Standard Elbow Standard Motion Control 50 mm Electronic Wrist wrist Rotator with 6-Band Coaxial Plug Wiring Connector Orientation - The curve of the socket connectors should face inward toward the centre of the wrist;...
-
Page 46: The Lmanination Collar And Clamp Ring
Espire Elleboog Pro & Hybrid van Steeper Group, distributeur Loth Fabenim B.V. The Lamination Collar and Clamp Ring 9.1 Orientation of the Lamination Collar and Clamp Ring The lamination collar must be oriented properly relative to the patient socket to allow for correct internal / external humeral rotation and to protect the wiring of the Espire Elbow. -
Page 47: Internal-External Rotation
Espire Elleboog Pro & Hybrid van Steeper Group, distributeur Loth Fabenim B.V. The Lamination Collar and Clamp Ring 9.2 Internal-External Rotation The Espire is designed with humeral anti-rotation Top View stop pins to prevent 360-degree rotation. This feature is to prevent input wires from being twisted and potentially damaged. -
Page 48: Determining Proper Orientation On Test Socket
Espire Elleboog Pro & Hybrid van Steeper Group, distributeur Loth Fabenim B.V. The Lamination Collar and Clamp Ring 9.4 Determining Proper Orientation on Test Socket The lamination collar attachment to the socket must provide a clinically acceptable measurement from centre axis of shoulder to centre axis of elbow. The appropriate elbow carry angle must also be established, preferably for full extension. -
Page 49: Forearm Cable Lift Kit (Hybrid)
Espire Elleboog Pro & Hybrid van Steeper Group, distributeur Loth Fabenim B.V. Forearm Cable Lift Kit (Hybrid) 10.1 Cable Mounting Overview Elbow Size Mounting Location Standard Small Medial Standard (45mm wrist) Lateral Standard Standard Medial Extended (50mm wrist) Lateral Standard... -
Page 50: Terminal End Connections
Espire Elleboog Pro & Hybrid van Steeper Group, distributeur Loth Fabenim B.V. Forearm Cable Lift Kit (Hybrid) 10.3 Terminal End Connections There are many methods for attaching a lift cable to a terminal device. Two recommended options include: Single Cable Control – to raise the forearm. -
Page 51: Setting Up The Counterbalance (Hybrid)
Espire Elleboog Pro & Hybrid van Steeper Group, distributeur Loth Fabenim B.V. Setting up the Counterbalance (Hybrid) 11.1 Counterbalance Overview The counterbalance assists in flexion and extension of the Espire Elbow. Different amounts of tension are necessary based on the elbow’s overall length and the weight of the terminal device. -
Page 52: Counterbalance Adjustment
Espire Elleboog Pro & Hybrid van Steeper Group, distributeur Loth Fabenim B.V. Setting up the Counterbalance (Hybrid) 11.2 Counterbalance Adjustment Direction Adjustment Result Turn the dial posteriorly Supports more load on the to increase the elbow counterbalance weight. Note: Elbow cannot be over-adjusted. -
Page 53: Maintenance And Troubleshooting
Espire Elleboog Pro & Hybrid van Steeper Group, distributeur Loth Fabenim B.V. Maintenance and Troubleshooting 12.1 Troubleshooting Caution: The Espire Elbow should never be serviced while connected to the end- user. Ensure that the device is disconnected and powered off before any service or maintenance is performed. -
Page 54: Maintenance
Espire Elleboog Pro & Hybrid van Steeper Group, distributeur Loth Fabenim B.V. Maintenance and Troubleshooting If the Espire Elbow system becomes unresponsive or control becomes erratic, try the following: • Turn the system off, wait several seconds and power back on. -
Page 55: Intended Use And Safety
Espire Elleboog Pro & Hybrid van Steeper Group, distributeur Loth Fabenim B.V. Intended Use and Safety 13.1 Intended Use Intended Use Statement The Espire Elbow is to be used exclusively for external prosthetic fittings of the upper limbs. The Espire Elbow processes the end-user’s input signals to activate and control powered elbow movement. -
Page 56: Safety
Espire Elleboog Pro & Hybrid van Steeper Group, distributeur Loth Fabenim B.V. Intended Use and Safety Contraindications for use of the Espire Pro or Hybrid elbow system include the following: • Any condition that prevents socket fitting, such as a complicated wound or intractable pain which precludes socket wear •... - Page 57 Espire Elleboog Pro & Hybrid van Steeper Group, distributeur Loth Fabenim B.V. Intended Use and Safety Safety Instructions Info: Use on aeroplanes Airlines may not permit the use of this device on their aircraft. Check with your airline before traveling to ensure this device is allowed for use on the plane.
- Page 58 Espire Elleboog Pro & Hybrid van Steeper Group, distributeur Loth Fabenim B.V. Intended Use and Safety Caution: Thermal overloading Extreme temperature conditions can lead to faulty control or malfunction of the Espire Elbow and result in a risk of injury. Avoid areas outside the specified operating temperature range.
- Page 59 Espire Elleboog Pro & Hybrid van Steeper Group, distributeur Loth Fabenim B.V. Intended Use and Safety Caution: Water and Humidity The electrical and mechanical systems of your Espire Elbow are not water-resistant. Water must be prevented from entering the Espire Elbow. Be careful not to let water run over the top of the prosthetic glove and enter the Espire Elbow as well as the terminal device.
- Page 60 Espire Elleboog Pro & Hybrid van Steeper Group, distributeur Loth Fabenim B.V. Intended Use and Safety Caution: EM Disturbances Do not use the Espire Elbow near active HF SURGICAL EQUIPMENT and the RF shielded room of an EM SYSTEM for magnetic resonance imaging, where the intensity of EM DISTURBANCES is high.
- Page 61 Espire Elleboog Pro & Hybrid van Steeper Group, distributeur Loth Fabenim B.V. Intended Use and Safety Warning: Using with Other Equipment Use of this equipment adjacent to or stacked with other equipment should be avoided because it could result in improper operation. If such use is necessary, any equipment needs to be agreed appropriate with their Prosthetist and/or Steeper.
- Page 62 Espire Elleboog Pro & Hybrid van Steeper Group, distributeur Loth Fabenim B.V. Intended Use and Safety Complies with Standards Description Version ISO 22523 External limb prostheses and external 2006 orthoses – Requirements and test methods AAMI ANSI 60601-1 Medical Electrical Equipment – Part 1:...
- Page 63 Espire Elleboog Pro & Hybrid van Steeper Group, distributeur Loth Fabenim B.V. Intended Use and Safety Description Version FCC Part 15 Radio Frequency 2015 Ed 1 IEC 62133 Secondary cells and batteries containing 2017 alkaline or other non-acid electrolytes –...
- Page 64 Espire Elleboog Pro & Hybrid van Steeper Group, distributeur Loth Fabenim B.V. Intended Use and Safety Phenomenon & Test Level Remarks Standard Radiated Emissions Group 1, Class B The Espire Elbow uses RF CISPR11 ed5.0 energy only for its internal (with A1:2010), function.
- Page 65 Espire Elleboog Pro & Hybrid van Steeper Group, distributeur Loth Fabenim B.V. Intended Use and Safety Definitions of symbols used in this device and its packaging Symbol Definition Source Consult instructions for use. BS EN ISO 15223-1: 2012 Reference no. 5.4.3 Keep dry.
- Page 66 Espire Elleboog Pro & Hybrid van Steeper Group, distributeur Loth Fabenim B.V. Intended Use and Safety Symbol Definition Source Protection against solid foreign objects of IEC 60601-1, Table 12.5 mm diameter and greater, and D.3, Symbol 2 protection against vertically falling water drops when tilted up to 15 degrees.
- Page 67 Espire Elleboog Pro & Hybrid van Steeper Group, distributeur Loth Fabenim B.V. Espire Elbow Pro & Hybrid Instruction Manual - For Prosthetists...
- Page 68 Authorized representative for Manufacture EU countries Steeper Group Emergo Europe Unit 3 Stourton Link, Intermezzo Drive Prinsessegracht 20 Leeds, LS10 1DF, United Kingdom 2514 AP The Hague Tel: +44 (0) 870 240 4133 The Netherlands Email: customerservices@steepergroup.com Tel: +31 70 345 8570 Email: EmergoEurope@ul.com...
Need help?
Do you have a question about the Espire Elbow Pro & Hybrid and is the answer not in the manual?
Questions and answers