Table of Contents
Advertisement
Quick Links
Advertisement
Table of Contents

Subscribe to Our Youtube Channel
Related Manuals for ESX VISION NAVICEIVER VN720 VO-M2


Summary of Contents for ESX VISION NAVICEIVER VN720 VO-M2
- Page 1 VN720 VO-M2...
- Page 2 IMPORTANT NOTE FOR YOUR VEHICLE‘S SERVICE STATION After installation of the ESX Naviceiver inside the vehicle, the device is not recognized as the original radio and causes an error message in the fault memory of the vehicle (depending on the vehicle, for example „Infotainment CAN, no communication“).
-
Page 3: Table Of Contents
INDEX Safety Information ...........................4 Basic functions ............................6 Operating elements .................................6 Main menu ....................................7 Navigation ....................................8 Multimedia player ..................................9 Radio .....................................11 DVD (DVD/CD-Player)................................14 Application ....................................15 – Bluetooth™ ..................................16 – LinkPod ....................................19 – AV/TV ....................................20 – Quick Charge ..................................20 – A2DP ....................................21 –... -
Page 4: Safety Information
SAFETY INFORMATION • In general, the assembly and installation of the device must be performed by a trained and technically skilled specialists, as the installation and connection of the device requires complex knowledge. • This device is only suitable for the operation in a vehicle with an on-board voltage of 12 volts, negative ground. - Page 5 SAFETY INFORMATION • The device supports only DVD/CD standard disk size of diameter with 12 cm. Do not attempt to insert disks with a different size or any other object into the disk slot. Be sure to load only one disk at the same time. •...
-
Page 6: Basic Functions
BASIC FUNCTIONS OPERATING ELEMENTS Turn the display on / off. Activation of the voice control (short push) or to activate or deactivate the mute function Start or pause the media playback. (push and hold) Slot for CD/DVD disks (Ø 12 cm). Open the phone mode. -
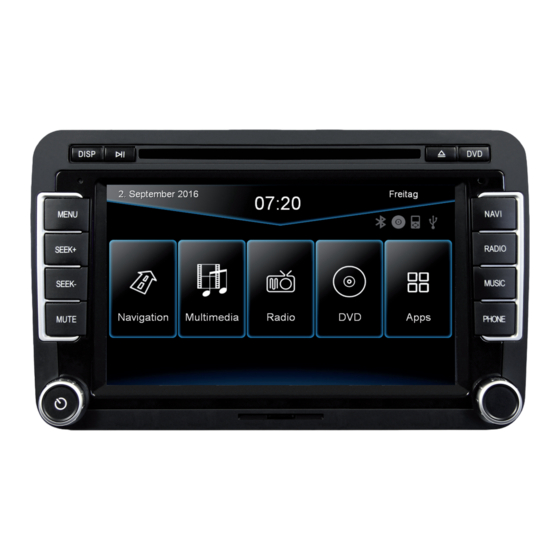
Page 7: Main Menu
BASIC FUNCTIONS MAIN MENU After power on, the device starts with the main menu. By pressing the „MENU“ button on the device, you can always get to the main menu too. Depending on the selected design theme (Skin), the current date and time will be displayed here. The four function icons are (depending on the skin) is highlighted in white and thus activated when the corresponding function is in use, such as „Bluetooth connection“, „CD / DVD in the drive“, „iPod con- nection“... -
Page 8: Navigation
„Navigation“ in the main or push the „NAVI“ buttons on the device. Note: If you have accidentally changed the path and want to use the original ESX iGO software, the path must be always „\Storage Card\NaviOne\Navione.exe“. The unit receives GPS satellite signals automatically. In poor weather conditions or for example while passing a tunnel, these signals may be disturbed. -
Page 9: Multimedia Player
BASIC FUNCTIONS MULTIMEDIA PLAYER Open the multimedia player (source selection via USB or SD) by tapping „Multimedia“ in the main menu or by pressing the „MUSIC“ button on the device. Refer to page 21 for CD Audio playback. Tap here to enter the main menu without inter- Tap here to open folder list or to change the rupting the playback of the current title. - Page 10 BASIC FUNCTIONS FOLDER PLAYBACK Tap on the folder icon in the multimedia menu on the bottom left (see page 9, #9) and the currently playing folder appears. Now you can scroll through the list and select another song by taping directly or with „go back“...
-
Page 11: Radio
BASIC FUNCTIONS RADIO Open the radio application by tapping „Radio“ in the main menu or by pressing the „RADIO“ button on the device. Tap here to enter the main menu without inter- With the arrows you can quick-start the search rupting the radio playback. - Page 12 BASIC FUNCTIONS Settings and station presets Tap on the „gear“ icon to open the settings and then: „Rename Station“ to rename the current radio station. „Delete Station“ to delete the current radio station from the presets. „Delete All Stations“ to delete all radio stations from the pre- sets.
- Page 13 BASIC FUNCTIONS RDS functions This device supports RDS (Radio Data System) in the frequency range 87.5 - 107.9 MHz FM. The follow- ing RDS functions are only available if they are supported by the selected radio station. AF (Alternative Frequency) The AF function enables the automatic switching of the receiv- ing frequency when leaving the reception range of a transmitter.
-
Page 14: Dvd (Dvd/Cd-Player)
BASIC FUNCTIONS (DVD/CD-Player) The DVD player supports the following formats: DVD, DVD-R/RW, DVD+R/RW, VCD, CD, CD-R/RW, MP3. Open the DVD application by tapping „DVD“ in the main menu. Tap during DVD playback on any spot on the display to open the DVD menu. When you playback a CD or MP3-CD, the user interface is different. -
Page 15: Application
BASIC FUNCTIONS APPS Open the application menu by tapping on „Apps“ in the main menu. The device offers a variety of applications that can be used as described below. Some of these func- tions require the appropriate accessories. Tap here to switch off the display. To switch on Tap here to start the A2DP audio streaming. -
Page 16: Bluetooth
BASIC FUNCTIONS BLUETOOTH™ Open the Bluetooth™ application by tapping „Bluetooth™“ in the main menu or by pressing the „PHONE“ button on the device. PAIRING At first pair the devices, if necessary refer to the manual of your mobile phone. Open the „Settings“ menu on your mobile phone and open the Bluetooth settings. - Page 17 BASIC FUNCTIONS CONTACTS AND CALL HISTORY Once your mobile phone has been connected via Bluetooth to the device, the synchronization of your contacts and call history starts automatically. Tap on „Contacts“. Tap on a name to start a phone call. Tap on the white search field to search for Tap on „History“.
- Page 18 BASIC FUNCTIONS Tap on „Dialled“ to display the already trans- To synchronize your contacts and call history acted phone calls. tap on „Sync. Now“. KEYPAD Tap on „Keypad“ to enter phone numbers manually. Then enter the desired number and then tap the green phone icon to start dialing.
-
Page 19: Linkpod
BASIC FUNCTIONS LinkPod (optional) Connect your iPod™ or iPhone™ via USB with the ESX device. When the iPod™ icon is highlighted in white (top next to the time display), the connection is active. The battery charging function is carried out when the unit is turned on. -
Page 20: Av/Tv
Please note that the USB data function is deactivated when the USB connection is used for the quick charging. The ESX device provides in „Quick Charge“ function a charging current of 1A - 2.1A (depending on the connected equipment). Note: Please note that the „Quick Charge“ function only works with USB port 1. -
Page 21: A2Dp
Bluetooth, which works with the streaming A2DP standard, there is the possibility, to playback audio stream over the ESX device. Connect this device as described on page 15 and select a music source A2DP under Apps. If the message „A2DP is not connected“ appears, your BT device it is not connected or the audio playback is not (yet) enabled. - Page 22 BASIC FUNCTIONS Audio You can open the audio settings in the main menu by tapping on „Apps“ and „Audio“ or by pressing the right rotary control (except while DVD/TV playback) on the device. Tap on one of the control bars to change the sound adjust- ment.
- Page 23 BASIC FUNCTIONS Tap on one of the control bars to change the equalizer preset. Tap on „Advance“ to open the advanced audio settings. On the left under „Channel Pre-Volume“ you can set the indi- vidual volume for each application. Just tap on the arrow icons to change the value upward or downward.
- Page 24 BASIC FUNCTIONS Scroll the right field down to see all settings under „MISC“. Under the section „Loudness“ you can set the bass/treble boost from 0 - 20dB regardless of the equalizer settings. Note: This can lead to high distortion for the speakers. Under „Subwoofer“...
-
Page 25: Files
BASIC FUNCTIONS Files With the file manager, it is possible to manage and open com- puter specific file formats. The system supports the following file formats: Photo: BMP, JPEG, GIF, PNG Video: MPEG (*.mpg, *.mpeg), AVI, RM (*.rm. *.rmvb), WMV, MP4 (*.mp4, *.mov), MKV (*.mkv) Audio: MP3, WMA, WAV, FLAC, AAC, Monkey Audio (*.ape) Tap once to highlight a particular file. -
Page 26: Virtual Disk
BASIC FUNCTIONS Once you have open an image file, you can start a slideshow of all the pictures stored in the directory. Tap on the image and the playback options are displayed. Tap on „Info“ to view the memory information of each storage locations. - Page 27 BASIC FUNCTIONS Note: When using multiple USB sticks, the stick with the desired RIPs must have been always connected first! If you can not access the RIPs, remove all USB sticks and connect the appropriate stick via USB. If you con- nect a USB Stick with contained CD RIPs while is Virtual Disk opened, they will not appear immediately.
-
Page 28: E-Link
USB debug mode. Please note that the procedure for any Android device may vary. Connect your Android device via USB to the ESX Naviceiver and tap on „Detect Phone“. The first time you connect to an Android device, the device will automatically install the „Drive Mode“... -
Page 29: Audio
BASIC FUNCTIONS Under „Choose Application“ you can select the desired appli- cation. By tapping on the transparent „>“ arrow on the bottom left, a further window opens in the lower third of the screen. There you find more options such as „Back“, „Home“, „Set- tings“... - Page 30 BASIC FUNCTIONS Option You can open the option menu by tapping on „Options“ in the „Apps“ menu. Language settings Tap on „Skin“. Select the desired language. Tap on „Apply“. Tap on „Skin“. Tap on the menu „Skins“ and select the de- sired design theme (skin).
- Page 31 BASIC FUNCTIONS Set the current date. Set the current time. Tap on the check box right to set on daylight Tap on „Apply“. saving time. Tap on the check box left to set the time for- mat to 12-hours (AM / PM). Display Tap on „Display“.
- Page 32 BASIC FUNCTIONS The check box „CCD Camera“, enables the With the check box „Pause Media Whilst Re- optional rear view camera function. As soon verse“, the media playback will be paused as reverse gear is engaged, the transmission when the reverse gear is engaged. of the video camera is automatically dis- Please note that the volume reduction in played on the screen.
- Page 33 BASIC FUNCTIONS Key illumination of the device (only in night driving mode) Tap on „Display“. Set the key Illumination brightness by mov- ing the status bar to a desired position. Note: This is only possible when the light of the vehicle is switched on. Under „LED Backlight Color“...
- Page 34 BASIC FUNCTIONS Under „Voice Volume“ you can adjust the If „Play Bluetooth Status Voice“ is activated, volume of the speech output (0-10). an audible confirmation of the Bluetooth™ connection is issued whenever you connect The unit will inform you after the activation of or disconnect a paired Bluetooth™...
- Page 35 BASIC FUNCTIONS Operating System Under „System“ you find information about the system. Shell: Version number of the user interface Version number of the operating system MCU: Version number of the CAN-BUS protocol Check under www.esxnavi.de if an operating system update is available or ask your retail dealer. Then follow the installation instructions that come with the update.
-
Page 36: Custom Settings
CUSTOM SETTINGS Menu assignment You have the possibility to arrange the main menu or apps menu to your liking. To change the position of a control panel, press and hold for 5 seconds the regarding panel in the main or apps menu until the dashed lines are visible. -
Page 37: Wallpaper
CUSTOM SETTINGS Wallpaper You have the possibility to customize the background image to your liking. First, copy the desired wallpaper file to the microSD card or on a USB stick. Tap on „Apps“. Tap on „Options“. Tap at „Wallpaper“ on „Browse“ Select a file by double click. -
Page 38: Start Logo
Copy the image file from your PC to the SD card. It must be located in no folder. Insert the SD card into the ESX device and restart the device by pressing the reset button. The device now automatically installs the desired boot logo. -
Page 39: Additional Functions
ADVANCED OPERATIONS INFRARED REMOTE The included remote control allows you to control some basic functions on the device. Point directly with the front of the remote control to the screen of the device. The distance should not be more than 3 meters. If you use the remote control for the first time, you have to remove the safety foil in the battery compartment on the back. -
Page 40: Multifunction Steering Wheel
Note for other Audio/Video outputs: By using the cable G71-MNV0009 (see installation guide) it is possible to playback audio and video signals on other devices. The media source is always the same, which is played on ESX device. -
Page 41: Optional Rearview Camera
ADVANCED OPERATIONS OPTIONAL REAR VIEW CAMERA If you have installed an optional rear view camera, the camera image on the screen is automatically shown, when the reverse gear will be engaged (See page 32). This also occurs even when the power is off. After the reverse gear will be disen- gaged, the device restarts the previously used application or function. -
Page 42: Troubleshooting
TROUBLESHOOTING If the following troubleshooting tips do not solve the problem and the malfunction persists, please contact an authorized repair or installation service. Do not open the device or attempt to repair it by yourself. This may cause serious damages to the electronic components of the device and in your vehicle or may void the war- ranty of the device. - Page 43 TROUBLESHOOTING Problems Causes Remedy CD/DVD playback The DVD menu can not be opened. The disc does not support menus or is Insert another disc. plagiarism. The picture quality during playback is Brightness, contrast and color saturation Check the DVD player settings and correct insufficient.
- Page 44 TROUBLESHOOTING Problems Causes Remedy Navigation The navigation application will not start. The software is not compatible with the Check the compatibility of software with device. Windows CE 6, or get yourself a compatible version. The software was not installed on the Check the settings under Apps - Options device properly.
- Page 45 TROUBLESHOOTING Problems Causes Remedy Bluetooth/Phone No connection or pairing of the devices. Bluetooth function of the phone is not Enable Bluetooth function in the phone enabled. settings. Bluetooth enabled but the phone is not Enable „visible“ in the phone settings. visible.
-
Page 46: General Notes
GENERAL INFORMATION Care and Maintenance This device is equipped with high precision and sensitive technique and should always be treated with caution. Please note the following tips to avoid endangering the warranty and extend the life of the appliance. • Children under 12 should not operate the device. Keep the device and all accessories away from small children. - Page 47 GENERAL INFORMATION Legal Notice • ESX or Audio Design GmbH are in no way affiliated with the Volkswagen AG or any of its subsidiaries or af- filiated companies connected to, or is acting on its behalf or with its authorization.
- Page 48 ESX Car Media Systems · Audio Design GmbH Am Breilingsweg 3 · D-76709 Kronau/Germany Tel. +49 7253 - 9465-0 · Fax +49 7253 - 946510 www.esxnavi.de - www.audiodesign.de ©2017 All Rights Reserved...
Need help?
Do you have a question about the VISION NAVICEIVER VN720 VO-M2 and is the answer not in the manual?
Questions and answers