Table of Contents
Advertisement
Quick Links
Advertisement
Table of Contents

Related Manuals for ESX VN715-MB-A1-DAB


Summary of Contents for ESX VN715-MB-A1-DAB
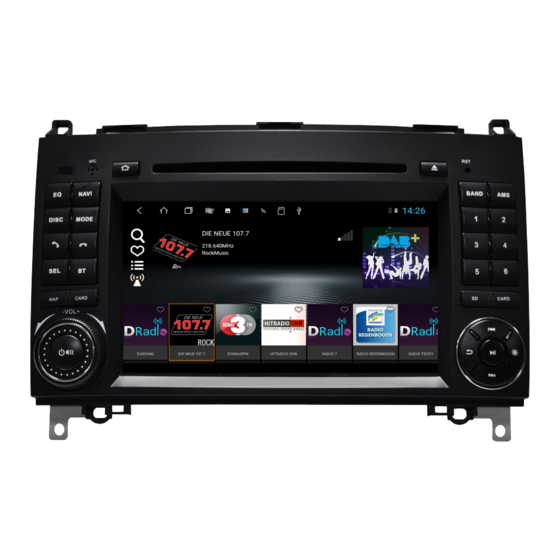
- Page 1 VN715-MB-A1-DAB INFOTAINMENT TOUCHSCREEN NAVICEIVER VISION SERIES FOR ANDROID ™...
-
Page 2: Important Notes
IMPORTANT NOTES This guide is an aid for the professional installation of the device. Please note the following notes before installation: • Always handle all parts of the device and the components of your vehicle with care. • Under all circumstances observe the regulations of the vehicle manufacturer and do not make any changes to the vehicle which could impair driving safety. -
Page 3: Recommended Tools
RECOMMENDED TOOLS Torx T25 Plastic mounting wedges Cable ties screwdriver or bit... -
Page 4: Scope Of Delivery
SCOPE OF DELIVERY ITEM FIGURE QUANTITY Main device System connector QUADLOCK Standard System connector QUADLOCK with CAN-Bus decoder CAN-Bus connection cable Antenna adapter Fakra on ISO AV connector with all audio and video connections and additional USB port... - Page 5 SCOPE OF DELIVERY ITEM FIGURE QUANTITY GPS antenna DAB antenna 4G/LTE antennas 4G/LTE dongle WIFI antenna...
-
Page 6: Wiring Diagram
WIRING DIAGRAM WiFi antenna Connector for 4G/LTE dongle USB port GPS antenna Connector for external microphone (optional) Radio antenna AV connector DAB antenna System connector 4G/LTE antenna with device fuse System connector with device fuse AV connector 19 18 17 16 14 13 12 11 9 10... -
Page 7: Reset Button
MICRO SD SLOT FOR NAVIGATION SOFTWARE Here you can insert the MicroSD card of the navigation software. For the device to have access, you may need to assign the access path in the Apps menu under “Settings”. RESET BUTTON If the device stops responding to input, the system is overloaded or crashed. Then reboot the system by pressing the reset button (RST) on the front panel. - Page 8 SETUP THE 4G/LTE INTERNET CONNECTION First lay the two 4G/LTE antennas inside the dashboard towards the windshield, one antenna for the left and one for the right. Ideally, you should stick the antennas to the windshield to ensure optimal recep- tion.
- Page 9 SETUP THE 4G/LTE INTERNET CONNECTION Then turn on the device to test the 4G/LTE connection. After the device has started, enter After successful entry, the SIM card is your 4-digit PIN code of the SIM card unlocked. here. Confirm the entry with the tick. If the device is successfully connect- If the device is turned off, you have ed to the mobile Internet, the „4G“...
-
Page 10: Installation Tips
INSTALLATION TIPS Shipping locks: Remove both shipping locks on the top of the device before starting installation. GPS antenna: The GPS antenna must be mounted horizontally, if possible on the front of the dashboard (ensure a clear view to the sky). No reception is possible with a met- al-coated windscreen. - Page 11 Then remove all cable plugs and the antenna plug on the radio. Now lay the connection cables of the ESX device (see p. 6) in the vehicle to the desired instal- lation location and connect them accordingly at the new ESX device.
- Page 12 INSTALLATION GUIDE MERCEDES-BENZ A CLASS (W169 10/2004 - 4/2012) Carefully unlatch the fan unit above the radio on both sides. You will find the brackets in the top first slot on each side. Use a small slotted screwdriver to loosen the bracket. Then loosen the fan unit with assembly wedges.
- Page 13 INSTALLATION GUIDE MERCEDES-BENZ A CLASS (W169 10/2004 - 4/2012) Now carefully remove the lower radio cover. Now remove both lower retaining screws on each side using the Torx T25 screwdriver. Then carefully pull the radio out of the slot. Then remove all cable plugs and the antenna plugs on the radio.
- Page 14 Now connect all connection cables and plugs at the ESX device (see p. 6). Then also connect the vehi- cle-specific cable connector and the antenna con- nector. Then slide the ESX device into the slot of the dashboard. Check the function of the device before assembly.
- Page 16 ESX Car Media Systems · Audio Design GmbH Am Breilingsweg 3 · D-76709 Kronau/Germany Tel. +49 7253 - 9465-0 · Fax +49 7253 - 946510 www.esxnavi.de - www.audiodesign.de © All rights reserved. Technical changes, errors and mistakes reserved.
Need help?
Do you have a question about the VN715-MB-A1-DAB and is the answer not in the manual?
Questions and answers