
Related Manuals for Bosch DRH18LT65


Summary of Contents for Bosch DRH18LT65
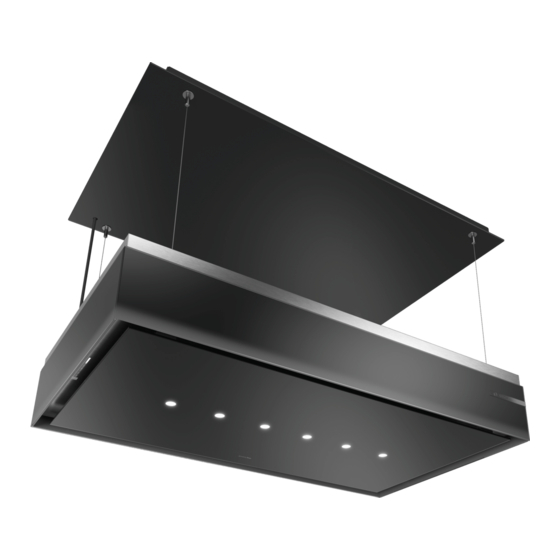
- Page 1 Ceiling-mounted ventilation system DRH18LT65 User manual and installation instructions [en]...
-
Page 2: Table Of Contents
en Safety 1.2 Intended use Table of contents This appliance is designed only to be built into kitchen units. Read the special installation instructions. USER MANUAL The appliance can only be used safely if it is Safety .............. 2 correctly installed according to the safety in- structions. -
Page 3: Safety
Safety en ▶ Clean the grease filters regularly. Changes to the electrical or mechanical as- ▶ Never work with naked flames close to the sembly are dangerous and may lead to mal- appliance (e.g. flambéing). functions. ▶ Do not install the appliance near a solid ▶... -
Page 4: Preventing Material Damage
en Preventing material damage in the interior of the appliance may cause ex- An ingress of moisture can cause an electric plosions. shock. ▶ Never use highly caustic alkaline or highly ▶ Before cleaning, pull out the mains plug or acidic cleaning agents. In particular, do not switch off the fuse in the fuse box. -
Page 5: Operating Modes
Operating modes en 4 Operating modes 4.1 Air recirculation mode The air which is drawn in is cleaned by the grease fil- ters and an odour filter, and conveyed back into the room. To bind odours in circulating-air mode, you must install an odour filter. The dif- ferent options for operating the appli- ance in circulating-air mode can be found in our catalogue. -
Page 6: Familiarising Yourself With Your Appliance
Accessories vary from one appliance to another. When placement) purchasing accessories, always quote the exact product number (E no.) of your appliance. → Page 14 You can find out which accessories are available for your appliance in our catalogue, in the online shop or from our after-sales service. www.bosch-home.com... -
Page 7: Basic Operation
Before using for the first time en 7 Before using for the first time Configure the settings for initial start-up. Clean the ap- pliance and accessories. 8 Basic operation 8.1 Switching on the appliance 8.5 Switching on intensive mode Requirement: Align the remote control as precisely as If particularly strong odours or vapours develop, you possible to the infrared receiver for the LED display. - Page 8 en Basic operation To save the setting, press and hold and for ap- 8.11 Switching off automatic mode prox. three seconds. Press . ▶ Or wait approx. 10 seconds until the setting is a The appliance switches to the fan setting that was saved automatically.
-
Page 9: Home Connect
Home Connect en Requirement: The appliance is switched off. 8.22 Resetting the appliance to the factory Press and hold and for approx. three seconds. settings a In the LED display, the LED for the setting that is Requirement: If you reinstall the appliance after disas- currently selected lights up. - Page 10 Home Connect app and will be able to 9.8 Declaration of Conformity start the software update via the app. Once the update Robert Bosch Hausgeräte GmbH hereby declares that has been successfully downloaded, you can start in- the appliance with Home Connect functionality meets stalling it via the Home Connect app if you are in your...
-
Page 11: Hob-Based Hood Control
Hob-based hood control en 10 Hob-based hood control You can connect your appliance to a suitable hob and, Note: Refer to the section entitled "Hob-based hood in this way, control the functions of your appliance via control" in the instruction manual for your hob. the hob. - Page 12 en Cleaning and servicing 11.4 Cleaning aluminium 11.9 Cleaning grease filters manually Observe the information regarding the cleaning The grease filters filter the grease from the cooking va- agents. pour. Regularly cleaned grease filters guarantee a high level of grease removal. → "Cleaning products", Page 11 Clean with a soft cloth and glass cleaner.
-
Page 13: Troubleshooting
Troubleshooting en Remove the empty batteries. 11.12 Replacing the batteries in the remote control WARNING ‒ Risk of injury! Children may swallow batteries. Keep batteries out of the reach of children. ▶ Keep an eye on any children when you are repla- ▶ cing batteries. Batteries may explode. - Page 14 en Customer Service Fault Cause and troubleshooting In the LED display, The batteries are almost empty. the LEDs flash one to → "Replacing the batteries in the remote control", Page 13 ▶ five times after the appliance is switched off. The lighting automat- Demo mode is switched on.
-
Page 15: Disposal
Disposal en 14 Disposal Find out here how to dispose of old appliances cor- 14.2 Disposing of batteries rectly. Batteries should be recycled in an environmentally friendly manner. Do not dispose of the batteries in the 14.1 Disposing of old appliance household rubbish. Valuable raw materials can be reused by recycling. -
Page 16: 15.4 Secure Installation
en Installation instructions WARNING ‒ Risk of fire! Grease deposits in the grease filter may catch fire. ▶ The specified safety clearances must be complied with in order to prevent a build-up of heat. 253 mm ▶ Observe the specifications for your cooking appliances. - Page 17 Installation instructions en ▶ If the power cord of this appliance is dam- Oscillating movement of the appliance may aged, it must be replaced by trained spe- result in injury. cialist staff. ▶ Do not do anything that makes the appli- Improper installation is dangerous.
- Page 18 en Installation instructions Use the enclosed screws are suitable only for con- 15.6 Instructions for the electrical crete ceilings. connection Install the appliance with a fixing material which is In order to safely connect the appliance to the elec- sufficiently stable and has been adjusted accord- trical system, follow these instructions.
- Page 19 Installation instructions en Position the appliance on the scissor lift table so To protect against scratches, position a spacer on that the appliance is on the frame. the appliance and place the frame cover on top of Do not place the appliance on the grease filters as these could be damaged.
- Page 20 en Installation instructions Thread the four cables into the cable tensioner and Carefully remove the protective film around the apply equal tension. cables so that the appliance's limit switch is not damaged. Place the scissor lift table or another suitable device under the appliance.
- Page 21 Installation instructions en Risk of injury when opening and closing the hinges. Open the odour filter cartridge. Keep your hands away from the hinges. ▶ Adjust the appliance height on the remote control using the button and the button. If you have not carried out a reference movement, the appliance automatically moves up and down as far as it will go.
- Page 22 en Installation instructions Carefully loosen the screws on the frame cover. Remove the on-site cable from the terminal plug and remove the protective tube. Do not use any tools. Loosen the four cable clamps. Note: In order to prevent damage to the limit switch, Open the cable tensioner and pull out the cables.
- Page 24 Expert advice for your Bosch home appliances, help with problems or a repair from Bosch experts. Find out everything about the many ways Bosch can support you: www.bosch-home.com/service Contact data of all countries are listed in the attached service directory.