Table of Contents
Advertisement
Quick Links
Advertisement
Table of Contents

Related Manuals for FLIR Extech EX612


Summary of Contents for FLIR Extech EX612
- Page 1 Ly wUser's Guide 400Amp True RMS AC Clamp Meter Model EX612 Patented...
- Page 2 Introduction Congratulations on your purchase of this Extech EX612 True RMS Clamp Meter. This meter measures AC Current, AC/DC Voltage, Resistance, Capacitance, Frequency, Diode Test, Duty Cycle and Continuity. Special features include Dual Input Thermocouple Temperature, and Non-Contact Voltage detector. The double molded case is designed for heavy duty use.
- Page 3 SAFETY NOTES • Do not exceed the maximum allowable input range of any function. • Do not apply voltage to meter when resistance function is selected. • Set the function switch OFF when the meter is not in use. • Remove the battery if meter is to be stored for longer than 60 days.
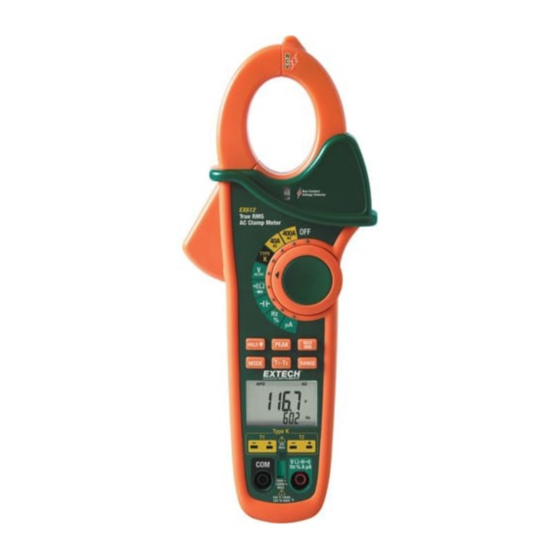
- Page 4 Description Meter Description Current clamp Clamp opening trigger HOLD/BACKLIGHT button MODE / ZERO button Backlit LCD Display Type K input jacks Multimeter input jacks Function switch PEAK button 10. MAX/MIN button 11. Range button 12. Thermocouple display button 13. Battery compartment (rear) 14.
-
Page 5: Operation
Operation NOTES: Read and understand all Warning and Caution statements in this operation manual prior to using this meter. Set the function select switch to the OFF position when the meter is not in use. Input Shutter The Input Shutter inhibits simultaneous connection to the thermocouple jacks and the DMM input jacks. - Page 6 AC Current Measurements WARNING: Disconnect the test leads before making clamp measurements. Rotate the Function switch to the 400A position Press the trigger to open jaw. Fully enclose only one conductor. Read the current value in the display. If the value is less than 40A, rotate the function switch to the 40A AC/DC position to improve resolution.
- Page 7 Resistance Measurements Note: Remove power from the device under test before making resistance measurements Slide the input shutter to the up position. Set the function switch to the Ω position. Insert the black test lead banana plug into the negative COM jack. Insert the red test lead banana plug into the positive V jack.
- Page 8 Capacitance Measurements WARNING: To avoid electric shock, discharge the capacitor before measuring. Slide the input shutter to the up position. Rotate the function switch to the capacitance position. Insert the black test lead banana plug into the negative COM jack. Insert the red test lead banana plug into the positive jack.
- Page 9 μA DC/AC Current Measurements Slide the input shutter to the up position. Rotate the function switch to the μA position. Press the MODE button to select AC or DC. Insert the black test lead banana plug into the negative COM jack. Insert the red test lead banana plug into the positive μA jack.
- Page 10 Data Hold To freeze the LCD reading, press the HOLD button. While data hold is active, the HOLD icon appears on the LCD. Press the HOLD button again to return to normal operation. MAX/MIN Press the MAX/MIN button to activate the MAX/MIN recording mode. The display icon "MAX"...
-
Page 11: Maintenance
Replace the rear cover and battery Warranty EXTECH INSTRUMENTS CORPORATION (a FLIR company) warrants this instrument to be free of defects in parts and workmanship for one year from date of shipment (a six month limited warranty applies to sensors and cables). If it should become necessary to return the instrument for service during or beyond the warranty period, contact the Customer Service Department at (781) 890-7440 ext. -
Page 12: Specifications
Specifications Accuracy Function Range Resolution (% of reading + digits) AC Current 400.0 AAC 0.1A ±(1.5% + 5 digits) 50/60 Hz 40.00 AAC 0.01A True RMS AC/DC μA DC: ±(1.0% + 2 digits) 400.00μA 0.01μA Current AC: ±(1.5% + 2 digits) 4000.0μA 0.1μA AC Voltage... - Page 13 Accuracy Function Range Resolution (% of reading + digits) Frequency 40.000Hz 0.001Hz ±(0.3% + 3 digits) (test leads) 400.00Hz 0.01Hz 4000.0Hz 0.1Hz 40.000kHz 0.001kHz ±(0.3% + 2 digits) 400.00kHz 0.01kHz 4000.0kHz 0.1kHz 40.000MHz 0.001MHz 100.00MHz 0.01MHz Not specified Sensitivity: 5 to 5kHz; 0.8Vrms min., 5kHz to 150kHz; 5Vrms min Duty Cycle 0.5% to 99.0% 0.1%...
- Page 14 For the latest version of this User’s Guide, Software updates, and other up-to-the-minute product information, visit our website: www.extech.com Copyright © 2008 Extech Instruments Corporation (a FLIR company) All rights reserved including the right of reproduction in whole or in part in any form.
Need help?
Do you have a question about the Extech EX612 and is the answer not in the manual?
Questions and answers