Table of Contents
Advertisement
Quick Links
Advertisement
Table of Contents

Subscribe to Our Youtube Channel
Related Manuals for Verizon T41P


Summary of Contents for Verizon T41P
- Page 1 T41P IP User guide desk phone onetalk.com...
-
Page 2: Table Of Contents
User guide Contents Welcome ..........................................5 Initial setup ........................................5 Connecting the phone to power and Ethernet ..........................5 Viewing E911 location information ..............................5 Getting to know your desk phone ...............................6 Hardware components ..................................6 Navigating the display ..................................7 Indicators and notifications ................................7 Customizing your desk phone ................................ - Page 3 User guide Bridge Line ......................................14 Call Barge ....................................... 14 Remote Group Pickup ..................................14 Call Forwarding ....................................14 Call Forward Always ..................................14 Call Forward Busy ....................................14 Call Forward No Answer ................................14 Call Forward to Voice Mail ................................14 Call Move .........................................
- Page 4 User guide Important customer information............................... 26 WEEE warning ..................................... 26 Customer feedback ..................................26 GNU GPL information ..................................26 Copyright ........................................ 26 Warranty ......................................... 26 Important 911 emergency response information ........................ 27 Declaration of conformity ................................27 Class B digital device or peripheral............................27 Important safety precautions ...............................
-
Page 5: Welcome
To view your 911 address, press the Address line key to the right of the LCD screen base station: Initial setup If your T41P desk phone was not connected and set up by your IT account administrator, verify the following with your administrator: 1. -
Page 6: Getting To Know Your Desk Phone
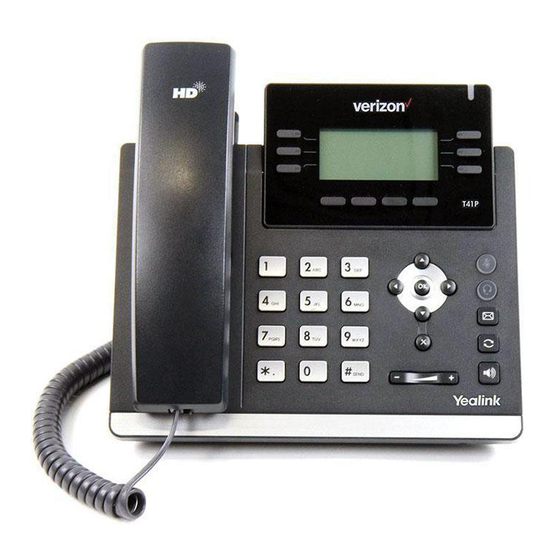
User guide Getting to know your desk phone Hardware components Item Description Item Description Displays info about calls, messages, soft keys, time, date Speakerphone key Toggles unit into hands-free speakerphone mode and other relevant data, such as: • Caller ID LCD screen Adjusts the volume of the handset, headset, speaker •... -
Page 7: Navigating The Display
User guide Customizing your desk phone Navigating the display About Basic settings Setup and preference options for the following can be found in the Basic Settings menu: • Language preferences • Time and date • Display settings • Ringtone and keypad sound settings Indicators and notifications To access Basic Settings: Power indicator LED... -
Page 8: Time And Date
User guide Time and date Display settings Time and date are displayed in the middle of the status bar. To change backlight duration: You can also set your preferred formats for displaying time You can set the time duration for the backlight of your desk and date in the Time &... -
Page 9: Sound Settings
• Label Line keys • Value (extension number) Your T41P comes with nine configurable line keys. You can use them to create one-button speed dials for frequently You will get a prompt to enter the extension number if left blank. -
Page 10: Using The Intercom Key
User guide Using the Intercom key To use a dedicated Intercom line key when extension is defined: General information: 1. From the Home screen, press the Intercom soft key • If you attempt to use speed dial to dial the extension needed for an intercom call, your phone will display an error message. -
Page 11: Basic Call Features
User guide Basic call features While on a call or when the line is otherwise in use: Press the corresponding incoming line key to answer the call. Make outgoing calls. Alternatively, press Hold to place the current call on hold, then press Answer to pick up the incoming call. -
Page 12: Redial Last Number
User guide Redial last number. To blacklist a contact: From your directory: Press twice when the phone is idle to dial out the last dialed number. 1. Press the Directory soft key while the phone is idle 2. Locate the contact you wish to blacklist by selecting Block a call. - Page 13 User guide To remove a contact from a blacklist: From your Call History: 1. Press the Menu soft key while the phone is idle 1. Press the History soft key 2. Press the Directory soft key, then press Blacklist 2. Select the caller you want to blacklist 3.
-
Page 14: Bridge Line
U.S. toll or 800 number. configure bridged devices by logging into the My Business Call Forward Busy Verizon One Talk Admin Portal. Forwards calls to an alternative number when your One Talk Monitoring and answering a bridged line: number is busy. Calls can be forwarded to any domestic U.S. -
Page 15: Call Move
User guide Call Move If your One Talk number is shared with other devices, when you are on a live call, you can move from your desk phone to your mobile device or tablet and from your other devices to your desk phone without disconnecting. -
Page 16: Transferring Calls
User guide Transferring calls Call History You may transfer an active call to any other phone number Call History maintains a list of all calls that were missed, (it does not have to be a One Talk number). There are three placed, received and forwarded. -
Page 17: Contact Management
User guide Contact management To delete all or a subset of all call logs: 1. Tap the The built-in phone directory can store the names and phone numbers of your contacts. You can store up to 1,000 contacts 2. Select Options and 48 groups in your phone’s local directory. - Page 18 User guide To search for a contact: To delete a contact: 1. Press the Directory soft key 1. Press the Directory soft key when the phone is idle, and then press All Contacts 2. Select All Contacts 2. Highlight the contact you wish to delete 3.
- Page 19 User guide To blacklist a contact from your directory: To remove a contact from blacklist: See Advanced Calling Features > Block a call > Blacklist 1. Press Menu and then the Directory soft key a contact. 2. Select the Blacklist folder 3.
-
Page 20: Groups
User guide Groups To delete a group: 1. Press the Directory soft key Groups are a great way to organize large lists of contacts, such as by function or department. Groups help you more 2. Select the desired contact group quickly find the individual(s) you need to reach. - Page 21 User guide To move a contact to a different group: To remove a contact from a blacklist: 1. Press the Directory soft key, then press All Contacts or the 1. Press the Menu soft key while the phone is idle group to which the contact belongs 2.
-
Page 22: Voice Mail
User guide Voice Mail System status, troubleshooting and other settings To retrieve Voice Mail messages: To check phone status: Press the message button on the desk phone console. 1. Press the Menu soft key 2. Scroll to navigate to and select Status. Basic info will appear: IP Address, MAC Address, Firmware Version 3. -
Page 23: Reboot Or Reset The Phone
User guide Reboot or reset the phone. To reset the phone to factory settings: 1. From Advanced Settings, scroll to Reset & Reboot These are advanced settings for administrators only and and press OK require an admin password. The default password is “admin.” 2. -
Page 24: About Your Options
• Advanced Calling (HD Voice) Technology • Dual-port Gigabit Ethernet • IPv6 • SIP v1 (RFC2543), v2 (RFC3261) • Supports bridging that allows T41P, T46G, T46GW and T49G to monitor incoming calls • Transport Layer Security (TLS) • Yealink Optima HD voice... -
Page 25: Accessibility Features
The standard handset of the Yealink phone isn’t fully Hearing-aid compatible with HAC. If customers have HAC requirement, compatible (HAC) Verizon can ship the additional handset to replace only the handsets WF40 WF40 Wi-Fi USB Stick current standard handset of the phone •... -
Page 26: Important Customer Information
User guide Important customer information Customer feedback We are striving to improve our documentation quality, and To avoid electric shock, use caution when connecting cables. we appreciate your feedback. Email your opinions and For example, do not connect safety extra-low voltage (SELV) comments to docsfeedback@yealink.com. -
Page 27: Important 911 Emergency Response Information
Neither Verizon Wireless nor any of its affiliates shall be liable for any service outage and/or inability to access emergency • A DANGER warning refers to situations that could cause... -
Page 28: T41 Desk Phone Navigation Guide (Soft Key Menu A)
User guide T41 desk phone navigation guide (soft key menu A) This navigation guide shows the hierarchy of screens for the Soft Key menu. You can refer to this diagram for a visual representation of the flow of the soft key screens and as a reference guide when you need to locate specific menu items. -
Page 29: T41 Desk Phone Navigation Guide (Soft Key Menu B)
User guide T41 desk phone navigation guide (soft key menu B) This navigation guide shows the hierarchy of screens for the Soft Key menu. You can refer to this diagram for a visual representation of the flow of the soft key screens and as a reference guide when you need to locate specific menu items. -
Page 30: T41 Desk Phone Navigation Guide (Soft Key Menu C)
Call Forwarding No Answer to Voice Mail OFF Back One Talk–capable desk phone must be purchased from Verizon to support some of these features. Features available on select phones. Activation of the One Talk feature and broadband connection is required.
Need help?
Do you have a question about the T41P and is the answer not in the manual?
Questions and answers