Advertisement
DIGITAL YACHT LTD
•
The easiest was to install the drivers on Windows 7/8/10 is to make sure the PC is connected to the
internet and to plug the AIS100USB in. The "Found New Hardware Wizard" will be triggered and
Windows will search online for the latest driver.
•
If you do not have an internet connection on the boat, then you can download the Windows or the
Mac drivers from our "Online CD", copy them to a USB memory stick and then take them down to the
boat. You can find the drivers in the "AIS100+iAIS+uAIS+AISNet USB Driver" folder on our "Online
CD" at
https://support.digitalyacht.net/
•
Windows will create a "virtual" COM port for the AIS100PRO which you can find in the Windows
Device Manager program. Look in the "LPT&COM Ports" section to find what COM port number the
AIS100PRO has been allocated. Make a note of this number as you will have to enter this COM port
number in the PC Navigation software, so that it knows which port the AIS is connected to – consult
the instruction manual supplied with your PC Software to understand how this is configured.
Installation Step 5 – NMEA 0183
•
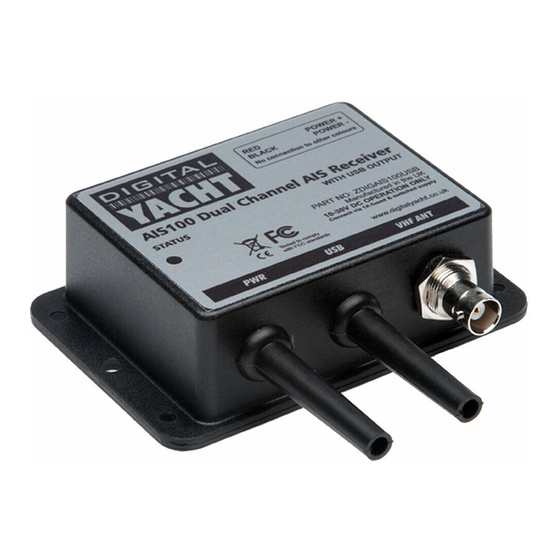
The AIS100PRO Receiver can be connected to other AIS compatible equipment via the NMEA0183
connections on the PWR/DATA cable. A table showing what each of the 6 wires of the PWR/DATA
cable does is printed on the AIS100PRO Receiver and repeated below for your convenience;
AIS100 Receiver PWR/DATA cable
o
RED
o
BLACK
o
ORANGE -
o
BROWN
o
YELLOW -
o
GREEN
•
The most common connection to a dedicated chart plotter is to take the NMEA Output (Orange+ and
Brown –) from the AIS100PRO Receiver and to connect it to a free NMEA Input on the plotter. You
must then tell the chart plotter that AIS data is connected to this port and set the baud rate to 38,400
Baud – the standard speed for AIS data. Consult the instruction manual supplied with your Chart
Plotter to understand how this is configured.
•
If you wish to multiplex other NMEA 0183 GPS or Instrument data through the AIS100PRO, connect
the NMEA 0183 (4800 baud) data to the NMEA In + and – connections. As long as the NMEA data
has valid checksums the data will be output with the AIS data at 38,400 baud on the NMEA 0183 and
USB outputs.
•
Apply power to the AIS100PRO Receiver and verify that the Green "Status" LED lights.
•
The "Status" LED will flicker every time that valid data from an AIS target is received. Depending
upon the number of vessels, fitted with AIS transponders, sailing within VHF range of your vessel,
the frequency of flickering maybe constant or as little as once every 30 seconds.
•
Installation is now completed
The AIS100PRO is also compatible with Mac OS X and all LINUX Kernels since V2.4.20.
AIS100PRO Quick Start Guide
-
Power + (12v)
Power – (0v)
-
NMEA Out +
NMEA Out –
-
NMEA In +
NMEA In –
-
QUICK START AIS100PRO V1.01
Advertisement
Table of Contents

Subscribe to Our Youtube Channel
Related Manuals for DIGITAL YACHT AIS100USB


Summary of Contents for DIGITAL YACHT AIS100USB
- Page 1 The easiest was to install the drivers on Windows 7/8/10 is to make sure the PC is connected to the internet and to plug the AIS100USB in. The “Found New Hardware Wizard” will be triggered and Windows will search online for the latest driver.
- Page 2 AIS100PRO Quick Start Guide DIGITAL YACHT LTD Installation & Quick Start Guide AIS100PRO AIS Receiver QUICK START AIS100PRO V1.01...
- Page 3 AIS100PRO Quick Start Guide DIGITAL YACHT LTD 1. Introduction Congratulations on the purchase of your AIS100PRO AIS Receiver. It is recommended that your receiver is installed by a professional installer. Before operating the unit you should familiarise yourself with this Quick Start Guide and the user manuals for any equipment you wish to connect it to.
- Page 4 AIS100PRO Quick Start Guide DIGITAL YACHT LTD Fixing location drawing • Once the unit is secured, connect the AIS/VHF antenna. Ensure the connection is fully made; should feel a slight click as the BNC locks. Installation Step 3 - Power •...
Need help?
Do you have a question about the AIS100USB and is the answer not in the manual?
Questions and answers