Advertisement
Quick Links
Quick Start EVK-M8QSAM / M8xCAM
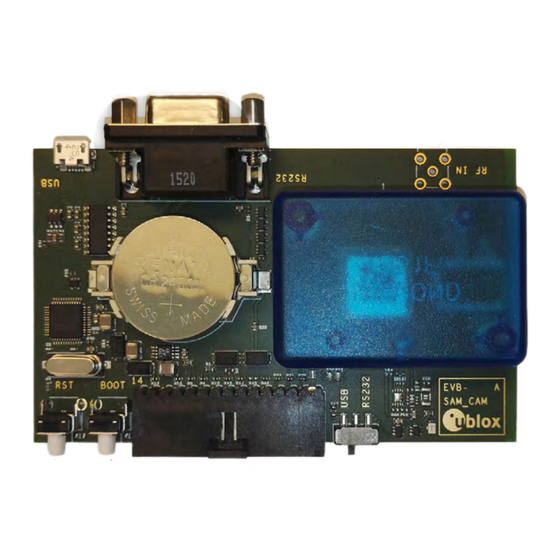
1. Overview
A (USB)
C (RS232)
D (RST)
G (Boot)
F (14-pin connector)
UBX-16024579 - R03
E (RF IN)
EVK-M8xCAM only
B (USB/RS232 switch)
2. Setup
1.
Download and install the EVK-M8QSAM / EVKM8xCAM
software (and documentation) from
www.u-blox.com/evk-search.
See installation notes on the back of this card.
2.
Connect the unit to a PC. Options:
• USB: Connect via USB port (A). Set switch (B) to
USB. The USB driver installs automatically when
the device is connected to a PC; this requires an
internet connection.
• UART: Connect via RS232 (C). Set switch (B) to
RS232.
NOTE: Press RST (D) after setting switch (B).
3.
Provide power to the device at all times, either via USB
on the back or the V5 IN pin on the front (F).
4.
EVK-M8QSAM: Place the EVK with an unobstructed
view of the sky, no external antenna connectivity at (E).
5.
EVK-M8QCAM / EVK-M8CCAM: Place the EVK with
an unobstructed view of the sky or connect antenna
signal to (E).
6.
Start the u-center GNSS evaluation software and se-
lect the corresponding COM port and baud rate.
Copyright © 2018, u-blox AG
Advertisement

Related Manuals for u-blox EVK-M8 CAM Series


Summary of Contents for u-blox EVK-M8 CAM Series
- Page 1 B (USB/RS232 switch) an unobstructed view of the sky or connect antenna signal to (E). F (14-pin connector) Start the u-center GNSS evaluation software and se- lect the corresponding COM port and baud rate. UBX-16024579 - R03 Copyright © 2018, u-blox AG...
- Page 2 NOTE: Refer to recommendations in the EVK user guide u-center menu under the Windows Start button, when using the EVK-M8QCAM or EVK-M8CCAM with a All Programs > u-blox GNSS simulator. For more information about the EVK-M8QCAM or EVK- M8CCAM, contact your nearest u-blox support: www.u-blox.com/contact-technical-support UBX-16024579 - R03...