Table of Contents
Advertisement
Quick Links
Solar Surveillance Installation Guide
SLR-A75 Series
WiFi Solar Surveillance System (SLR-A75-4W)
4G Solar Surveillance System (SLR-A75-4G)
Thank you for purchasing a SLR-A75 Series Solar Surveillance System.
This install guide covers basic setup, installation and use of your surveillance system.
For more information, please visit:
www.vip-vision.com
Version 230818
Advertisement
Table of Contents

Related Manuals for Vip-Vision SLR-A75 Series


Summary of Contents for Vip-Vision SLR-A75 Series
- Page 1 SLR-A75 Series WiFi Solar Surveillance System (SLR-A75-4W) 4G Solar Surveillance System (SLR-A75-4G) Thank you for purchasing a SLR-A75 Series Solar Surveillance System. This install guide covers basic setup, installation and use of your surveillance system. For more information, please visit: www.vip-vision.com...
-
Page 2: Included Components
SLR-A75 Series | Solar Surveillance 1. Pre-install Information 1.1 Included components Part Product Code Image Solar Panel SSL-A40MN (Optional remote control device) 4.0MP Mini PTZ Dome Camera VSIP4MPPTZMINI Camera Adapter VSBKTA106 Right Angle Bracket VSBKTB305W Junction Box VSBKTA140 Pole Mount Bracket... -
Page 3: Camera Information
Stream Type General Encode Type H.265 Encode Type H.265 Resolution 2592x1520 Resolution 704x576 (D1) StreamCTRL StreamCTRL Quality 6 (Best) Bit Stream 512Kbps Ref Stream 1536-8192Kbps Ref Stream 139-768Kbps I Frame Interval I Interval Watermark 1 (off ) Characters DigitalCCTV www.vip-vision.com... - Page 4 SLR-A75 Series | Solar Surveillance 1.3 Solar Panel Information Motion Sensing Solar Panel with 40W Street Light Note: This solar panel system is fitted with undervoltage protection, which disconnects the load at approximately 10.8V. If you are not receiving any voltage on the output wires, place the panel in direct sunlight for a minimum of one hour and re-test.
- Page 5 C x 4 M8 x 4 M6 O x 4 O x 2 M6 O x 2 C x 2 6 C x 2 M8*2 0 x 2 M6*16 x 2 North 8 x 4 Φ50-60mm M8*3 0 x 4 www.vip-vision.com...
-
Page 6: Installation
SLR-A75 Series | Solar Surveillance 2. Installation 2.1 Mounting the solar panel to the pole Caution: Solar panel must be placed so it is in direct sunlight all day. Any shading will greatly reduce the solar panel’s performance! 1. Drill an 8mm hole in the pole... - Page 7 (flatter), the more often it will need to be cleaned. Fig. 2.2a Fig. 2.2b Solar panel angle adjust cover Solar panel angle adjust Allen head 3. Tighten the bolt after adjusting the angle to secure the solar panel in place. 4. Replace the cover. www.vip-vision.com...
- Page 8 SLR-A75 Series | Solar Surveillance 2.3 Mounting the camera to the pole The camera, camera adapter, right angle bracket and junction box are already connected (A, B, C & D). • Mount the pole mount bracket to the pole first.
- Page 9 2. Open the junction box (Fig. 2.3c). Fig. 2.3c Junction box interior (no 4G router) Note: This image shows the inside of the junction box as seen with the WiFi kit. The 4G kit will also have the 4G router pre-installed inside the junction box. www.vip-vision.com...
- Page 10 SLR-A75 Series | Solar Surveillance Caution: Do not allow the negative and positive power supply wires from the solar panel to touch (short circuit) - this will cause the lithium polymer battery to enter protection mode and output voltage will drop to 0V.
- Page 11 5. (Optional) Connect the network switch to an NVR (The camera includes a microSD card for edge recording). 6. (Optional) Connect the network switch to a router. Refer to the next page for a WiFi system map example using a PoE injector. www.vip-vision.com...
- Page 12 SLR-A75 Series | Solar Surveillance Ethernet Power Solar Panel WiFi Wireless Bridge (AP) Camera Wireless Bridge 240VAC Power (Station) PoE Injector Network Switch Router (optional) NVR (optional) Internet Fig. 3.1a Example WiFi Setup Crucial evidence. Always.
- Page 13 Antenna (optional) Camera connected 12VDC power via Ethernet cable Fig. 3.2a 4G router overview Camera & 4G router connected via RJ45 4G router powered via terminal block Camera powered via terminal block Battery/terminal block connection Fig. 3.2b Connection overview www.vip-vision.com...
- Page 14 SLR-A75 Series | Solar Surveillance QR code remote access setup (4G) 1. Install the free app from the App Store for iOS (iDMSS Plus) or Play Store for Android (gDMSS Plus). 2. Open the iDMSS Plus/gDMSS Plus app you have installed on your device and select “Camera”...
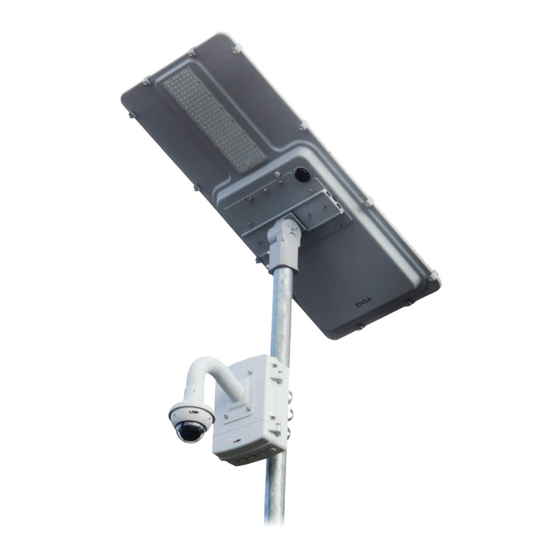
- Page 15 3. Connections 3.3 Finish camera installation 1. Close the junction box and securely fasten the 4 attached bolts (Fig. 3.3a). Fig. 3.3a Complete solar surveillance system www.vip-vision.com...
- Page 16 SLR-A75 Series | Solar Surveillance 4. Solar Sensor Light Configuration (Optional) This section covers how to set up the motion-activated 40W LED light on the solar panel. Our example will show you how to configure your solar panel & light with the remote control, showing you the steps required to set up the light to activate after motion is detected at night.
-
Page 17: Operation
(as shown in the diagram below): Sunset Interval 1 Daytime operation Daytime 14 hours operation (Light off ) (Motion activates light at 10% brightness for 20 sec) Note: To change solar panel settings back to factory default, set Re-Deflt to YES www.vip-vision.com... - Page 18 SLR-A75 Series | Solar Surveillance Disabling Motion Activated LED Light To disable the LED light system again, simply change all S-Time values (S-Time-1, S-Time-2 & S-Time-) back to 0H. This will skip every Interval after the sun sets, so editing other values after this point is unnecessary.
-
Page 19: Troubleshooting
3. My camera doesn't have power. • Check the connections from the solar panel battery to the camera. • If the battery is out of power, the camera should automatically turn on once the solar panel absorbs more light. www.vip-vision.com... - Page 20 SLR-A75 Series | Solar Surveillance Note: All products, designs and software here are subject to change without prior written notice. Please visit our website for more information. For more information, please visit: www.vip-vision.com Crucial evidence. Always. Crucial evidence. Always.
Need help?
Do you have a question about the SLR-A75 Series and is the answer not in the manual?
Questions and answers