Table of Contents
Advertisement
Quick Links
Advertisement
Table of Contents

Related Manuals for Zanussi ZI 918/12 KA

Summary of Contents for Zanussi ZI 918/12 KA
- Page 1 REFRIGERATOR- FREEZER ZI 918/12 KA INSTRUCTION BOOKLET 2223 032-63...
-
Page 2: Important Safety Information
IMPORTANT SAFETY INFORMATION It is most important that this instruction book should be retained with the appliance for future reference. Should the appliance be sold or transferred to another owner, or should you move house and leave the appliance, always ensure that the book is left with the appliance in order that the new owner can get to know the functioning of the appliance and the relevant safety information. -
Page 3: Table Of Contents
Disposal of old Appliances The symbol on the product or on its packaging indicates that this product may not be treated as household waste. Instead it shall be handed over to the applicable collection point for the recycling of electrical and electronic equipment. By ensuring this product is disposed of correctly, you will help prevent potential negative consequences for the environment and human health, which could otherwise be caused... -
Page 4: Operation
OPERATION Before using Remove all securing tapes. Wash inside the appliance with lukewarm water and bicarbonate of soda (5 ml to 0.5 litre of water). Do not use soap or detergent as the smell may linger. Dry thoroughly. Setting the temperature The temperature inside the refrigerator and the freezer is regulated by a single thermostat with 6 temperature positions and an “OFF”... -
Page 5: Frozen Food Storage
Frozen food storage Making ice cubes The appliance is provided with one or more trays for When first starting-up or after a period of use, before ice-cubes trays. putting the products in the freezer compartment let Fill the tray(s) 3/4 full to give the ice space to expand the appliance run for at least two hours on the and place them in the freezer compartment. -
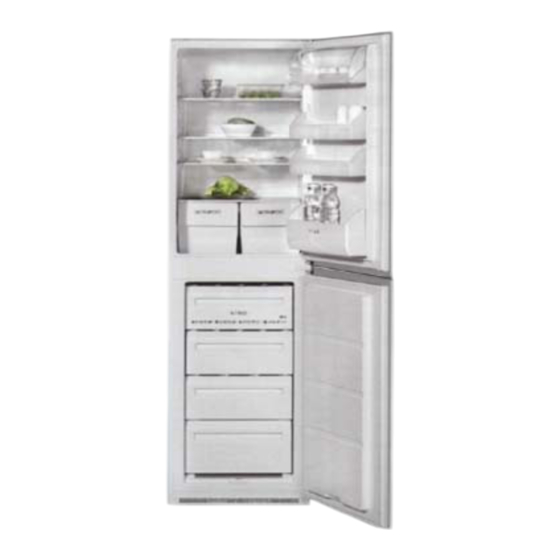
Page 6: Movable Shelves
Movable shelves The walls of the refrigerator have runners so that the shelves can be positioned as desired . For better use of space, the front half-shelves can lie over the rear ones. D338 Positioning the door shelves To permit storage of food packages of various sizes, the door shelves can be adjusted in height. -
Page 7: Hints And Tips
HINTS AND TIPS Food Storage • Try to avoid keeping the door open for long periods, or opening the door too frequently as • To obtain the best results from your appliance, warm air will enter the cabinet, and cause the neither hot foods nor liquids which may compressor to often switch on unnecessarily. -
Page 8: Maintenance And Cleaning
MAINTENANCE AND CLEANING Before any maintenance or cleaning work is carried Changing the light bulb out, DISCONNECT the appliance from the Should the interior light fail to work, first switch off ELECTRICITY supply. the appliance and disconnect from the electricity supply, then replace the bulb as follows;... - Page 9 Remember to wash the defrost cleaner in hot soapy water at regular intervals. Dry throughly before replacing. Freezer When the frost has reached a thickness of up to 4mm it can be removed using the ice scraper provided with the appliance. During this operation it is not necessary to disconnect the appliance from the mains and remove the food.
-
Page 10: Something Not Working
SOMETHING NOT WORKING Important: If you call out an engineer to a fault listed below, or to repair a fault caused by incorrect use or installation a charge will be made, even if the appliance is under guarantee. Before contacting your local Service Force Centre, check the following points: Symptom Solution No power to the appliance... -
Page 11: Service And Spare Parts
Please note that a valid purchase receipt or guarantee documentation is required for in-guarantee service calls. CUSTOMER CARE DEPARTMENT For general enquiries concerning your Zanussi appliance or for further information on Zanussi products, please contact our Customer Care Department by letter or telephone at the address below or visit our website at www.zanussi.co.uk... -
Page 12: Guarantee Conditions
Standard guarantee conditions We, Zanussi, undertake that if within 24 months of the date of the purchase this Zanussi appliance or any part thereof is proved to be defective by reason only of faulty workmanship or materials, we will, at our option repair or replace the same FREE OF CHARGE for labour, materials or carriage on condition that: The appliance has been correctly installed and used only on the electricity supply stated on the rating plate. -
Page 13: Technical Specification
TECHNICAL SPECIFICATIONS POWER SUPPLY VOLTAGE AND FREQUENCY 220-240 V / 50 Hz TOTAL POWER ABSORBED 160 W AVERAGE DAILY UNITS ELECTRICITY * 0.879 kWh GROSS CAPACITY Fridge 173 l Freezer 110 l NET CAPACITY Fridge 170 l Freezer 92 l STAR RATING This figure is based on standard test results in accordance with European Standard EN 153. -
Page 14: Installation
INSTALLATION Important Warning It must be possible to disconnect the appliance from IF YOU ARE DISCARDING AN OLD APPLIANCE the mains power supply; the plug must therefore be THAT HAS A LOCK OR CATCH ON THE DOOR, easily accessible after installation. YOU MUST ENSURE THAT IT IS MADE UNUSABLE TO PREVENT YOUNG CHILDREN BEING TRAPPED INSIDE. -
Page 15: Electrical Connection
A replacement cover/carrier must be obtained from WARNING: THIS APPLIANCE MUST BE your local Zanussi Service Force Centre. EARTHED. This appliance complies with the E.E.C. Directive The manufacturer declines any liability should No. -
Page 16: Door Reversal
Instructions for totally built-in appliances Door reversal The appliance is supplied with the right or left door opening. To change the opening direction of the doors proceed as in the following instructions before installing it. 1. Unscrew the upper pin and remove the spacer 2. - Page 17 Fit the appliance in the niche by making sure that it stands against the interior surface of the unit on the side where the door hinges of the appliances are fitted. Insert the appliance until the upper strip butts up against the unit (1) and make sure that the lower hinge is in line with the surface of the unit (2).
- Page 18 Place guide (Ha) on the inside part of the furniture ca. 50 mm door, up and down as shown in the figure and mark 90° the position of external holes. After having drilled holes, fix the guide with the screws supplied. 90°...
- Page 19 Fix cover (Hd) on guide (Hb) until it clips into place. PR167/1 If the appliance is fixed to the side of the kitchen unit, simply slacken the screws in fixing brackets (D), move the brackets as shown in the figure and re- tighten the screws.
- Page 20 © Electrolux plc 2006...
- Page 21 This file has been downloaded from: www.UsersManualGuide.com User Manual and User Guide for many equipments like mobile phones, photo cameras, monther board, monitors, software, tv, dvd, and othes.. Manual users, user manuals, user guide manual, owners manual, instruction manual, manual owner, manual owner's, manual guide, manual operation, operating manual, user's manual, operating instructions, manual operators, manual operator, manual product, documentation manual, user maintenance, brochure, user reference, pdf manual...
Need help?
Do you have a question about the ZI 918/12 KA and is the answer not in the manual?
Questions and answers