Advertisement
Quick Links
Advertisement

Related Manuals for Rasonic ROV-980


Summary of Contents for Rasonic ROV-980
- Page 1 ROV-980 READY COOK BUILT-IN OVEN...
- Page 2 Dear Customer, We take offering quality products more than your expectation as goal, offers you the products produced in modern facilities carefully and particularly tested for quality. Your manual is prepared in order to help you to use your appliance that is manufactured by the most recent technology, with confidence and maximum efficiency.
- Page 3 Contents 1- Presentation and size of product 2- Warnings 3- Preparation for installation and use 4- Using the oven 5- Cleaning and maintenance of your product 6- Service and Transport...
-
Page 4: Part 1: Presentation And Size Of Product
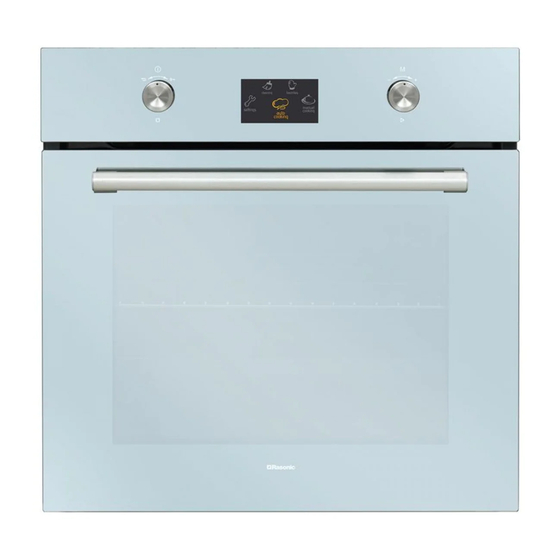
PART 1: PRESENTATION AND SIZE OF PRODUCT Built-In Oven LIST OF COMPONENTS : 1- Control panel 2- Handle 8- Wire Grill 3- Oven Door 9- Racks 4- Child Lock 10- Oven Light 5- Tray 11- Turbo Heating Element(behind the plate) 6- Lower Heating Element (behind the plate) 12- Fan (behind the plate) 7- Upper Heating Element (behind the plate) - Page 5 PART 2 SAFETY WARNINGS READ THESE INSTRUCTIONS CAREFULLY AND COMPLETELY BEFORE USING YOUR APPLIANCE, AND KEEP IT IN A CONVENIENT PLACE FOR REFERENCE WHEN NECESSARY. THIS MANUAL IS PREPARED FOR MORE THAN ONE MODEL IN COMMON. YOUR APPLIANCE MAY NOT HAVE SOME OF THE FEATURES THAT ARE EXPLAINED IN THIS MANUAL. PAY ATTENTION TO THE EXPRESSIONS THAT HAVE FIGURES, WHILE YOU ARE READING THE OPERATING MANUAL.
- Page 6 - During use, the appliance becomes hot. Care should be taken to avoid touching heating elements inside the oven. - During use, handles held for short periods in normal use can get hot. - Do not use harsh abrasive cleaners or sharp metal scrapers to clean the oven door glass and other surface since they can scratch the surface, which may result in shattering of the...
- Page 7 - Ensure that the supply cord is not wedged during the installation. If the supply cord is damaged, it must be replaced by the manufacturer, its service agent or similarly qualified persons in order to prevent a hazard. - While the oven door is open, do not let children climb on the door or sit on it. Installation Warnings - Do not operate the appliance before it is fully installed.
-
Page 8: Part 3: Preparation For Installation And Use
PART 3: PREPARATION FOR INSTALLATION AND USE Manufactured with best quality parts and materials, this modern, functional and practical oven will meet your needs in all respects. Make sure to read the manual to obtain successful results and not to experience any problems in the future. The information given below contain rules that are necessary for correct positioning and service operations. - Page 9 3.2. INSTALLATION OF BUILT-IN OVEN min. 10 mm min. 5 mm min. 5 mm Worktop min. Built-in min. 25 mm 50 mm Built-in oven Insert the oven into the cabinet by pushing it If the oven is installed under a hob, the forward.
- Page 10 The dimensions and material of the cabinet in which the oven will be installed must be correct and resistant to increases in temperature. In a correct installation, contact with electrical or insulated parts must be prevented. Insulating parts need to be fitted in a way to ensure that they cannot be removed by using any kind of tool.
- Page 11 Defrost Function The oven's warning lights will be turned on, the fan starts operating. To use the defrost function, take your frozen food and place it in the oven on a shelf placed in the third slot from the bottom. It is recommended that you can place an oven tray under the defrosting food, to catch the water accumulated due to melting ice.
- Page 12 Pizza Function The oven's thermostat and warning lights will be turned on, the ring and lower heating elements and fan will start operating. Fan and lower heating function is ideal for baking food, such as pizza, equally in a short time. While the fan evenly disperses the heat of the oven, the lower heating element ensures the baking of food dough.
-
Page 13: Energy Saving
Double Grill and Fan Function The oven's thermostat and warning lights will be turned on, the grill and upper heating elements and fan will start operating. The function is used for faster grilling of thicker foods and for covering a larger surface area. Both the upper heating elements and grill will be energised along with the fan to ensure even cooking. - Page 14 4.1 Ready Cook Knob Controls RIGHT KNOB Push: Select/Start Cooking Turn Right: Menu Navigation/Increase Temperature Turn Left: Menu Navigation/Decrease Temperature...
- Page 15 4. USE OF YOUR PRODUCT Ready Cook’s menus, such as manual cooking, auto cooking, favorites, cleaning and settings are described as below. Manual cooking Every cooking setting can be set by the user in manual cooking mode. 7 different cooking functions, temperature, boost function, cooking duration and cooking end time can be selected.
- Page 16 4. USE OF YOUR PRODUCT Cooking duration; Cooking end time; -Can be changed by rotating right knob -Can be changed by rotating right knob to right/left. to right/left. -Can be selected by pushing right knob. -Can be selected by pushing right knob. NOTE: If cooking duration is set as 00:00, cooking continues until user stops manualy.
- Page 17 4. USE OF YOUR PRODUCT On the animation - Left knob is pushed to stop cooking - Right knob is pushed to start and continue cooking. - Temperature can be changed by rotating right knob to right / left -While any cooking function is activated, left knob is rotated left go to setting scre Auto Cooking: Pre determined recepies which are prepared by professional cooks are can be used by...
- Page 18 4. USE OF YOUR PRODUCT Food names; Food weigth; -Can be changed by rotating right knob -Can be changed by rotating right knob to right/left. to right/left. -Can be selected by pushing right knob. -Can be selected by pushing right knob Cooking end time;...
- Page 19 4. USE OF YOUR PRODUCT On the animation screen; -Left knob is pushed to stop cooking -Right knob is pushed to start and continue cooking. To stop cooking and go back to main menu, left knob is pushed, then left knob is rotated to left.
- Page 20 4. USE OF YOUR PRODUCT On the run/edit screen; Cooking end time; -By rotating right knob to right/left, run/ -Can be changed by rotating right knob to edit can be navigated. right/left. -Run can be selected by pushing right -Can be selected by pushing right knob. knob.
- Page 21 4. USE OF YOUR PRODUCT To edit any favorite, below listed steps should be followed Favorites; On the main menu; -Can be changed by rotating right knob to -Rotate right/left the right knob to right/left navigate between menus. push -Can be selected by pushing right knob. right knob to select menu -Information about settings of the selected favorite is displayed at the below list.
- Page 22 4. USE OF YOUR PRODUCT Oven shelf; Cooking duration; -Can be changed by rotating right knob to -Can be changed by rotating right knob right/left. to right/left. -Can be selected by pushing right knob. - -Can be selected by pushing right knob. To achive smae cooking performance at each cooking, oven shelf information is important.
- Page 23 To edit any favorite, below listed steps should be followed. On the main menu; On the function selection screen; -Rotate right/left the right knob to navigate Right knob is pushed to select Vapclean. between menus. -Push right knob to select cleaning menu. Cleaning end time;...
- Page 24 Settings: On the settings menu, date, time, screen brigthness, buzzer tone, language options can be set. On the main menu; -Rotate right/left the right knob to navigate between menus. -Push right knob to select settings menu. On the languages menu; On the brigthness menu;...
- Page 25 On the software version menu; Only software version is displayed as ated. information. - Buzzer tone can be set by pushing right knob.
- Page 26 Key Lock: Key lock is used for to avoid changing settings of the oven unintentionally. To activate or inactivate the key lock, left knob is rotated left for 3 seconds. When key lock is activated, only "ON/OFF" button can be activated, but other buttons are not.
- Page 27 5th rack 4th rack 3rd rack 2nd rack 1st rack Rotisserie skewer insertion hole lid skewer insertion hole skewer handle skewer tip Use of rotisserie accessories Pass the skewer through the chicken and lock the clamps, insert the tip of the skewer into the hole found at the rear panel of cavity and make sure that it completely leans on the frame and fits in motor shaft.
- Page 28 Telescopic rails WARNING- Fit the grid correctly into any correspondent rack in the oven cavity and push it to the end. Removal of catalitic panel Removal of wire shelf...
-
Page 29: Maintenance
PART 5: CLEANING AND MAINTENANCE OF YOUR OVEN 5.1. CLEANING Before starting to clean your oven, be sure that all control buttons are off and your appliance is cooled off. Unplug the appliance. Do not use cleaning materials containing particles that might scratch the enamelled and painted parts of your oven. -
Page 30: Part 6: Service And Transport
PART 6: SERVICE AND TRANSPORT 6.1. TROUBLESHOOTING If the oven does not operate : The oven may be plugged off, there has been a blackout. On models fitted with a timer, time may not be regulated. If the oven does not heat : The heat may be not adjusted with oven’s heater control switch. - Page 31 Brand Model ROV-980 Type of Oven ELECTRIC Rated Voltage 220-240 Rated Frequency Rated Power 3100 Energy consumption (electricity) - conventional kWh/cycle 0,98 Energy consumption (electricity) - fan forced kWh/cycle 0,87 Volume Dimension (W x H x D) 595 x 595 x 575...
- Page 32 The symbol on the product or on its packaging indicates that this product may not be treated as household waste. Instead it shall be handed over to the applicable collection point for the recycling of electrical and electronic equipment. By ensuring this product is disposed of correctly, you will help prevent potential negative consequences for the environment and human health, which could otherwise be caused by inappropriate waste handling of this...
- Page 33 KOWLOON, HONG KONG 電話 TEL: (852) 28612767 傳真 FAX : (852) 28656706 網址 WEBSITE: 電郵 EMAIL: shew@shunhinggroup.com www.rasonic.com 保養及維修 Maintenance and Repair Service: 信興電器服務中心有限公司 SHUN HING ELECTRIC SERVICE CENTRE LTD. 辦公室: 香港新界葵涌勝耀街 8 號信興中心 18 樓 OFFICE: 18/F SHUN HING CENTRE, 8 SHING YIU STREET, KWAI CHUNG, N.T., HONG KONG 電話...
Need help?
Do you have a question about the ROV-980 and is the answer not in the manual?
Questions and answers