Table of Contents
Advertisement
Quick Links
Advertisement
Table of Contents

Subscribe to Our Youtube Channel
Related Manuals for Philips Deluxe HD2145


Summary of Contents for Philips Deluxe HD2145
- Page 1 HD2145 User Manual...
-
Page 3: Table Of Contents
Contents 1 Important 4 Cleaning and Maintenance 21 Power failure backup Inner lid function Steam valve Electromagnetic elds Floater (EMF) Pressure regulator Interior 2 Your All-in-One cooker Exterior What’s in the box Accessories and inner pot 22 Product overview Control panel overview 5 Recycling 3 Using your All-in-One 6 Guarantee and service... -
Page 4: Important
Important they have been given supervision or instruction concerning use of the Read this safety leaflet carefully before appliance by a person you use the appliance and save it for responsible for their future reference. safety. Danger Children should be •... - Page 5 WARNING: Make sure Make sure the heating • • to avoid spillage on the element, the temperature power connector to avoid sensor, and the outside a potential hazard. of the inner pot are clean Always follow the and dry before you put •...
- Page 6 Do not place the inner • accessories or parts from pot directly over an open other manufacturers or fire to cook food. that Philips does not Do not use the inner pot • specifically recommend. If if it is deformed. you use such accessories Make sure that the •...
-
Page 7: Power Failure Backup Function
Electromagnetic elds Always unplug the • (EMF) appliance if not used for a longer period. This Philips appliance complies with all applicable standards and regulations If the appliance is • regarding exposure to electromagnetic used improperly or for fields. -
Page 8: Your All-In-One Cooker
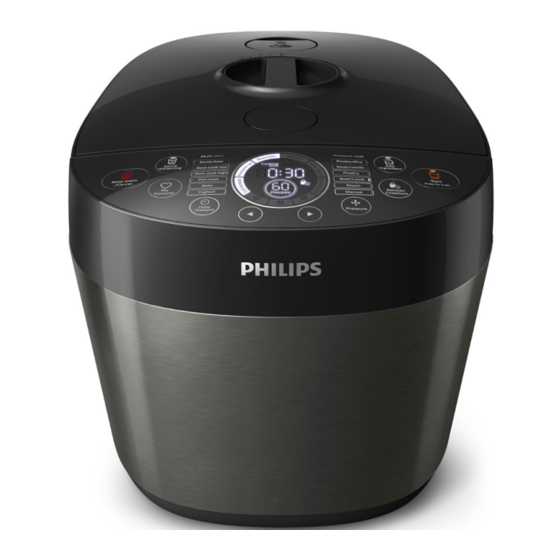
2 Your All-in-One cooker Congratulations on your purchase, and welcome to Philips! To fully benefit from the support that Philips offers, register your product at www.Philips.com/welcome. What’s in the box Main unit Steaming plate Inner Pot Rice&Soup ladle Measuring cup... -
Page 9: Product Overview
Product overview Top lid Water level indication Sealing ring Control panel Detachable inner lid Temperature controller Cap nuts Power socket Safety valve Lid open button Anti-block cap Lid lock/unlock handle Floating valve Steam valve Inner pot Pressure regulator... -
Page 10: Control Panel Overview
Control panel overview Cooking process indicator Pressure display Sauce thickening button Lid unlocked indicator Keep warm/Cancel button Pressure selection button My favourite button Reheat/child lock button Timer/Delayed button Start button Lid locked indicator Add ingredient button Menu selection button Display panel My favourite indicator... -
Page 11: Using Your All-In-One Cooker
3 Using your All- in-One cooker Before rst use Remove all packaging materials from the appliance. Take out all the accessories from the inner pot. Clean the parts of the All-in-One cooker thoroughly before using it for the first time (see chapter ‘Cleaning and Maintenance’). -
Page 12: Cooking Program
Cooking program Multi-cooking programs Cooking Default cooking Adjustable Cooking function temperature time cooking time 150°C 2 minutes 2-59 minutes Sauté/Sear* 70°C 8 hours 2-12 hours Slow cook low 90°C 6 hours 2-12 hours Slow cook high 90°C 6 hours 2-12 hours Pot roast 126°C 45 minutes... -
Page 13: Preparations Before Cooking
Press the lid open button to open Preparations before the top lid. cooking Warning • Make sure that the steam valve is not blocked and the detachable inner lid is properly installed. Note Take out the inner pot from the All- in-One cooker. -
Page 14: Pressure Cooking
Turn the handle clockwise to lock to choose one of the the top lid. pressure cooking functions. » The chosen cooking function lights up, the default pressure keeping time and pressure are displayed on the screen. Put the plug into the power socket. To set a different pressure keeping time, tap Timer/Delayed, Cooking time lights up. - Page 15 Tap and hold Start for 3 seconds, Tips the All-in-One cooker starts working • in the selected mode. to adjust the time by hours, tap to adjust the time by minutes. Tap and hold to fast forward or fast backward time. •...
-
Page 16: Adding Ingredient
Note • The pressure will be released automatically after the cooking completes. You can open the lid when it shows no pressure on the screen and the lid unlocked indicator blinks. • After the cooking process is finished, unplug the All-in-One cooker from the electrical outlet. -
Page 17: Multi-Cooking
to set the cooking time. Multi-cooking For the cooking time regulating range, refer to Chapter ‘Cooking Saucè/Sear, Slow cook low, Slow cook time regulating range‘. high, Pot roast, Bake, Yoghurt and Reheat are multi- cooking functions. Follow the steps in “Preparations before cooking”. -
Page 18: Source Thickening
When the cooking time has Tap Timer and tap to set the elapsed, the All-in-One cooker time. automatically switches to keep warm mode. » The Keep warm indicator on the working status ring lights up. Tap Reheat/Child lock for 3 seconds in standby mode, the All- in-One cooker will operate in reheat mode. -
Page 19: Preset Time For Delayed Cooking
Tap Start for 3 seconds to confirm Preset time for delayed the preset time. cooking » When preset time is elapsed, the All-in-One cooker starts working in the selected cooking mode automatically. Note • The preset timer is not available only in Sautè/Sear, Source thickening and Reheat. -
Page 20: Setting Up My Favourite Menu
Setting up My Favourite Note menu • Refer to “Set the cooking time” and “Set the cooking pressure” if you need to customize the program. The You can set any three menus as “My new program will be saved in the “My Favourite”. -
Page 21: Cleaning And Maintenance
4 Cleaning and Steam valve Maintenance • Press the recess of the steam valve and remove it from the top lid for cleaning. Note • Unplug the All-in-One cooker before starting to clean it. • Wait until the All-in-One cooker has cooled down sufficiently before cleaning Inner lid •... -
Page 22: Pressure Regulator
• • To assemble the floater, put the Hold the right handle of pressure thin end of the floater into the hole regulator and asseamble it back to on the lid (fig.a), and assemble the inner lid. the rubber ring around the floater (fig.b). -
Page 23: Recycling
6 Guarantee and service If you need service or information, or if you have a problem, visit the Philips website at www.philips.com or contact the Philips Customer Care Center in your country. You can find its phone number in the worldwide guarantee leaflet. -
Page 24: Speci Cations
Specifications Rated power output Rated capacity Diameter Model HD2145 910W - 1090W 6.0 L 22 cm Note • Unplug the All-in-One cooker if not used for a long time. -
Page 25: Troubleshooting
8 Troubleshooting If you encounter problems when using this appliance, check the following points before requesting service. If you cannot solve the problem, contact the Philips Consumer Care Center in your country. Problem Solution • The inner lid is not well assembled. Make sure the... - Page 26 Problem Solution E1, E2, E3, E8, • The All-in-One cooker has malfunction. Take the E10, E11, or E16 appliance to a Philips dealer or a service center displays on the authorised by Philips. screen.
- Page 28 © 2018 Koninklijke Philips N.V. All rights reserved. HD2145_UM_SG&MY_v2.0...
Need help?
Do you have a question about the Deluxe HD2145 and is the answer not in the manual?
Questions and answers