
Related Manuals for Kohler Numi+ K-3900T-2-0


Summary of Contents for Kohler Numi+ K-3900T-2-0
- Page 1 Installation Guide 安装说明 Numi Intelligent Toilet 纽密一体超感座便器 K-3900T-2 English page 2~22 中文页码 23~43 1195109-T01-F...
-
Page 2: Tools And Materials
Tools and Materials Assorted Drill with Assorted Bits Offset Screwdriver Scissors Screwdrivers Adjustable Wrench Knife Pencil Pliers Band Tape Plus: • Protective Material • Tape 1195109-T01-F Kohler Co. -
Page 3: Parts Bag Contents
CAUTION: Don't use any cement while installing the toilet. Heat expansion of the toilet may damage the feet of the toilet. Kohler will not be responsible for any damage because of using cement. WARNING: Risk of product damage. Do not throw into the toilet what is easy to block it, such as newspaper, paper pilch, sanitary towel. - Page 4 Carefully inspect the new toilet for damage. Consult the online users guide at kohler.com for more information. Kohler Co. reserves the right to make revisions in the design of products without notice. Confirm all parts below are included before beginning the installation.
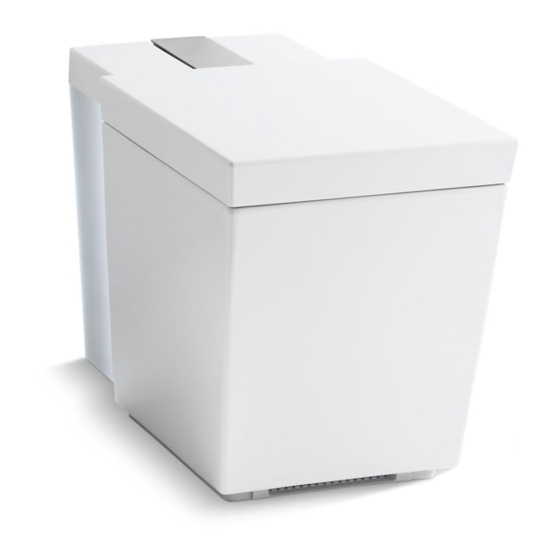
- Page 5 The sensor is located on the right side of the toilet. This sensor has a maximum range of 20cm. Keep this area free of obstructions. 1/2 ″ OD compression supply stop outlet is required unless an adapter is used. Kohler Co. 1195109-T01-F...
- Page 6 The toilet is equipped with a motion sensor ring actuator, located on the right side of the toilet. This sensor has a maximum range of 20 cm. Keep this area free of obstructions. 1/2 ″ OD compression supply stop outlet is required unless an adapter is used. 1195109-T01-F Kohler Co.
-
Page 7: Prepare The Site
NOTE: The supplied water supply hose is 18 ″ (46 cm) in length. The supplied hose must be used for this installation. Install the water supply and supply stop. Flush the water supply line into a pail or other container to remove all debris. Kohler Co. 1195109-T01-F... - Page 8 RCD, within 56 ″ (142 cm) of the back of the toilet. Install External Speaker Wires (optional) If external speakers will be used, install the speaker wires at this time with RCA plug installed at line-end (not presented). 1195109-T01-F Kohler Co.
- Page 9 Run the power cord into the docking station through the back cord opening in concealed type or the bottom cord opening in out-loading type. Position the docking station over the installation location, connect the docking station to the wall using two screws. Cut the tin(about 2mm) of the bare end of the wire. Kohler Co. 1195109-T01-F...
- Page 10 Snap the cover plate back into place. Remove the screw and tape from the cover plate and secure the cover plate with the screw to the docking station. 1195109-T01-F Kohler Co.
-
Page 11: Prepare The Installation Location
Directly under the screw holes on each side of the toilet, accurately mark the bottom edge of the base. The mark should intersect the lines labeled ″C″ and ″A ″ or ″B″ on each side of the template. Kohler Co. 1195109-T01-F... - Page 12 Measure dimension “C” on the template, starting at the inside line. Position a mounting block in the area indicated on the left side of the template. Align the outside Then move parallel 2mm to the inside. edge of the mounting blocks with the inside line. 1195109-T01-F Kohler Co.
- Page 13 At the locations where the centerline in the slots marked on the template and the pencil mark indicating the hole locations meet, drill a 13mm hole if anchors will be used. If anchors will be used, insert one of the supplied anchors in each of the holes. Remove the template. Kohler Co. 1195109-T01-F...
- Page 14 IMPORTANT! Confirm the clip is firmly holding the supply hose in place. The clip will be able to rotate freely with no significant resistance when properly installed. NOTE:Please use the water supply hose assemblies and tee valve components accompanying with new machine. The old hose assemblies and tee valve components shall not be used again. 1195109-T01-F Kohler Co.
- Page 15 NOTE: If there is a failure during start-up mode, follow the directions on the remote control. Once the start-up sequence has been completed flush the toilet using the manual buttons on the side of the toilet. Let the toilet fully refill and check for leaks. Kohler Co. 1195109-T01-F...
- Page 16 floor. It is difficult to achieve enough force with a standard screwdriver. There is a greater risk of stripping the screws when a drill is used. Thread each screw into the mounting blocks. Tighten the screws evenly to maintain the correct toilet position. Install the caps over the screw holes. 1195109-T01-F Kohler Co.
- Page 17 Eight AA batteries are loaded correctly according to the mark on the battery box. Tighten the screw on the battery box cover. Insert the battery box properly into the slot according to the mark on the battery box cover, and push the battery box until it is clamped. Kohler Co. 1195109-T01-F...
- Page 18 NOTE: The clip will easily snap into place on the supply hose inlet. If there is signi cant resistance, make sure the clip is not pushing the hose clip out of the way. Lower the cover and snap the clip into place on the supply hose inlet. 1195109-T01-F Kohler Co.
- Page 19 NOTE: If the language you desire does not appear on the screen, move the scroll bar down to see additional language options. Select the radio button for your desired language. The screen icons will immediately change. Select[home] to return to the main screen or [back] to return to the previous screen. Kohler Co. 1195109-T01-F...
- Page 20 Use the up and down indicators to adjust the hour and minute. Select the radio button for the [am] or [pm] option (12hr setting). Select[home] to return to the main screen or [back] to return to the previous screen. 1195109-T01-F Kohler Co.
- Page 21 Remote Control Setup - Connect the Remote Control NOTE: This setting can be used to connect a new remote control. Select[settings] . Select[maintenance] . Select[learn remote] . Follow the instructions on the remote screen. When complete select [yes]. Kohler Co. 1195109-T01-F...
-
Page 22: Complete The Installation
Complete the Installation Press the flush button on the remote control. Confirm the toilet flushes. Remove the protective film from the toilet and remote. Apply caulk around the base of the toilet following the caulk manufacturer’s instructions. 1195109-T01-F Kohler Co. - Page 23 • • • • • • Kohler Co. 1195109-T01-F...
- Page 24 套管 2个 地面法兰 其他附件 4.5x45DING 膨胀螺钉 2个 底进罩壳(选购件, 底装式进水用) 遥控器基座 遥控器 进水管 UX6x35膨胀管 2个 管夹 安装之前 危险:有电击的危险。在工作之前必须先行断开电源。 危险:有电击的危险。产品只能连接到正确接地的接地型插座,而且插座需由220V~,50Hz,10A 或以上的接地故障断路器(GFCI)或剩余电流漏电保护器(RCD)来加以保护。不得去除接地引 脚,也不得使用接地适配器。 注意:有人身伤害的危险。这款座便器重约55公斤(121磅)。抬升座便器需要两个人、并采用合 适的抬升方式。 注意:有人身伤害的危险。手不得插入电池盒插槽。 注意:存在有害气体的危险。如果新座便器不能即时安装,须临时在地面排污管开孔处覆盖一块抹布。 注意:有产品损坏或破损的危险。座便器不能安装在低于1 ° C的环境中,当温度低于0° C时,有可能冻 裂水箱而引起泄漏。 警告:在安装本座便器时切勿使用任何水泥。因为水泥的热膨胀可能使座便器的脚部挤破或损坏。科勒对 所有因为水泥安装而引起的座便器破裂恕不负责。 警告:提防损坏产品。请不要向便器内冲入新闻纸、纸尿垫、妇用卫生巾等容易堵塞的物品。请不要用重 力撞击陶瓷,以防止破损漏水。不要在0℃以下的水环境中使用。 注意:遵守当地关于水暖和电气方面的所有规范。 仔细检查新座便器有无损伤。 到科勒公司网站(Kohler.com)查阅在线用户指南,以获取更详尽的资料。 科勒公司保留修改产品设计的权利,恕不另行通知。 1195109-T01-F Kohler Co.
- Page 25 #10 x 1-1/2”螺钉 2个 套管 2个 蜡环 1个 地面法兰 1个 遥控器盒 遥控器基座 1个 遥控器 1个 遥控器基座电缆 1条 外接FM天线 1条 外接音源输入电缆 1条 4.5x45DING 膨胀螺钉 2个 UX6x35膨胀管 2个 说明书附件 用户手册 安装说明 快速使用指南 安装模板 其他附件 进水管 1条 管夹 1个 底进罩壳(选购件,底装式进水用) Kohler Co. 1195109-T01-F...
- Page 26 (2-1/5") 142cm(56" ) (4-1/16") 92cm 1/2" 进水 (36-1/4") (2-1/4") 接口 45cm 40cm (17-7/8") 15cm (15-5/8") (6") 电源插座 5cm(2" ) 31cm(12-1/4" ) 20cm(8" ) 侧视图 前视图 尺寸图 - 壁装式的电源与供水 注意:止水阀、电源插座及遥控器基座电源线的位置仅供参考。确保所有安装均遵守适用的规范与标准。 注意:止水阀不要装在座便器正后面,否则将影响后背板拆卸。 重要!不要在座便器背后安装有可能妨碍盖板开启的物件。所有装饰件应高于地面94cm(37英寸)以上。 遥控器基座配有5米(16英尺)长的电缆线。 产品的电源线长度约142cm(56”)。 这款座便器配有运动传感器,当它感测到前方物体运动时,便会自动打开盖板。传感器的感应距离可以通过遥 控器来调节。 这款座便器配有侧面传感器,位置在座便器的右侧。为避免误触发,请勿在传感器前方20cm范围内放置障碍物。 必须使用1/2”接口的止水阀,否则需用转换接头。 1195109-T01-F Kohler Co.
- Page 27 (12") 15cm (5-15/16") 104cm(41" ) - 完工墙面 168cm(66" ) 10cm (2-1/5"), (4-1/16") (1-1/2" ) 最小 45cm (2-1/4") (17-7/8") 40cm 92cm (15-5/8") (36-1/4") 31cm (12-1/4") 侧视图 前视图 尺寸图 - 底进式的电源与供水 注意:止水阀、电源插座、遥控器基座电源线的位置仅供参考。确保所有安装均遵守适用的规范与标准。 重要!不要在座便器背后安装有可能妨碍盖板开启的物件。所有装饰件应高于地面94cm(37”)以上。 遥控器基座配有5米(16英尺)长的电缆线。 产品的电源线长度约142cm(56”)。 这款座便器配有运动传感器,当它感测到前方物体运动时,便会自动打开盖板。传感器的感应距离可以通过遥 控器用户界面来调节。 这款座便器配有侧面传感器,位置在座便器的右侧。为避免误触发,请勿在传感器前方20cm范围内放置障碍物。 必须使用1/2”接口的止水阀,否则需用转换接头。 Kohler Co. 1195109-T01-F...
- Page 28 3cm(1-1/4" ) D 电源线和遥控器基座电缆线出口 仅用于底进式安装 ) 硅胶 止水阀凸出墙 面的尺寸不大 (1-5/8" ) (2-5/8" ) 于8cm 地面法兰 4cm(1-1/2" ) D. 供水软管出口 仅用于底进式安装 ) 安装现场的准备工作 警告:有电击的危险。安装或检修之前须先行断开电源。 警告:有电击的危险。产品只能连接到有可靠的接地型插座中,而且该插座要以220V~,50Hz, 10A或 以上的接地故障断路器(GFCI)或剩余电流漏电保护器(RCD)来加以保护。不得拆除接地引脚,也 不得使用接地适配器。 警告:有电击的危险。对于底进式安装的电源:产品只能连接到有可靠的接地、并安装有接地漏电断路 器(GFCI)或剩余电流漏电保护器(RCD)的专用电路中。 注意:止水阀不得装在座便器正后面,否则将影响后背板拆卸。 安装遥控器基座电缆线 如果墙面尚未装饰,装修时可在墙内预埋电线管以便穿基座电缆线(暗装式)。 如已经完成墙面装饰,请铺设电线槽将遥控器基座电缆线引到基座位置(明装式)。 安装供水管 重要!安装供水管时,请先连接座便器一端,再连接止水阀一端。 注意:产品所配的供水软管长度为46cm(18”),安装时必须使用产品所配的软管。 安装供水管和止水阀。 请将杂物清理干净,整理好现场。 1195109-T01-F Kohler Co.
- Page 29 安装现场的准备工作(续) 安装电源 注意:产品电源线长度约为142cm(56英寸)。 请安装220V~、50Hz、10A或以上的接地型插座,该插座要有接地故障断路器或剩余电流漏电保护器加以保护。 插座的位置应在座便器背面的142cm(56英寸)以内。 安装外置扬声器(按需要选择安装) 如需要使用外置扬声器,请采用带RCA端子的音频线(用户自购)。 Kohler Co. 1195109-T01-F...
- Page 30 孔 暗装式的电缆 线开孔 按住插头拔下 图1 螺丝 图2 橙色 蓝色 红色 白色 黑色 暗装式电 缆线入口 线束连接器 明装式电缆 线入口 遥控器基座电源线 图4 图3 安装遥控器基座 注意:遥控器基座配有5米(16”)长的电缆线。基座与座便器的距离不得超过这一长度。 将基座从包装盒中取出。 拆掉遥控器基座底部上的小螺丝。 用扁平工具沿着基座背面上部的空隙小心地起开面板。 小心拔出面板插头。 将面板放置一边。 暗装式电缆从背部开孔进线。 明装式电缆从底部开孔进线。 将基座定位在安装位置上,用基座作模板标记出螺钉的位置。 根据墙壁材质,在螺钉的安装位置上钻出合适的安装孔。 将基座内线束连接器上的五颗小螺丝旋松。. 根据明装或暗装方式将电缆线穿过底部或背部开孔。 将基座安放在安装位置,用两颗螺钉将基座固定到墙上。 将电缆线头顶端的焊锡(约2cm)剪去。 将电缆线线头按颜色穿进线束连接器小孔(如图3所示),并上紧每一颗螺丝。并将电缆线按图示位置固定到位。 取下基座上的保护膜。 1195109-T01-F Kohler Co.
- Page 31 安装遥控器基座(续) 将面板插头插上。 将面板紧扣在背板上。 旋紧底部螺丝。 Kohler Co. 1195109-T01-F...
- Page 32 仅适用于壁装式电源/水源的情况 底部螺钉孔 法兰中心线 将座便器放置在模板 的中心位置上 法兰 仅适用于贯穿地板 安装的电源/水源的情况 底部边 模板 缘线 胶带 俯视图 确定座便器的位置 重要!有损坏产品的危险。如果法兰中有T型螺栓,须将螺栓拆除。此项安装不需T型螺栓。 重要!由于座便器底部宽度尺寸存在差异,为使座便器居中安装,请按以下步骤操作 沿虚线将模板上与法兰位置相应的圆孔区域移除。 确定模板正确定位,将模板镂空的圆孔区域与法兰对中。 模板上的孔眼与法兰对准后,用胶带将模板固定到地板上。 确定座便器前端位置。将座便器前端与模板前端阴影区域对准。 确定座便器左右位置。左右移动座便器,使模板上外露阴影区域左右相等。 在底部螺钉孔的正下方沿陶瓷件边缘划出左右两侧的底座边缘线,这两条边缘线需与模板左右两侧上标注为 “C”、“A”或“B”的线条分别相交。 1195109-T01-F Kohler Co.
- Page 33 座便器边缘 底座边 左侧安 缘线 装线 俯视图 防护材料 确定固定块的位置 注意:座便器水箱里有少量防冻液,向前倾斜放置时,可能会有少量防冻液溢到地板上,请确保地板上有适当的 防护措施, 在座便器前端放置纸板等防护材料。 轻缓地向前倾斜座便器,直到座便器稳稳地靠在其前端表面上为止。 注意:虽然在模板上标有固定块的安装位置,由于座便器底部宽度尺寸存在差异,固定块的准确位置须由安装 者调整。 测量座便器左侧底座的实际宽度为“A”。 沿底座边缘线向内移动“A”的宽度,并在此处画一条“左侧安装线”。 测量座便器右侧底座的实际宽度为“B”。 沿底座边缘线向内移动“B”的宽度,并在此处画一条“右侧安装线”。 测量陶瓷内侧的宽度,标注为“C”。 重要!为避免安装时固定块与座便器内侧相干涉。两个固定块外边缘之间的距离应略小于尺寸“C”。 Kohler Co. 1195109-T01-F...
- Page 34 确定固定块的位置(续) 在模板的左侧放置一固定块,固定块的外缘与模板上的“左侧安装线”的内侧对齐,然后再向内侧平行移动2mm。 放置好固定块后,用铅笔在固定块的安装孔的中心做好标记。 在模板的右侧放置一固定块,固定块的外缘与模板上的“右侧安装线”的内侧对齐,然后再向内侧平行移动2mm。 放置好固定块后,用铅笔在固定块的安装孔的中心做好标记。 移去固定块。 在作好标记的位置上钻直径约为13mm的孔。 将膨胀管装入打好的孔中。 移去安装模板。 1195109-T01-F Kohler Co.
- Page 35 采用底进式安装时, 软管应竖直朝下 仅适用于壁装式电源/ 水源的情况 凸缘 供水管 管夹 膨胀螺钉 蜡环 仅适用于底进式安装 的电源/水源的情况 安装固定块与蜡环 在安装孔上方将固定块定位。 确保每个固定块有2个膨胀螺钉紧固。 在法兰盘上放置蜡环。 连接供水管到座便器 将供水管出水口连接到座便器进水口。 用管夹卡住供水管和进水口两边的凸缘,请确保卡紧。 注意:可能破损的危险。如果安装不正确,供水压力大时,易引起供水管脱落,而导致溢水的风险。 重要!请确认供水管与座便器进水口可靠连接,正确安装时,管夹可轻易转动。 注意:请使用随器具附带的新软管组件和角阀组件,旧软管组件和角阀组件不能使用。 Kohler Co. 1195109-T01-F...
- Page 36 外接扬声 器插口 外接FM天 线插孔 图中所示为使用 遥控器基座 壁装式电源/水 电缆线 源 时的安装方式 套管 装饰帽 FM Antenna 螺钉 Connection 标志线向上 安装座便器 定位座便器 小心地将座便器放置到位,确保座便器放置到位后不会受到供水管线和电源线的妨碍。 将供水管连接到止水阀。 将遥控器基座电缆线插头插入电缆线插孔,并确保插紧到位。 注意:标志线向上。 座便器内部有FM天线,通常情况下可以满意地接收FM广播。当安装环境接收效果较差时(如钢筋水泥建筑, 离广播发射塔较远或附近存在干扰源),可将附送的外接FM天线插入座便器背面的插孔中并展开,以提高 接收效果。 如果有外接喇叭,将喇叭线插入背部插孔(RCA插头)。 将遥控器放置在基座上。 连接电源。 打开止水阀。 注意:一旦连接电源后,座便器将自动进入启动模式。这一过程可能需要几分钟的时间。 注意:如果启动模式期间出现故障,请按照遥控器上的提示采取相应措施。 当启动模式结束后,可以用座便器侧面的手动按键进行冲洗。 1195109-T01-F Kohler Co.
- Page 37 安装座便器(续) 按下“冲水”键,向座便器缸体内注水,以检查有无泄漏。 固定座便器 把套管装入座便器两侧的底部螺钉孔。 将螺钉通过底部螺钉孔旋入固定块。 注意:由于此处操作靠近地面,普通螺丝刀难以提供足够大的锁紧力,请选用偏置螺丝刀紧固螺钉。 注意:在固定块上预钻孔时注意安全。 均匀的锁紧螺钉,确保座便器位置居中。 为螺钉孔盖上装饰帽。 Kohler Co. 1195109-T01-F...
- Page 38 1195109-T01-F Kohler Co.
- Page 39 Kohler Co. 1195109-T01-F...
- Page 40 翻盖 翻圈 关盖 繁体中文 系统维护 设置时间 Español 女性冲洗 臀部冲洗 暖风烘干 蓝牙设置 节电设置 Português 关于本机 用户设置 音乐 加热 灯光 主菜单 返回 主菜单 返回 主菜单 返回 用户 停止 设置 设置遥控器-语言 注意:如果遥控器电量不足,请将遥控器放置在基座上进行下面的操作步骤。 注意:系统默认语言为中文。如果所需要的为中文,请跳过此步骤。 更改屏显语言 选择“设置“ 选择“系统设置“ 选择“语言“ 注意:如果屏幕上未显示您所需要的语言,请向下拖动滑动条来查找更多语言选项。 选择您想要的语言。屏幕语言会立即相应更改。 选择“主菜单“来返回主画面,或是选择“返回“来返回到前一个画面。 1195109-T01-F Kohler Co.
- Page 41 用户设置 音乐 加热 灯光 用户 停止 设置 主菜单 返回 主菜单 返回 主菜单 返回 设置时间 12:34 am 小时制 小时制 10:51 主菜单 返回 设置遥控器-日期与时间 设置或更改日期 选择“设置” 选择“系统设置” 选择“设置日期” 使用上,下箭头来调节日,月和年 选择想要的日期格式 选择“主菜单”返回主画面,或是选择“返回“来返回到前一个画面。 设置或更改时间 选择“设置” 选择“系统设置” 选择“设置时间” 选择“12小时制”或“24小时制”选项 使用上,下箭头来调节小时与分钟 选择“上午”(am)或“下午”(pm)选项(12小时制) 选择“主菜单”返回主画面,或是选择“返回”来回到前一个画面 Kohler Co. 1195109-T01-F...
- Page 42 功能设置 诊断 键。 清洁设置 配对 翻盖 翻圈 关盖 系统维护 工厂菜单 女性冲洗 臀部冲洗 暖风烘干 蓝牙设置 数据复位 是 否 关于本机 关机 音乐 加热 灯光 用户 停止 设置 主菜单 返回 主菜单 返回 主菜单 返回 设置遥控器-建立与座便器的连接 注意:这项设置可以用来连接新的遥控器。 选择“设置“。 选择“系统维护“。 选择“配对“。 按照遥控器屏幕上的指示进行操作,完成后选择“是“。 1195109-T01-F Kohler Co.
- Page 43 12:34 am 主菜单 小冲 大冲 翻盖 翻圈 关盖 女性冲洗 臀部冲洗 暖风烘干 音乐 加热 灯光 用户 停止 设置 安装完成 按遥控器上的大冲或者小冲按键,确认座便器冲洗正常。 取下座便器和遥控器上的保护膜。 遵照填缝制造商的指示在座便器底座周围填缝。 Kohler Co. 1195109-T01-F...
Need help?
Do you have a question about the Numi+ K-3900T-2-0 and is the answer not in the manual?
Questions and answers