Table of Contents
Advertisement
Available languages
Available languages
Quick Links
Das Gerätetypenschild befi ndet sich an der Innenseite des Gerätes.
The appliance identifi cation card is located on the inside of the appliance.
Halten Sie die vollständige Typennummer bereit,
wenn Sie mit der Kundendienstabteilung Kontakt aufnehmen.
When contacting the service department, have the complete type number to hand.
Adressen und Telefonnummern der Kundendienstorganisation fi nden Sie auf der Garantiekarte.
You will fi nd the addresses and phone numbers of the service organisation on the guarantee card.
Anleitung
Ofen
Instructions for use
Oven
OVM406RVS
Advertisement
Chapters
Table of Contents

Subscribe to Our Youtube Channel
Related Manuals for Pelgrim OVM406RVS


Summary of Contents for Pelgrim OVM406RVS
- Page 1 Das Gerätetypenschild befi ndet sich an der Innenseite des Gerätes. The appliance identifi cation card is located on the inside of the appliance. OVM406RVS Anleitung Ofen Halten Sie die vollständige Typennummer bereit, wenn Sie mit der Kundendienstabteilung Kontakt aufnehmen. Instructions for use When contacting the service department, have the complete type number to hand.
- Page 2 Anleitung DE 3 - DE 26 Manual EN 3 - EN 26 Benutzte Piktogramme - Pictograms used Wissenswertes - Important information Tipp - Tip...
-
Page 3: Table Of Contents
INHALT Ihr ofen Einführung Bedienleiste Beschreibung Verwendung Erste verwendung Ofeneinstellungen Ofenmodi Timer Zusätzliche modi wählen Reinigung Den ofen reinigen Einschubschienen entfernen und reinigen Grillelement nach unten klappen Demontieren der ofentür Demontieren der ofenscheiben Aqua-clean-modus Ofenlampe auswechseln Probleme lösen Allgemeines Technische spezifikationen Ihr ofen und die umwelt Entsorgung des geräts und der verpackung DE 3... -
Page 4: Ihr Ofen
IHR OFEN Einführung Herzlichen Glückwunsch zum Kauf Ihres Pelgrim-Ofens. Bei der Entwicklung dieses Produkts stand der Gedanke der optimalen Benutzerfreundlichkeit im Mittelpunkt. Daher bietet der Ofen Ihnen eine umfangreiche Auswahl an Einstellungen, wodurch Sie jederzeit die passende Zubereitungsweise wählen können. -
Page 5: Bedienleiste
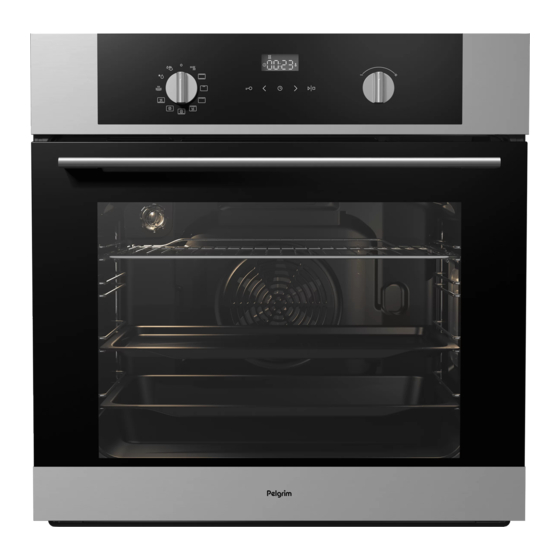
IHR OFEN Bedienleiste 1. Aus 2. Oberhitze + Unterhitze 3. Kleiner Grill 4. Großer Grill 5. Grill mit Lüfter 6. Oberhitze + Unterhitze + Lüfter 7. Unterhitze mit Lüfter 8. Geschirrwärmer 9. Auftauen 10. Aqua-Clean 11. Display (Zubereitungsinformationen und Timeruhr) 12. -
Page 6: Beschreibung
IHR OFEN Beschreibung Ebene 4 Ebene 3 Ebene 2 Ebene 1 1. Bedienleiste 2. Einschubebenen 3. Ofentür 4. Griff Das folgende Zubehör wird bei Ihrem Ofen mitgeliefert: • Tiefes Backblech. • Backblech. • Ofenrost. Anmerkung Beziehen Sie sich auf die Kochanleitung in dieser Anleitung, um das passende Zubehör für Ihre Speisen zu bestimmen. -
Page 7: Verwendung
VERWENDUNG Erste Verwendung Aktuelle Zeit einstellen Wenn Sie das Gerät das erste Mal an das Stromnetz anschließen, leuchtet das Display auf. Nach drei Sekunden beginnen das Uhrensymbol und „12:00“ auf dem Display zu blinken. 1. Drücken Sie auf die „Weniger/Mehr-Taste“, um die aktuelle Zeit Weniger/Mehr-Taste einzustellen. -
Page 8: Ofeneinstellungen
VERWENDUNG Anmerkungen • Die Temperatur kann während der Zubereitung geändert werden. • Die Garzeiten entsprechen ungefähren Schätzungen und können in Abhängigkeit von einigen Bedingungen variieren. • Für einige Speisen muss der Ofen erst vorgeheizt werden. • Wenn Sie Backpapier verwenden, muss dieses gegen hohe Temperaturen beständig sein. - Page 9 VERWENDUNG Grill + Lüfter Die Hitze wird durch die obersten Heizelemente erzeugt und durch den Lüfter verteilt. Dieser Modus kann auch zum Grillen von Fleisch und Fisch verwendet werden. Oberhitze + Unterhitze + Lüfter Die Kombination aus Oberhitze, Unterhitze und Lüfter sorgt für eine gleichmäßige Erhitzung und ist ideal zum Backen geeignet.
-
Page 10: Ofenmodi
VERWENDUNG Ofenmodi Oberhitze + Unterhitze Die Hitze wird durch die Heizelemente oben und unten im Gerät erzeugt. Diese Einstellung eignet sich zum traditionellen Backen und Braten. Ober- und Unterhitze • Das Backblech oder der Ofenrost wird in der Regel auf Ebene 2 eingeschoben. - Page 11 VERWENDUNG • Stellen Sie bei diesem Ofenmodus den „Temperaturschalter“ auf die Grilleinstellung. • Beobachten Sie den Garvorgang stets aufmerksam. Das Fleisch kann aufgrund der hohen Temperatur schnell anbrennen. • Heizen Sie den Ofen 5 Minuten vor. Grilleinstellung Großer Grill Die Hitze strömt aus dem obersten Element und dem Grillelement. Dies ist besonders geeignet für Aufläufe und gebackene Speisen, die eine schöne Kruste am Boden oder eine Bräunung benötigen.
- Page 12 VERWENDUNG Grill + Lüfter Die Hitze wird durch das oberste Heizelement erzeugt und durch den Lüfter verteilt. Dieser Modus kann auch zum Grillen von Fleisch, Fisch, Geflügel und Gemüse verwendet werden. Sie müssen die Lebensmittel nicht wenden und sie werden schön knusprig. Grill und Lüfter •...
- Page 13 VERWENDUNG • Schieben Sie das Blech auf Ebene 2 ein. • Temperaturmodus: 50 – 275 °C* • Vorheizen wird empfohlen. * Die von Ihnen verwendeten Glasschalen müssen für Temperaturen von 50 – 275 °C geeignet sein. Unterhitze + Lüfter Die Speise wird durch das unterste Heizelement erhitzt und der Lüfter verteilt die Hitze im Ofen.
-
Page 14: Timer
VERWENDUNG Geschirrwärmer Mit diesem Modus können Sie Ihr Essgeschirr vor dem Servieren vorwärmen. Auf diese Weise kühlt das Essen langsamer aus. Auftauen Beim Auftaumodus sorgt der Lüfter für eine Zirkulation der Luft. Geschirrwärmer Es sind keine Heizelemente eingeschaltet. Verwenden Sie diesen Modus für das langsame Auftauen von gefrorenen Speisen (Kuchen, Biskuit, Kekse, Brot, Brötchen und gefrorenes Obst). - Page 15 VERWENDUNG Eine Garzeit einstellen • Wählen Sie mit dem „Ofenfunktionsknopf“ eine Ofenfunktion aus und stellen Sie die Temperatur ein. • Drücken Sie auf die „Timer-Taste“, um die Funktion „Garzeit“ auszuwählen. • Auf dem Display leuchtet das Symbol für „Garzeit“ auf. •...
-
Page 16: Zusätzliche Modi Wählen
VERWENDUNG • Drücken Sie auf die „Start-/Stopp-Taste“, um den Garvorgang zu starten. Der Timer wartet ab, bis es Zeit ist, den Garvorgang zu starten. Das Temperatursymbol leuchtet nun auf. Der Ofen wird automatisch eingeschaltet (16:00 Uhr) und zum gewählten Zeitpunkt (18:00 Uhr) ausgeschaltet. - Page 17 VERWENDUNG Anmerkung: Wenn die Kindersicherung aktiviert ist und kein Timermodus eingestellt wurde (es wird also nur die Uhrzeit angezeigt), funktioniert der Ofen nicht. Wenn die Kindersicherung aktiviert wird, nachdem ein Timermodus eingestellt wurde, wird der Ofen normal funktionieren. Die Einstellungen können allerdings nicht mehr geändert werden. Wenn die Kindersicherung aktiviert ist, können Ofenmodi oder zusätzliche Modi nicht geändert werden.
-
Page 18: Reinigung
REINIGUNG Den Ofen reinigen Reinigen Sie den Ofen regelmäßig, um zu vermeiden, dass sich Essensreste ansammeln, besonders auf den Oberflächen und an der Innen- und Außenseite, der Tür und den Dichtungen. • Reinigen Sie die Oberflächen an der Außenseite mit einem weichen Tuch und warmer Seifenlauge. -
Page 19: Grillelement Nach Unten Klappen
REINIGUNG Grillelement nach unten klappen Das oberste Heizelement kann für die bessere Reinigung des Ofenraums nach unten geklappt werden. Entnehmen Sie zuerst den Ofenrost und/oder das Backblech und die Einschubschienen. Trennen Sie das Gerät vom Stromnetz. Das Heizelement muss kalt sein, da sonst ein Verbrennungsrisiko besteht. -
Page 20: Demontieren Der Ofenscheiben
REINIGUNG 1. Öffnen Sie zuerst vollständig die Tür (soweit das möglich ist). 2. Drehen Sie die Verriegelungshebel um 90° zurück. 3. Schließen Sie langsam die Tür, bis die Verriegelungshebel sich mit den Scharnieröffnungen in einer Linie befinden. Heben Sie die Tür in einem Winkel von 15° (gemessen an der Position der geschlossenen Tür) leicht an und ziehen Sie sie aus beiden Scharnieröffnungen des Geräts. -
Page 21: Aqua-Clean-Modus
REINIGUNG Um die Ofenscheibe zu wechseln, müssen Sie die umgekehrte Reihenfolge des Verfahrens befolgen. Die Markierungen (Halbkreise) auf der Tür und der Ofenscheibe müssen überlappen. Aqua-Clean-Modus Mithilfe des Aqua-Clean-Modus und einem feuchten Tuch können Sie einfach Fett und Schmutz von den Ofenwänden entfernen. Den Aqua-Clean-Modus verwenden Verwenden Sie das Reinigungsprogramm nur, wenn der Ofen kalt ist. -
Page 22: Ofenlampe Auswechseln
REINIGUNG Ofenlampe auswechseln Die Lampe (E14, 230-240 V, 25 W, 300 °C) ist ein Gebrauchsgegenstand und fällt daher nicht unter den Garantieanspruch. Trennen Sie das Gerät vom Stromnetz, indem Sie den Stecker aus der Steckdose ziehen oder die Sicherung im Zählerkasten ausschalten. Lampe in der Rückwand 1. -
Page 23: Probleme Lösen
PROBLEME LÖSEN Allgemeines Falls Sie Probleme mit Ihrem Ofen haben, probieren Sie die nachfolgenden Lösungen aus. Möglicherweise sparen Sie sich so die Zeit und Mühe eines unnötigen Anrufs beim Kundendienst. Das Essen wird nicht zubereitet. • Überprüfen Sie, ob der Timer eingestellt ist und auf die „Start-Taste“ gedrückt worden ist. - Page 24 Wenn eine Wartungsmaßnahme durchgeführt werden muss, ziehen Sie den Stecker aus der Steckdose und nehmen Sie bitte Kontakt mit dem Kundendienst von Pelgrim auf. Halten Sie die folgenden Informationen bei Ihrem Anruf griffbereit: • Die Modell- und Seriennummer (angegeben an der Innenseite der Ofentür).
-
Page 25: Technische Spezifikationen
TECHNISCHE SPEZIFIKATIONEN Modell OVM406 Stromquelle 230 V ~ 50 Hz Energieverbrauch Maximale Leistung 2900 W Grillmodus (klein) 1600 W Grillmodus (groß) 2700 W Unterhitze 1000 W Oberhitze 1100 W Kühlmethode Motorbetriebener Kühllüfter Abmessungen Abmessungen Gerät: B 595 x H 595 x T 568 mm Abmessungen bei Einbau: B 560 x H 560 x T 550 mm Volumen... -
Page 26: Ihr Ofen Und Die Umwelt
IHR OFEN UND DIE UMWELT Entsorgung des Geräts und der Verpackung Dieses Produkt wurde aus nachhaltigen Materialien hergestellt. Wenn das Gerät nicht mehr verwendet wird, muss es in verantwortungsbewusster Weise entsorgt werden. Informationen dazu erhalten Sie bei den zuständigen Behörden. Die Verpackung des Geräts ist recycelbar. - Page 27 CONTENTS Your oven Introduction Control panel Description Initial use Oven settings Oven functions Timer Selecting additional functions Cleaning Cleaning the oven Removing and cleaning the guide rails. Folding down the grill element Removing the oven door Removing the oven window Aqua clean function Replacing the oven lamp Solving problems...
-
Page 28: Your Oven
YOUR OVEN Introduction Congratulations on the purchase of this Pelgrim oven. This product is designed to offer optimum user-friendliness. The oven has a wide range of settings enabling you to select the correct cooking method every time. This manual shows how you can best use this oven. -
Page 29: Control Panel
YOUR OVEN Control panel 1. Off 2. Top heat + bottom heat 3. Small grill 4. Large grill 5. Grill with fan 6. Top heat + bottom heat + fan 7. Bottom heat with fan 8. Plate warmer 9. Defrosting 10. -
Page 30: Description
YOUR OVEN Description Level 4 Level 3 Level 2 Level 1 1. Control panel 2. Rack levels 3. Oven door 4. Handle The following accessories are supplied with your oven: • Deep baking tray. • Baking tray. • Oven rack. Note Consult the cooking guidelines in this user manual to select the correct accessory for your dishes. -
Page 31: Use
Initial use Set the current time When you connect the appliance to the mains electricity for the first time, the display lights up. After three seconds the clock symbol and ‘12:00’ will flash on the display. 1. Press the ‘less or more button’ to set the current time. Less and more You can set the values in the display faster by holding down the button... -
Page 32: Oven Settings
Notes • The temperature can be changed during cooking. • Cooking times are rough estimates and can vary depending on a number of conditions. • For certain dishes, the oven should be preheated. • If you use baking paper, this should be able to withstand high temperatures. - Page 33 Top heat + bottom heat + fan The combination of top heat, bottom heat and fan provides even heating and is ideal for baking. Bottom heat + fan The bottom element heats the dish and the heat is distributed by the fan. Plate warmer Use this function to warm plates and bowls before serving food.
-
Page 34: Oven Functions
Oven functions Top heat + bottom heat Heat is generated by the heating elements at the top and bottom of the appliance. This setting is suitable for traditional baking and roasting. Top and bottom heat • The baking tray or the grill rack is usually placed at level 2. •... - Page 35 • For this oven function turn the ‘temperature dial’ to the grill setting. • Keep an eye on the cooking process. At high temperatures, meat can burn quickly. • Preheat the oven for 5 minutes. Grill setting Large grill The heat comes from the top element and the grill element. This setting is particularly useful for dishes and baked food that require a real bottom crust or browning.
- Page 36 Grill + fan The fan distributes the heat generated from the top heating element. You can use this function for grilling meat, fish, poultry and vegetables. It gives food a crispy texture without it needing to be turned over. Grill and fan •...
- Page 37 Bottom heat + fan The bottom element heats the dish and the heat is distributed by the fan. This setting is used for baking yeasted pastry and preserving fruit and vegetables. Bottom heat and fan • Place the tray at level 2. •...
-
Page 38: Timer
Plate warmer Use this function to warm plates and bowls before serving food. This ensures that the food stays hotter for longer. Plate warmer Defrosting In the defrost function the fan circulates the air. No heat elements are switched on. Use this function for slow defrosting of frozen dishes (cakes, biscuits, cookies, bread, bread rolls and frozen fruit). - Page 39 Setting the ‘end time’ • In this setting you can set the time the oven should switch off. A cooking time first needs to be set. Ensure that the clock is set precisely to the current time. Setting a preparation time •...
-
Page 40: Selecting Additional Functions
• Press the ‘start/stop button’ to start the cooking process. The timer will delay the cooking process until the appropriate time. The pictogram will now light up. The oven will switch on automatically (16:00 hours) and switch off at the selected time (18:00 hours). - Page 41 When the child lock is activated, oven functions or additional functions cannot be changed. The cooking process can only be ended by turning the ‘oven function dial’ to ‘0’. The child lock remains activated even after the oven has been switched off.
-
Page 42: Cleaning
CLEANING Cleaning the oven Clean the oven regularly to prevent fat and leftover food from accumulating, especially on interior and exterior surfaces, the door and seal. • Clean exterior surfaces with a soft cloth and soapy warm water. Wipe afterwards with a clean, damp cloth and dry the surfaces. •... -
Page 43: Folding Down The Grill Element
CLEANING Folding down the grill element The uppermost grill element can be folded downwards to enable easier cleaning of the oven space. First remove the oven rack and/or the baking tray and the guide rails. Disconnect the appliance from the power mains. The heater must be cool;... -
Page 44: Removing The Oven Door
CLEANING Removing the oven door Keep your fingers away from the hinges of the oven door. The hinges are spring loaded and can cause injury if they spring back. Make sure that the hinge latches are applied correctly to lock the hinges. -
Page 45: Aqua Clean Function
CLEANING 2. Grasp the glass at the bottom and gently lift this upwards to remove it from the support. 3. The inner third glass (depending on the model) can be removed by lifting this carefully and removing it. Also remove the rubber seals around the glass. -
Page 46: Replacing The Oven Lamp
CLEANING Replacing the oven lamp The lamp (E14, 230-240 V, 25 W, 300 °C) is a consumer item and therefore does not fall under the guarantee. Cut the power to the appliance by removing the plug from the socket or switching off the fuse in the fuse box! Rear wall lamp 1. -
Page 47: Solving Problems
SOLVING PROBLEMS General Try the solutions below if you have problems with your oven. You could save yourself the time and effort of an unnecessary phone call to customer services. The food is not cooked • Check whether the timer has been set and you have pressed the ‘start button’. - Page 48 Repairs may only be performed by a qualified service technician. If maintenance is required, remove the plug from the socket and contact Pelgrim customer services. Have the following information to hand when you call: • The model number and serial number (stated on the inside of the oven door) •...
-
Page 49: Technical Specifications
TECHNICAL SPECIFICATIONS Model OVM406 Power source 230 V ~ 50 Hz Energy consumption Maximum power 2900 W Grill function (small) 1600 W Grill function (large) 2700 W Bottom heat 1000 W Top heat 1100 W Cooling method Motor cooling fan Dimensions Appliance dimensions: W 595 x H 595 x D 568 mm... -
Page 50: Your Oven And The Environment
YOUR OVEN AND THE ENVIRONMENT Disposal of the appliance and packaging This product is made from sustainable materials. However, the appliance must be disposed of responsibly at the end of its useful life. The government can provide you with information about this. The appliance packaging is recyclable.
Need help?
Do you have a question about the OVM406RVS and is the answer not in the manual?
Questions and answers