Table of Contents
Advertisement
Quick Links
Advertisement
Table of Contents

Subscribe to Our Youtube Channel
Related Manuals for Pelgrim OVM326RVS


Summary of Contents for Pelgrim OVM326RVS
- Page 1 OVM326RVS Instructions for use Oven...
- Page 2 Instructions for use EN 3 - EN 19 Pictograms used Important information EN 2...
-
Page 3: Table Of Contents
TABLE OF CONTENTS Your oven Introduction Control panel Description Guide rails/Telescopic guide rails Accessories Operation Initial use Controlling the appliance Oven functions Maintenance Cleaning the appliance Removing and cleaning the guide rails Removal and installation of the oven door Removal and installation of the oven door glass Aqua Clean function Replacing the oven lamp Solving problems... -
Page 4: Your Oven
YOUR OVEN Introduction Congratulations on the purchase of this Pelgrim oven. This product is designed to offer optimum user-friendliness. The oven has a wide range of settings enabling you to select the correct cooking method every time. This manual shows how you can best use this oven. -
Page 5: Control Panel
YOUR OVEN Control panel 1. Function knob (in ‘Off’ position) 2. Top heat + bottom heat 3. Small grill 4. Large grill 5. Grill with fan 6. Top heat + bottom heat + fan 7. Bottom heat with fan 8. Plate warmer 9. -
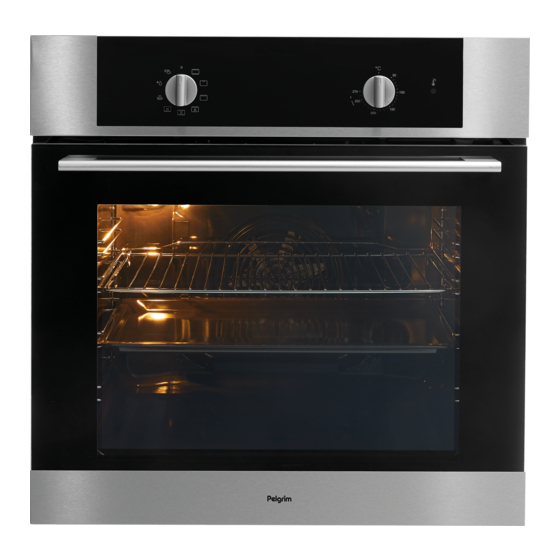
Page 6: Description
YOUR OVEN Description Level 4 Level 3 Level 2 Level 1 1. Control panel 2. Oven levels 3. Oven door 4. Door handle Guide rails/Telescopic guide rails • The oven has four or five guide rails (Level 1 to 4/5), depending on the model. -
Page 7: Accessories
YOUR OVEN Accessories Your appliance is accompanied by a range of accessories, depending on the model. Only use original accessories; they are specially suited to your appliance. Be sure that all the accessories that are being used are able to withstand the temperature settings of the chosen oven function. -
Page 8: Operation
OPERATION Initial use • Remove the packaging materials from the appliance. • Check the appliance for damage. Do not use the appliance if it is damaged, but contact your supplier. • Remove the protective film. • Clean the interior of the appliance and all the accessories with warm water and a dish detergent. -
Page 9: Oven Functions
OPERATION Oven functions Consult the table to select the desired function. Also consult the instructions for preparation on the dish packaging. Function Description Top + Bottom Heat • The dish is heated by heating elements at the top and bottom of the oven cavity. •... - Page 10 OPERATION Function Description Top Heat + Bottom Heat + Fan • The dish is heated by means of the upper and lower heating elements in combination with the fan. • The heat circulates around the dish. • This function can be used for baking pastry, for defrosting and to preserve fruit and vegetables.
-
Page 11: Maintenance
MAINTENANCE Cleaning the appliance Clean the oven regularly to prevent fat and leftover food from accumulating, especially on the surfaces of the interior and the exterior, the door and the seal. • Clean the exterior surfaces with a soft cloth and warm water with soap. -
Page 12: Removal And Installation Of The Oven Door
MAINTENANCE Removal and installation of the oven door Keep your fingers away from the hinges of the oven door. The hinges are spring loaded and can cause injury. Make sure that the hinge latches are applied correctly to lock the hinges. -
Page 13: Removal And Installation Of The Oven Door Glass
MAINTENANCE Removal and installation of the oven door glass The glass in the oven door can be cleaned from the inside, but you do need to remove the glass from the door to do this. First remove the oven door (see chapter ‘Removal and installation of the oven door’). 1. -
Page 14: Aqua Clean Function
MAINTENANCE Aqua Clean function With the Aqua Clean function and a damp cloth, you can easily remove grease and dirt from the oven walls. Using the Aqua Clean function Only use the cleaning programme if the oven is cold. If the oven is hot, it is more difficult to remove dirt and grease using this programme. -
Page 15: Replacing The Oven Lamp
MAINTENANCE Replacing the oven lamp The lamp in this household appliance is only suitable for illumination of this appliance. The lamp is not suitable for household room illumination. The light bulb is a consumer item and therefore not covered by warranty. -
Page 16: Solving Problems
SOLVING PROBLEMS General Try the solutions below if you have problems with your oven. You could save yourself the time and effort of an unnecessary phone call to customer services. The food is not cooked • Close the door properly. •... - Page 17 • Repairs may only be performed by a qualified service technician. If maintenance is required, remove the plug from the socket and contact Pelgrim customer services. Have the following information to hand when you call: • The model number and serial number (stated on the inside of the oven door) •...
-
Page 18: Your Oven And The Environment
YOUR OVEN AND THE ENVIRONMENT Disposal of the appliance and packaging This product is made from sustainable materials. However, the appliance must be disposed of responsibly at the end of its useful life. The government can provide you with information about this. The packaging of the appliance can be recycled. -
Page 19: Cooking Test
COOKING TEST Food tested in compliance with the EN 60350-1 standard OVM326 Baking Dish Equipment Guide (from Temperature Cooking time System the bottom) (°C) (min) Cookies - single level Shallow enamel-coated 140-150 * 25-40 baking tray Cookies - two levels Shallow enamel-coated 2, 3 140-150 *... - Page 20 The appliance rating label is located on the inside of the appliance. When contacting the service department, have the complete type number to hand. You will find the addresses and phone numbers of the service organisation on the guarantee card. *685352* 685352...
Need help?
Do you have a question about the OVM326RVS and is the answer not in the manual?
Questions and answers