Table of Contents

Advertisement

Quick Links

M70c
User Guide

Advertisement

Table of Contents
loading

Summary of Contents for Lenovo 11GL002ACA

  • Page 1 M70c User Guide...
  • Page 2 • Setup Guide First Edition (May 2020) © Copyright Lenovo 2020. LIMITED AND RESTRICTED RIGHTS NOTICE: If data or software is delivered pursuant to a General Services Administration “GSA” contract, use, reproduction, or disclosure is subject to restrictions set forth in Contract No. GS-...
  • Page 3: Table Of Contents

    Update UEFI BIOS....Use Lenovo Vantage ....9 Recover from a BIOS update failure ..
  • Page 4 Self-help resources ... . . Certified information ..85 Call Lenovo ....Appendix E. Notices and Before you contact Lenovo .
  • Page 5: About This Documentation

    • Depending on the version of operating systems and programs, some user interface instructions might not be applicable to your computer. • Documentation content is subject to change without notice. Lenovo makes constant improvements on the documentation of your computer, including this User Guide. To get the latest documentation, go to: https://pcsupport.lenovo.com...
  • Page 6 M70c User Guide...
  • Page 7: Chapter 1. Meet Your Computer
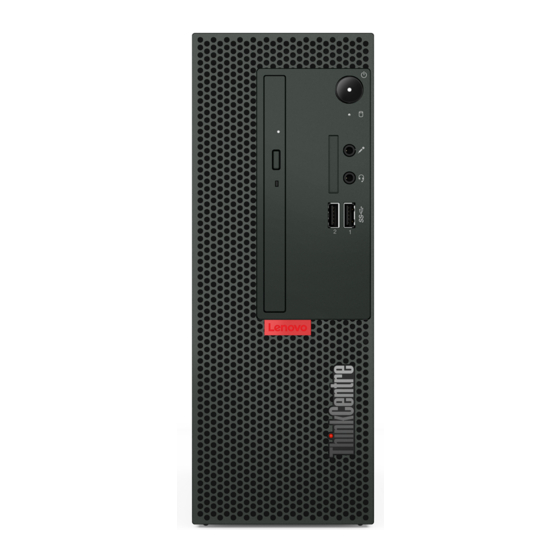
    • Blinking rapidly: The computer is entering sleep or hibernation mode. • Blinking slowly: The computer is in sleep mode. 5. Storage drive activity indicator This indicator is on when the storage drive is in use. © Copyright Lenovo 2020...
  • Page 8 Supported cards: • Secure Digital (SD) card • Secure Digital eXtended-Capacity (SDXC) UHS-1 card 6. SD-card slot* • Secure Digital High-Capacity (SDHC) UHS-1 card Note: Your computer does not support the content protection for recordable media (CPRM) feature for the SD card. 7.
  • Page 9: Rear

    Rear Send audio signals from the computer to external devices, such as powered stereo speakers, headphones, or multimedia keyboards. To connect a stereo system or other external recording device, connect a cable between the audio line-in connector of the device and the audio line-out connector of the computer. 1.
  • Page 10 Connect to a local area network (LAN). When the green indicator is on, the 10. Ethernet connector computer is connected to a LAN. When the yellow indicator blinks, data is being transmitted. Lock devices (such as the keyboard and the mouse) to your computer through a 11.
  • Page 11: Features And Specifications

    Features and specifications • Width: 100.0 mm (3.9 inches) Dimensions • Height: 270.0 mm (10.6 inches) • Depth: 303.5 mm (11.9 inches) Weight (without the package) Maximum configuration as shipped: 4.5 kg (9.9 lb) 1. Right-click the Start button to open the Start context menu. Hardware configuration 2.
  • Page 12: Statement On Usb Transfer Rate

    • Card reader* • Memory slots • M.2 solid-state drive slot Expansion • Optical drive bay* • PCI-Express x1 card slot • PCI-Express x16 graphics card slot • Storage drive bay • Bluetooth* Network features • Ethernet LAN • Wireless LAN* * for selected models Statement on USB transfer rate Depending on many factors such as the processing capability of the host and peripheral devices, file...
  • Page 13: Chapter 2. Get Started With Your Computer

    With a Microsoft account, you can: • Enjoy one-time signing in if you are using other Microsoft services, such as OneDrive, Skype, and Outlook. com. • Sync personalized settings across other Windows-based devices. © Copyright Lenovo 2020...
  • Page 14: Windows User Interface

    Windows user interface Change account settings, lock the computer, or sign out from the current account. 1. Account Open the Documents folder, a default folder to save your received files. 2. Documents Open the Pictures folder, a default folder to save your received pictures. 3.
  • Page 15: Connect To Networks

    Access Lenovo Vantage Open the Start menu and click Lenovo Vantage. You also can type Lenovo Vantage in the search box. To download the latest version of Lenovo Vantage, go to Microsoft Store and search by the app name.
  • Page 16: Use Multimedia

    • The available features vary depending on the computer model. • Lenovo Vantage makes periodic updates of the features to keep improving your experience with your computer. The description of features might be different from that on your actual user interface.
  • Page 17 • Show only on 2: Display the video output only on an external display. ® If you show programs using DirectDraw or Direct3D in full-screen mode, only the main display shows the video output. Change display settings 1. Right-click a blank area on the desktop and select Display settings. 2.
  • Page 18 M70c User Guide...
  • Page 19: Chapter 3. Explore Your Computer

    Open the Start menu, and then click Settings ➙ Devices ➙ Bluetooth & other devices. b. Turn on the Bluetooth switch. 2. Click Add Bluetooth or other device ➙ Bluetooth. 3. Select a Bluetooth device, and then follow the on-screen instructions. © Copyright Lenovo 2020...
  • Page 20: Use The Optical Drive (For Selected Models)

    Your Bluetooth device and computer will automatically connect the next time if the two devices are in range of each other with Bluetooth turned on. You can use Bluetooth for data transfer or remote control and communication. Use the optical drive (for selected models) If your computer has an optical drive, read the following information.
  • Page 21: Use A Smart Cable Clip

    Purchase accessories Lenovo has a number of hardware accessories and upgrades to help expand the capabilities of your computer. Options include memory modules, storage devices, network cards, power adapters, keyboards, mice, and more.
  • Page 22 M70c User Guide...
  • Page 23: Chapter 4. Secure Your Computer And Information

    Note: You are responsible for evaluating, selecting, and implementing the locking device and security feature. Lenovo makes no comments, judgments, or warranties about the function, quality, or performance of the locking device and security feature. You can purchase computer locks from Lenovo.
  • Page 24: Log In To Your Computer Securely

    Log in to your computer securely This section provides secure ways to log in to your computer with a password or your face. Use passwords Password types You can set the following passwords in UEFI (Unified Extensible Firmware Interface) BIOS (Basic Input/ Output System) to prevent unauthorized access to your computer.
  • Page 25: Use Software Security Solutions

    • If the supervisor password is forgotten, it might not be removed by clearing CMOS depending on your BIOS settings. • If the hard disk password is forgotten, Lenovo cannot remove the password or recover data from the storage drive.
  • Page 26: Use The Cover Presence Switch

    To erase all storage drive data: 1. Set a hard disk password for the storage drive you will recycle. See “Use passwords” on page 18. 2. Restart the computer. When the logo screen is displayed, press F1 or Fn+F1. 3. Select Security ➙ Hard Disk Password ➙ Security Erase HDD Data and press Enter. 4.
  • Page 27 To configure the Smart USB Protection function: 1. Restart the computer. When the logo screen is displayed, press F1 or Fn+F1. 2. Select Security ➙ Smart USB Protection and press Enter. 3. Select the desired setting and press Enter. 4. Press F10 or Fn+F10 to save the changes and exit. Chapter 4 Secure your computer and information...
  • Page 28 M70c User Guide...
  • Page 29: Chapter 5. Uefi Bios

    Change the display language of UEFI BIOS UEFI BIOS supports four display languages: English, French, Russian, and simplified Chinese. To change the display language of UEFI BIOS: 1. Select Main ➙ Language and press Enter. 2. Set the display language as desired. © Copyright Lenovo 2020...
  • Page 30: Set The System Date And Time

    Set the system date and time 1. Restart the computer. When the logo screen is displayed, press F1 or Fn+F1. 2. Select Main ➙ System Time & Date and press Enter. 3. Set the system date and time as desired. 4.
  • Page 31: Enable Or Disable The Automatic Power-On Feature

    5. Press F10 or Fn+F10 to save the changes and exit. Enable or disable the ErP LPS compliance mode Lenovo computers meet the eco-design requirements of the ErP Lot 3 regulation. For more information, go https://www.lenovo.com/us/en/compliance/eco-declaration You can enable the ErP LPS compliance mode to reduce the consumption of electricity when the computer is off or in sleep mode.
  • Page 32: Change The Its Performance Mode

    Download and install the latest UEFI BIOS update package by one of the following methods: • From Lenovo Vantage: Open Lenovo Vantage to check the available update packages. If the latest UEFI BIOS update package is available, follow the on-screen instructions to download and install the package.
  • Page 33: Recover From A Bios Update Failure

    2. Download the flash BIOS update driver for the operating system version or the ISO image version (used to create a flash update disc). Then, download the installation instructions for the flash BIOS update driver you have downloaded. 3. Print the installation instructions and follow the instructions to update the BIOS. Recover from a BIOS update failure 1.
  • Page 34 M70c User Guide...
  • Page 35: Chapter 6. Troubleshooting, Diagnostics, And Recovery

    3. See Chapter 6 “Troubleshooting, diagnostics, and recovery” on page 29 to resolve the problem you are experiencing, run the diagnostic program, and recover your operating system. 4. If the problem persists, contact Lenovo. See Chapter 8 “Help and support” on page 61. Troubleshooting Use the troubleshooting information to find solutions to problems that have definite symptoms.
  • Page 36: Startup Problems

    Startup problems Problem Solution • Ensure that the power cord is correctly connected to the rear of the computer and to a working electrical outlet. • If the computer has a secondary power switch on the rear of the The computer does not start up when you computer, ensure that it is switched on.
  • Page 37: Audio Problems

    Audio problems Problem Solution • If you are using powered external speakers that have an On/Off control, ensure that: – The On/Off control is set to the On position. – The speaker power cable is connected to a properly grounded, functional ac electrical outlet.
  • Page 38 Problem Solution • Connect the cable from the Ethernet connector to the RJ45 connector of the hub. • Enable the Ethernet LAN feature in UEFI BIOS. • Enable the Ethernet LAN adapter. 1. Go to Control Panel and view by large icons or small icons. 2.
  • Page 39 Problem Solution • Enable the Bluetooth feature in UEFI BIOS. • Enable all Bluetooth devices. 1. Right-click the Start button to open the Start context menu. 2. Click Device Manager. Type the administrator password or provide confirmation if prompted. 3. Expand Bluetooth to display all Bluetooth devices. Right-click each Bluetooth device, and then click Enable device.
  • Page 40: Performance Problems

    Performance problems Problem Solution Note: Depending on the volume of the storage drives and amount of data stored on the storage drives, the disk-defragmentation process might take up to several hours. 1. Close any open programs and windows. 2. Open the Start menu. Excessive fragmented files exist on the 3.
  • Page 41: Storage Drive Problems

    Storage drive problems Problem Solution • Ensure that the signal cables and power cables for all the storage drives are connected correctly. • Ensure that the computer is configured correctly to support the storage drives. Some or all storage drives are missing from –...
  • Page 42: Serial Connector Problems

    Problem Solution • Disable any background programs, such as AntiVirus or Desktop The playback is slow or choppy. Themes. • Ensure that video resolution is less than 1152 x 864 pixels. • Ensure that the disc is in the drive with the shiny side of the disc facing down.
  • Page 43: Software Problems

    Lenovo diagnostic tools For information about Lenovo diagnostic tools, go to: https://pcsupport.lenovo.com/lenovodiagnosticsolutions Recovery This section introduces the recovery information of the Windows 10 operating system. Ensure that you read and follow the on-screen recovery instructions. The data on your computer might be deleted during the recovery process.
  • Page 44: Use Advanced Options

    Windows recovery programs are damaged. If you did not create a recovery USB drive as a precautionary measure, you can contact Lenovo Customer Support Center and purchase one from Lenovo. For a list of the Lenovo Support phone numbers for your country or region, go to: https://pcsupport.lenovo.com/supportphonelist Create a recovery USB drive Attention: The creation process deletes anything stored on the USB drive.
  • Page 45: Update The Device Driver

    Download and install the latest driver by one of the following methods: • From Lenovo Vantage: Open Lenovo Vantage to check the available update packages. If the latest UEFI BIOS update package is available, follow the on-screen instructions to download and install the package.
  • Page 46 M70c User Guide...
  • Page 47: Chapter 7. Cru Replacement

    If you intend on installing the CRU, Lenovo will ship the CRU to you. CRU information and replacement instructions are shipped with your product and are available from Lenovo at any time upon request. You might be required to return the defective part that is replaced by the CRU.
  • Page 48: Replace A Cru

    Replace a CRU Follow the replacement procedure to replace a CRU. Vertical stand Prerequisite Before you start, read Appendix A “Important safety information” on page 65 and print the following instructions. Replacement procedure 1. Remove any media from the drives and turn off all connected devices and the computer. 2.
  • Page 49: Computer Cover

    4. Install the vertical stand. 5. Reconnect the power cord and all disconnected cables to the computer. Computer cover Prerequisite Before you start, read Appendix A “Important safety information” on page 65 and print the following instructions. Before you open the computer cover, turn off the computer and wait several minutes until the computer is cool.
  • Page 50: Front Bezel

    6. Remove the computer cover. 7. Install the computer cover. 8. Place the computer in an upright position. 9. Reinstall all the removed parts. Then, reconnect the power cord and all disconnected cables to the computer. Note: If a locking device is available, use it to lock the computer. Front bezel Prerequisite Before you start, read Appendix A “Important safety information”...
  • Page 51: Pci-Express Card

    Replacement procedure 1. Remove the computer cover. See “Computer cover” on page 43. 2. Remove the front bezel. 3. Install the front bezel. 4. Reinstall all the removed parts. Then, reconnect the power cord and all disconnected cables to the computer.
  • Page 52 Replacement procedure 1. Remove the computer cover. See “Computer cover” on page 43. 2. Replace the PCI-Express card according to your model: • For computers with a pre-assembled PCI-Express connector cable, do the following: a. Disconnect the PCI-Express connector cable. b.
  • Page 53: Optical Drive

    a. Remove the PCI-Express card. b. Install the PCI-Express card. 3. Reinstall all the removed parts. Then, reconnect the power cord and all disconnected cables to the computer. Optical drive Prerequisite Before you start, read Appendix A “Important safety information” on page 65 and print the following instructions.
  • Page 54 4. Remove the optical drive. 5. Remove the optical drive bracket. 6. Install the optical drive bracket. M70c User Guide...
  • Page 55: Hard Disk Drive

    7. Install the optical drive. 8. Connect the signal and power cable to the new optical drive. 9. Reinstall all the removed parts. Then, reconnect the power cord and all disconnected cables to the computer. Hard disk drive Prerequisite Before you start, read Appendix A “Important safety information” on page 65 and print the following instructions.
  • Page 56 a. Remove the screw that secures the hard disk drive bracket. b. Remove the 3.5-inch hard disk drive and the bracket. c. Remove the 3.5-inch hard disk drive from the bracket. M70c User Guide...
  • Page 57 d. Install the 3.5-inch hard disk drive into the bracket. e. Install the 3.5-inch hard disk drive and the bracket. f. Install the screw to secure the bracket. Chapter 7 CRU replacement...
  • Page 58 • For computers with the 2.5-inch hard disk drive, do the following: a. Remove the screw that secures the hard disk drive bracket. b. Remove the 2.5-inch hard disk drive and the bracket. M70c User Guide...
  • Page 59 c. Remove the 2.5-inch hard disk drive from the bracket. d. Install the 2.5-inch hard disk drive into the bracket. e. Install the 2.5-inch hard disk drive and the bracket. Chapter 7 CRU replacement...
  • Page 60: Memory Module

    f. Install the screw to secure the bracket. 6. Connect the signal cable and the power cable to the hard disk drive. 7. Reinstall all the removed parts. Then, reconnect the power cord and all disconnected cables to the computer. Memory module Prerequisite Before you start, read Appendix A “Important safety information”...
  • Page 61: Coin-Cell Battery

    2. Remove the front bezel. See “Front bezel” on page 44. 3. Remove the optical drive. See “Optical drive” on page 47. 4. Remove the hard disk drive. See “Hard disk drive” on page 49. 5. Remove a memory module. 6.
  • Page 62 Your computer has a special type of memory that maintains the date, time, and settings for built-in features, such as parallel connector assignments (configurations). A coin-cell battery keeps this information active when you turn off the computer. The coin-cell battery normally requires no charging or maintenance throughout its life; however, no coin-cell battery lasts forever.
  • Page 63: M.2 Solid-State Drive

    • Do not attempt to replace the Optane memory in the M.2 solid-state drive slot. Replacement of the Optane memory must be done by a Lenovo-authorized repair facility or technician. • The internal storage drive is sensitive. Inappropriate handling might cause damage and permanent loss of data.
  • Page 64 a. Remove the M.2 solid-state drive. b. Install the M.2 solid-state drive. • For computers with the heat sink for the M.2 solid-state drive, do the following depending on the computer model: M70c User Guide...
  • Page 65 a. Remove the heat sink with the bracket. b. Remove the heat sink. c. Remove the M.2 solid-state drive. Chapter 7 CRU replacement...
  • Page 66 d. Install the M.2 solid-state drive. e. Install the heat sink. f. Install the heat sink with the bracket. 6. Reinstall all the removed parts. Then, reconnect the power cord and all disconnected cables to the computer. M70c User Guide...
  • Page 67: Chapter 8. Help And Support

    How to access? Use Lenovo Vantage to: • Configure device settings. • Download and install UEFI BIOS, drivers and firmware • Open the Start menu and click Lenovo Vantage. updates. • Use Windows Search. • Secure you computer from outside threats.
  • Page 68: Call Lenovo

    Call Lenovo If you have tried to correct the problem yourself and still need help, you can call Lenovo Customer Support Center. Before you contact Lenovo Prepare the following before you contact Lenovo: 1. Record the problem symptoms and details: •...
  • Page 69: Purchase Additional Services

    • Lenovo hardware repair - If the problem is determined to be caused by Lenovo hardware under warranty, trained service personnel are available to provide the applicable level of service. • Engineering change management - Occasionally, there might be changes that are required after a product has been sold.
  • Page 70 M70c User Guide...
  • Page 71: Appendix A. Important Safety Information

    Customer Support Center for further guidance. • Power cords, plugs, power adapters, extension cords, surge protectors, or power supplies that are cracked, broken, or damaged. © Copyright Lenovo 2020...
  • Page 72 Note: If you notice these conditions with a product (such as an extension cord) that is not manufactured for or by Lenovo, stop using that product until you can contact the product manufacturer for further instructions, or until you get a suitable replacement.
  • Page 73 Do not use them with any other products. For your safety, Lenovo provides a power cord with a grounded attachment plug to use with this product. To avoid electrical shock, always use the power cord and plug with a properly grounded outlet.
  • Page 74 If you intend to use your PC in a country or region that is different from your ordering location, please purchase an additional Lenovo power cord for the country or region where the PC will be used. Refer to the power cord guide provided in our Web site, , for details.
  • Page 75 Plugs and outlets DANGER If a receptacle (power outlet) that you intend to use with your computer equipment appears to be damaged or corroded, do not use the outlet until it is replaced by a qualified electrician. Do not bend or modify the plug. If the plug is damaged, contact the manufacturer to obtain a replacement.
  • Page 76 If the coin-cell battery is not a CRU, do not attempt to replace the coin-cell battery. Replacement of the battery must be done by a Lenovo-authorized repair facility or technician. The Lenovo-authorized repair facilities or technicians recycle Lenovo batteries according to local laws and regulations.
  • Page 77 computer, power adapter, and many accessories produce some heat during normal operation. Extended contact with the body could cause discomfort or, potentially, a skin burn. • Do not charge the battery or operate your computer, power adapter, or accessories near flammable materials or in explosive environments.
  • Page 78 DANGER Connect and disconnect cables as described in the following procedures when installing, moving, or opening covers on this product or attached devices. To connect: To disconnect: 1. Turn everything OFF. 1. Turn everything OFF. 2. First, attach all cables to devices. 2.
  • Page 79 Liquid crystal display (LCD) notice DANGER To avoid shock hazards: • Do not remove the covers. • Do not operate this product unless the stand is attached. • Do not connect or disconnect this product during an electrical storm. • The power cord plug must be connected to a properly wired and grounded power outlet. •...
  • Page 80 2 can be dangerous due to excessive sound pressure levels. If your Lenovo computer came with headphones or earphones in the package, as a set, the combination of the headphones or earphones and the computer already complies with the specifications of EN 50332-1. If different headphones or earphones are used, ensure that they comply with EN 50332-1 (Clause 6.5...
  • Page 81 For tips on how to minimize visual fatigue, please go to to visit https://www.lenovo.com/us/en/safecomp/ “Minimizing Visual Fatigue”. Tip-over hazard prevention notice The computer may cause harm to children if it is not located in an appropriate place. Follow the tips below to protect children from harm caused by the computer tipping over: •...
  • Page 82 Static electricity prevention Static electricity, although harmless to you, can seriously damage computer components and options. Improper handling of static-sensitive parts can damage the part. When you unpack an option or CRU, do not open the static-protective package containing the part until the instructions direct you to install it. When you handle options or CRUs, or perform any work inside the computer, take the following precautions to avoid static-electricity damage: •...
  • Page 83 The cause of a problem might be change in hardware, change in software, or any other actions that might have taken place. A log book can help you or a Lenovo technician determine the cause of a problem. • Back up your data on the storage drive regularly. You can restore the storage drive from a backup.
  • Page 84 Clean the computer surface: Wipe it with a lint-free cloth dampened in mild soap and water. Avoid applying liquids directly to the surface. Clean the keyboard: Wipe the keys one by one with a lint-free cloth dampened in mild soap and water. If you wipe several keys at a time, the cloth might hook onto an adjacent key and possibly damage it.
  • Page 85: Appendix B. Accessibility And Ergonomic Information

    This chapter provides information about accessibility and ergonomics. Accessibility information Lenovo is committed to providing users who have hearing, vision, and mobility limitations with greater access to information and technology. This section provides information about the ways these users can get the most out of their computer experience.
  • Page 86 keyboard with all the standard keys. You can select keys using the mouse or another pointing device, or you can tap to select the keys if your computer supports multi-touch screen. • High Contrast High Contrast is a feature that heightens the color contrast of some text and images on your screen. As a result, those items are more distinct and easier to identify.
  • Page 87 Your computer provides industry-standard connectors that enable you to connect assistive devices. Documentation in accessible formats Lenovo provides electronic documentation in accessible formats, such as properly tagged PDF files or HyperText Markup Language (HTML) files. Lenovo electronic documentation is developed to ensure that visually impaired users can read the documentation through a screen reader.
  • Page 88 Display: Position the display to maintain a comfortable viewing distance of 510 mm to 760 mm (20 inches to 30 inches). Avoid glare or reflections on the display from overhead lighting or outside sources of light. Keep the display screen clean and set the brightness to levels that enable you to see the screen clearly. Press the brightness control keys to adjust display brightness.
  • Page 89: Appendix C. Supplemental Information About The Ubuntu Operating System

    The LLW also is preinstalled on the computer. To access the LLW, go to the following directory: /usr/share/doc/lenovo-doc If you cannot view the LLW either from the Web site or from your computer, contact your local Lenovo office or reseller to obtain a printed version of the LLW.
  • Page 90 M70c User Guide...
  • Page 91: Appendix D. Compliance And Tco Certified Information

    The full text of the system EU declaration of conformity is available at: https://www.lenovo.com/us/en/compliance/eu-doc Lenovo cannot accept responsibility for any failure to satisfy the protection requirements resulting from a non-recommended modification of the product, including the installation of option cards from other manufacturers.
  • Page 92 Lenovo encourages owners of information technology (IT) equipment to responsibly recycle their equipment when it is no longer needed. Lenovo offers a variety of programs and services to assist equipment owners in recycling their IT products. For information about recycling Lenovo products, go to: https://www.lenovo.com/us/en/compliance/recycling...
  • Page 93 Collect and recycle a disused Lenovo computer or monitor If you are a company employee and need to dispose of a Lenovo computer or monitor that is the property of the company, you must do so in accordance with the Law for Promotion of Effective Utilization of Resources.
  • Page 94 If the battery needs to be replaced, contact your place of purchase or contact Lenovo for service. If you need to dispose of a lithium battery, insulate it with vinyl tape, contact your place of purchase or a waste-disposal operator, and follow their instructions.
  • Page 95 Disposing of battery packs from Lenovo products Your Lenovo device might contain a lithium-ion battery pack or a nickel metal hydride battery pack. You can find details on the battery pack in the product documentation. If you need to dispose of a battery pack, insulate it with vinyl tape, contact Lenovo sales, service, or your place of purchase, or a waste-disposal operator, and follow their instructions.
  • Page 96 Ukraine RoHS India RoHS RoHS compliant as per E-Waste (Management) Rules. Mainland China RoHS M70c User Guide...
  • Page 97 Taiwan RoHS Electromagnetic emission notices Federal Communications Commission (FCC) Supplier’s Declaration of Conformity The following information refers to ThinkCentre M70c, machine types: 11GJ, 11GK, 11GL, and 11GM. This equipment has been tested and found to comply with the limits for a Class B digital device, pursuant to Part 15 of the FCC Rules.
  • Page 98 • Connect the equipment into an outlet on a circuit different from that to which the receiver is connected. • Consult an authorized dealer or service representative for help. Lenovo is not responsible for any radio or television interference caused by using other than recommended cables and connectors or by unauthorized changes or modifications to this equipment. Unauthorized changes or modifications could void the user’s authority to operate the equipment.
  • Page 99 Klasse B. Dieses Gerät ist berechtigt, in Übereinstimmung mit dem Deutschen EMVG das EG-Konformitätszeichen - CE - zu führen. Verantwortlich für die Konformitätserklärung nach Paragraf 5 des EMVG ist die Lenovo (Deutschland) GmbH, Meitnerstr. 9, D-70563 Stuttgart. Japan VCCI Class B compliance statement...
  • Page 100 This product is subject to the United States Export Administration Regulations (EAR) and has an Export Classification Control Number (ECCN) of 5A992.c. It can be re-exported except to any of the embargoed countries in the EAR E1 country list. Lenovo product service information for Taiwan Taiwan precautionary vision statement 警語:使用過度恐傷害視力...
  • Page 101 Lenovo encourages you to make efficient use of energy an integral part of your day-to-day operations. To help in this endeavor, Lenovo has preset a default power plan. To change the power plan, see “Set the power plan” on page 13.
  • Page 102 M70c User Guide...
  • Page 103: Appendix E. Notices And Trademarks

    Lenovo representative for information on the products and services currently available in your area. Any reference to a Lenovo product, program, or service is not intended to state or imply that only that Lenovo product, program, or service may be used. Any functionally equivalent product, program, or service that does not infringe any Lenovo intellectual property right may be used instead.
  • Page 104 Actual results may vary. Users of this document should verify the applicable data for their specific environment. This document is copyrighted by Lenovo and is not covered by any open source license, including any Linux agreement(s) which may accompany software included with this product. Lenovo may update this document at any time without notice.

This manual is also suitable for:

Thinkcentre m70c11gj0028us

Table of Contents