Table of Contents
Advertisement
Quick Links
Before returning this product call
1-800-4-D
Questions? See us on the World Wide Web at www.dewalt.com
INSTRUCTION MANUAL
GUIDE D'UTILISATION
MANUAL DE INSTRUCCIONES
DW744
Heavy-Duty 10" (254 mm) Job Site Table Saw
Banc de scie circulaire industrielle de chantier de 254 mm (10 po)
Sierra de banco para el lugar de trabajo de 254 mm (10 pulg.) de alta resistencia
IN MOST CASES, A D
WALT
E
IF YOU HAVE A SUGGESTION OR COMMENT, GIVE US A CALL.
IF YOU SHOULD EXPERIENCE A PROBLEM WITH YOUR
D
WALT PURCHASE,
E
call 1-800-4-D
WALT REPRESENTATIVE CAN RESOLVE
E
YOUR PROBLEM OVER THE PHONE.
YOUR FEEDBACK IS VITAL TO THE SUCCESS OF
D
WALT'S QUALITY IMPROVEMENT PROGRAM.
E
INSTRUCTIVO DE OPERACIÓN, CENTROS DE SERVICIO Y PÓLIZA
DE GARANTÍA. ADVERTENCIA: LÉASE ESTE INSTRUCTIVO ANTES
DE USAR EL PRODUCTO.
WALT
E
Advertisement
Table of Contents

Related Manuals for DeWalt DW744X


Summary of Contents for DeWalt DW744X
- Page 1 IF YOU HAVE A SUGGESTION OR COMMENT, GIVE US A CALL. YOUR FEEDBACK IS VITAL TO THE SUCCESS OF WALT’S QUALITY IMPROVEMENT PROGRAM. Questions? See us on the World Wide Web at www.dewalt.com INSTRUCTION MANUAL INSTRUCTIVO DE OPERACIÓN, CENTROS DE SERVICIO Y PÓLIZA DE GARANTÍA.
-
Page 3: Polarized Plugs
green-colored rigid ear, lug, and the like, extending from the adapter must be connected Defi nitions: Safety Guidelines to a permanent ground such as a properly grounded outlet box. Whenever the adapter is used, it must be held in place with a metal screw. DO NOT use a sheet metal screw. The definitions below describe the level of severity for each signal word. -
Page 4: Additional Safety Rules For Table Saws
• DO NOT FORCE TOOL. It will do the job better and be safer at the rate for which it was • NEVER STAND ON TOOL. Serious injury could occur if the tool is tipped or if the cutting designed. tool is unintentionally contacted. - Page 5 • NEVER CUT METALS, CEMENT BOARD OR MASONRY. Certain man-made • Kickback occurs when the saw blade binds in the cut and violently thrusts the materials have special instructions for cutting on table saws. Follow the manufacturer’s workpiece back toward the operator. recommendations at all times.
-
Page 6: Specifications
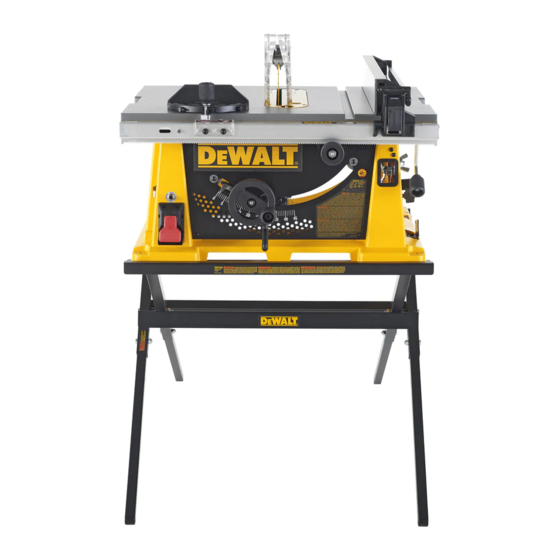
to the nearest authorized D WALT service center for repair. The riving knife must be Unpacking in alignment with the saw blade and the anti-kickback assembly must stop a kickback WARNING: To reduce the risk of once it has started. Check their action before ripping by pushing the wood under the FIG. - Page 7 FIGURE 3 FEATURES (Fig. 3, 4) A. Table G. Bevel lock lever Examine Figures 3 and 4 to become familiar with the saw and its various parts. The following B. Blade H. Circuit breaker button sections on assembly and adjustments will refer to these terms and you must know what and where the parts are.
- Page 8 3. Place the saw blade on to the spindle FIG. 5B 5. Tighten the riving knife lock knob. (XX) making sure the teeth of the WARNING: Before connecting the table saw to the power source or operating the blade (B) point down at the front of saw, always inspect the blade guard assembly and riving knife for proper alignment and the table.
- Page 9 FIG. 10 ADJUSTING THE RIP SCALE (FIG. 1, 10) FIG. 14 FIG. 15A FIG. 15B 1. Unlock the rail lock lever (E). 2. Set the blade at 0° bevel and move the fence in until touches the blade. 3. Lock the rail lock lever. 4.
- Page 10 Rip Fence Operation FIG. 16 On-Off Switch FIG. 20 WARNING: To reduce the risk of injury, be sure RAIL LOCK LEVER (FIG. 16) switch is in the OFF position before plugging The rail lock lever (E) locks the fence machine in. in place preventing movement during Lift the switch paddle (I) up to turn your saw ON and cutting.
-
Page 11: Bevel Stop And Pointer Adjustment
FIG. 22 BEVEL STOP AND POINTER ADJUSTMENT FIG. 25 (FIG. 3, 23, 24) 1. Raise the blade fully by rotating the blade height adjustment wheel clockwise until it stops. 2. Unlock the bevel lock lever (G) by pushing it up and to the right. - Page 12 WALT blade body thickness and kerf widths are Saw Blades thickness and the blade kerf, or cutting, width marked on the provided at www.dewalt.com. WARNING: Riving knifes must be matched to saw blade blade or on the blade packaging. The riving knife thickness If a different blade is used and the body thickness and dimensions in order to function effectively.
-
Page 13: Ripping Small Pieces
• Blade is tight. Guard Operating Feature (Fig. 31) FIG. 32 • Bevel angle and height lock knobs are tight. WARNING: To reduce the risk of injury, turn unit off • If ripping, ensure fence lock lever is tight and fence is and disconnect machine from power source before parallel to the blade. -
Page 14: Bevel Ripping
Push Block (Fig. 35, 36) Bevel Ripping FIG. 33 IMPORTANT: Only use the push block (A12) with the This operation is the same as ripping except the bevel angle narrow rip auxiliary fence, see Narrow Rip auxiliary Fence. is set to an angle other than zero degrees. The push block should be used once the material being cut WARNING: Before connecting the table saw to the power reaches the saw table top. - Page 15 4. Start the saw motor and allow the blade to come up to speed. Miter Gauge Operation 5. While using both hands to keep the workpiece against the face of the miter gauge, To set your miter gauge, loosen the lock handle and move the miter gauge to the desired and holding the workpiece flat against the table, slowly push the workpiece through the angle.
Need help?
Do you have a question about the DW744X and is the answer not in the manual?
Questions and answers