Table of Contents
Advertisement
Quick Links
Advertisement
Table of Contents

Related Manuals for Crock-Pot Express Crock XL CPE300


Summary of Contents for Crock-Pot Express Crock XL CPE300
- Page 1 Express Crock XL Multi-Cooker User Guide CPE300 CPE300_19EM1.indd 1 1/3/19 09:56...
- Page 2 CPE300_19EM1.indd 2 1/3/19 09:56...
-
Page 3: Table Of Contents
Contents Crock-Pot's Safety Precautions 1 - 2 Features of your Express Crock 3 - 4 Things to know about your Express Crock 5 - 6 Using your Express Crock Time Delay Function Pressure Cooking 9 - 12 Slow Cooking Cooking Guide... -
Page 4: Crock-Pot's Safety Precautions
Crock-Pot's Safety Precautions SAFETY PRECAUTIONS FOR YOUR MULTI • Children should be supervised to ensure that COOKER. they do not play with the appliance. • Do not plug in or switch on the unit without • The temperature of accessible surfaces may having the cooking pan inside the unit. - Page 5 Crock-Pot's Safety Precautions Crock-Pot is very safety conscious when • The appliance should be supplied through a designing and manufacturing consumer residual current device (RCD) having a rated products, but it is essential that the product residual operating current not exceeding 30 user also exercise care when using an electrical appliance.
-
Page 6: Features Of Your Express Crock
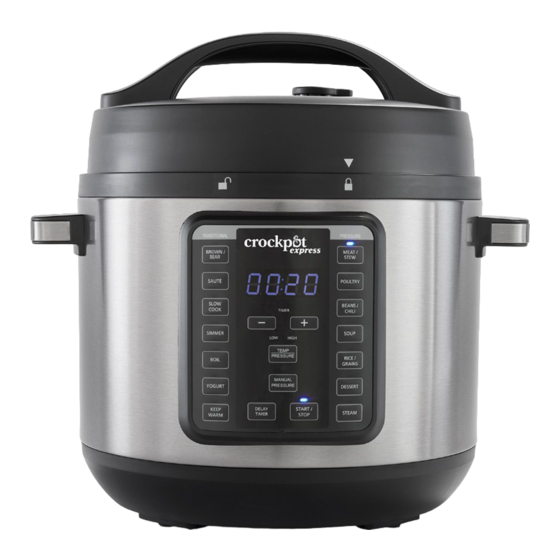
Features of your Express Crock Control Panel Underside of Lid CPE300_19EM1.indd 3 1/3/19 09:56... - Page 7 Features of your Express Crock A. Power Cord K. Power Cord Port Removable power cord for added flexibility Connect the Power Cord here to use your and ease of storage. Express Crock. B. Lid Lock Pin L. Display Screen Acts as safety feature to ensure lid is Shows the remaining cooking time.
- Page 8 Before First Use of the Express Crock Step 1. Remove Packaging Step 5. Standard Lid Assembly Ensure all packaging has been removed. Place Lid upon Multi-Cooker and align with . To lock, twist counterclockwise, Step 2. Position Machine aligning with . To unlock, twist Lid Place the Heating Base facing you on a dry, clockwise and align with...
-
Page 9: Things To Know About Your Express Crock
Things to know about your Express Crock The Express Crock Multi-Cooker has been • The TEMP/PRESSURE button is used to designed with safety in mind and has select desired cooking pressure (HIGH various safety measures. or LOW). Each pre-set cooking setting •... -
Page 10: Using Your Express Crock
Using your Express Crock • This Multi-Cooker allows you to delay Note: The Multi-Cooker beeps as each the start of your cooking so that cooking button is pressed. finishes when you need it. See page 8 for instructions on the DELAY TIMER function. •... -
Page 11: Time Delay Function
Time Delay Function This Multi-Cooker allows you to delay the Example: start of your cooking so that cooking finishes It’s 4pm and you want to have a soup cooked when you need it. and ready in 2 hours’ time for dinner at 6pm. You want to set the machine now so you are Note: The DELAY TIMER function is not free to do other things. -
Page 12: Pressure Cooking
Cooking Pot Markings Inside the removable Cooking Pot are Foods that expand markings to guide the fill level of the Cooking during cooking (e.g. Pot. The word MAX indicates the maximum rice) should never go fill line. above the 1/2 mark. The 1/3, 1/2, and 2/3 markings are handy guides to use in your recipes. - Page 13 Using Pressure Cooking functions TIP: Place the Multi-Cooker on a flat, level surface. Place Cooking Pot inside Heating Base. Plug • The pressure cooking settings are in the the Multi-Cooker into a wall outlet. The Multi- Cooking Guide table on page 14. Cooker will beep, and the Display Screen will •...
- Page 14 Releasing Pressure at the End of Cooking Natural Pressure Release Method: Quick Pressure release method should be used with caution: After cooking cycle is complete, let Multi- Cooker naturally release pressure through Using a kitchen utensil, gradually flick the tab the Bobber Valve.
- Page 15 Bobber Valve When Bobber Valve is in the “UP” position, DO NOT attempt to open the Lid, as the Multi- Cooker is still under pressure. When the Bobber Valve is in the “DOWN” position, the pressure has released. (See figure 5) “UP”...
-
Page 16: Slow Cooking
Slow Cooking LOW Setting: This is suitable for simmering food warm until serving - perfect for busy and slow cooking. Recommended cooking families, those on the run and those who times in LOW are from 6 to 8 hours. need flexible meal times. This setting is not hot enough to cook and should only be used HIGH Setting: This is for faster cooking. -
Page 17: Cooking Guide
Cooking Guide Cooking Pressure Temperature Default Setting Cook Time Range Function Adjustments Adjustments MANUAL High Pressure / 30 Low-High 1 minute - 4 hours PRESSURE minutes SLOW COOK High temp / 4 hours Low-High 30 minutes – 20 hours High pressure / 10 STEAM Low-High 1 minute –... -
Page 18: Steaming
Steaming Capacity: The STEAM function is perfect for gently steaming fish and vegetables. It is When the Multi-Cooker is used with the pre-programmed to use the HIGH pressure STEAM function, the maximum capacity of cooking setting. When steaming, use the liquid should be just under the rack wires, so Steaming Rack. - Page 19 Steaming Chart Food Amount Amount of Pre-prep Cooking water Time, minutes Asparagus 250g 400ml trim woody ends Broccoli 300g 400ml trim stalks Brussel Sprouts 400g 400ml peel outer leaves, leave whole Butternut Squash 1 whole, 400ml cut in half, remove seeds, slice 900g-1kg into 6 Carrots...
-
Page 20: Brown/Sear & Sauté
Using the BROWN/SEAR and SAUTÉ Functions BROWN/SEAR The settings BROWN/SEAR and SAUTÉ do not cook under pressure. They works similarly Designed to brown (sear) meat for casseroles to standard cooking, requiring dry heat, and and soups. Browning meat prior to pressure therefore do not need the Lid. - Page 21 Using the RICE/GRAINS Function Place the Multi-Cooker on a flat, level • The Multi-Cooker needs to gain pressure surface. before pressure cooking can begin. When the Multi-Cooker is gaining pressure, Place Cooking Pot inside Heating Base. Plug the Multi-Cooker into a wall outlet. The Multi- “HEAt”...
-
Page 22: Boiling & Simmering
Using the BOIL and SIMMER Functions BOIL The BOIL and SIMMER settings do not cook under pressure. they work similarly to Use to prepare meals like pasta and poached standard cooking, requiring dry heat, and eggs. therefore do not require a lid. LOW setting - Suitable for boiling low volumes of food up to the 1/3 Cooking Pot mark. -
Page 23: Care & Cleaning
To Change a Setting To Change the Temperature or Pressure It’s easy to switch functions during cooking. You can change the temperature or pressure Press the START/STOP button and then select on certain pre-set functions before cooking the new desired cooking function. A new begins by pressing the TEMP/PRESSURE timer will flash on the Display Screen, and the button before pressing START/STOP. - Page 24 Sealing Gasket may need to be replaced every 1 – 2 years depending on If white spots form on surface of Cooking Pot, regular use. Contact Crock-Pot customer ® then soak it in a solution of vinegar or lemon service to order replacement parts.
- Page 25 Care & Cleaning Bobber Valve Note: Condensation may collect inside the Gently press the valve up and down 2-3 times Heating Base under the removable Cooking and ensure it is clear from debris before you Pot. This is normal. Allow to cool, and then begin using the Multi-Cooker.
-
Page 26: Troubleshooting & Notification Codes
Troubleshooting Subject Question Solution Power My Multi-Cooker will Make sure outlet is functioning properly not turn on Check that the Multi-Cooker is plugged in Call Customer Service on 1300 881 861 (Aus), 0800 786 232 (NZ) Doneness of My food was Make sure you selected the proper cooking setting food undercooked... - Page 27 Notification Codes Error Solution “CLOSE LID” Ensure that the Lid is closed completely and in the LOCKED position, blinking light aligning with . Display “E1” The Multi-Cooker will stop the cooking cycle. Unplug Multi-Cooker and contact service center. Display “E2” The Multi-Cooker will stop the cooking cycle.
-
Page 28: Hints & Tips
Hints & Tips With your Express Crock you can create a • The Cooking Pot is designed to be used large variety of delicious meals, snacks and only in this Multi-Cooker. Do not use on desserts. Various foods take different times stovetop, in microwave, or in oven. - Page 29 Notes CPE300_19EM1.indd 26 1/3/19 09:56...
- Page 30 Notes CPE300_19EM1.indd 27 1/3/19 09:56...
- Page 31 CPE300_19EM1.indd 28 1/3/19 09:56...
- Page 32 SPECIFICATION 2 0 1 9 Sunbeam Corporation PTY LTD | ACN 000 006 771 Crock-Pot and Sunbeam are registered trade marks. Due to continued product improvements, product illustrations and photographs in this User Guide may differ slightly from the actual product.
Need help?
Do you have a question about the Express Crock XL CPE300 and is the answer not in the manual?
Questions and answers