Advertisement
Quick Links
EN1242 EchoStream
Transmitter
Installation Instructions - 05362F
1 Overview
The EN1242 smoke detector is a wireless, battery powered photoelectric
smoke sensor. The sensor includes a built-in sounder for alarm alerts, a
visual status LED, and an Inovonics Wireless EchoStream transmitter. The
sensor works as part of a security/fire alarm system and communicates
with the system control panel. Under normal (non-alarm) conditions, the
LED flashes once every eight seconds while the sensor monitors the
surrounding conditions. When the sensor detects smoke, the LED lights,
the built-in sounder beeps loudly, and an alarm signal is transmitted. The
smoke sensor is powered by the two included three-volt lithium batteries.
When the EN1242 detects an inactive smoke sensor a tamper message
will be transmitted.
Note: For UL installations, refer to the EN4216R Installation and Operation
Manual or the EN7285 Installation Instructions.
1.1 Inovonics Wireless Contact Information
If you have any problems with this procedure, contact Inovonics Wireless
technical services:
• E-mail: support@inovonics.com
• Phone: (800) 782-2709; (303) 939-9336
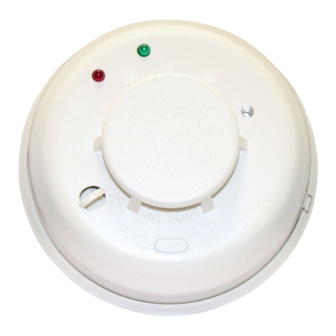
1.2 EN1242 Components
A
Figure 1 EN1242 Components
A Low Battery/Clean Me
B Frequency Band
Selection Pins
1.3 EN1242 Features
A
Figure 2 EN1242 Features
A Sounder Vent B LED
2 Installation and Startup
2.1 Install Batteries
1. Turn the sensor housing counterclockwise 15 degrees and detach it
from the mounting base.
© Inovonics, 2009 - www.inovonics.com
®
Smoke Detector
B
C Reset Button
Selection Pins
B
C Test/Silence
Button
2. Remove the battery compartment cover.
Figure 3 EN1242 Battery Compartment Cover
3. Install/replace the two three-volt batteries.
Note: A tamper message will transmit for approximately ten seconds while
the unit powers up after the installation of both batteries. If only one battery
is installed, the tamper message will transmit continuously.
2.2 Open the Housing
1. Using a small screwdriver to press the sensor cap release tab, apply
downward pressure and turn the cap about one inch counter-clockwise
to remove the cap..
C
Figure 4 Remove the Sensor Cap
2. Place both thumbs on either side of the optical chamber and push down
to detach the sensor housing.
C
Figure 5 Push Down on the Optical Chamber
2.3 Select the Frequency Band
EchoStream products are able to use a range of radio frequencies, and
must be configured for your geographic area. To configure the transmitter:
1. Place a selection jumper on the appropriate frequency band selection
pins.
• Place the jumper on the left two pins, marked AU, to set the frequency
range to 915-928 MHz for Australia.
• Place the jumper on the right two pins, marked NZ, to set the
frequency range to 921-928 MHz for New Zealand.
• Leave the jumper off the pins to set the frequency range to 902-928
MHz for North America.
2. Press the Reset button to complete configuration.
Caution: When pressing the Reset button, make sure you don't also touch
the frequency band selection pins. Touching the frequency band selection
pins while pressing the Reset button can inadvertently set the device to the
wrong frequency band.
Battery
Compartment
Advertisement

Related Manuals for Inovonics 3B6OT9ESL


Summary of Contents for Inovonics 3B6OT9ESL
- Page 1 1.1 Inovonics Wireless Contact Information 1. Using a small screwdriver to press the sensor cap release tab, apply If you have any problems with this procedure, contact Inovonics Wireless downward pressure and turn the cap about one inch counter-clockwise technical services: to remove the cap..
- Page 2 Refer to your receiver, network coordinator or control panel manual for Flashes Sensor Condition/Action registration instructions. Inovonics Wireless recommends all EchoStream transmitters be supervised. When prompted, you will press the EN1242 Self-diagnostics failure. Return sensor for service/ Reset button to complete registration.
- Page 3 (36) months from the date of manufacture. Within the warranty period, Inovonics will repair or replace, at its option, all or any part of the warranted Product. Inovonics will not be responsible for dismantling and/or reinstallation charges.
Need help?
Do you have a question about the 3B6OT9ESL and is the answer not in the manual?
Questions and answers