Advertisement
Advertisement
Table of Contents

Related Manuals for Axis Car Audio AX1501


Summary of Contents for Axis Car Audio AX1501
- Page 1 CAR AUDIO...
-
Page 2: Table Of Contents
Safety Precautions Contents Safety Information ........1 Thank you for purchasing this product. CD NOTES Please read through these operating Panel Controls ..........2 Playing a defective or dusty CD can instructions so cause dropouts in sound. General Operation ........3 Handle the disc by holding its Sound Setting .......... -
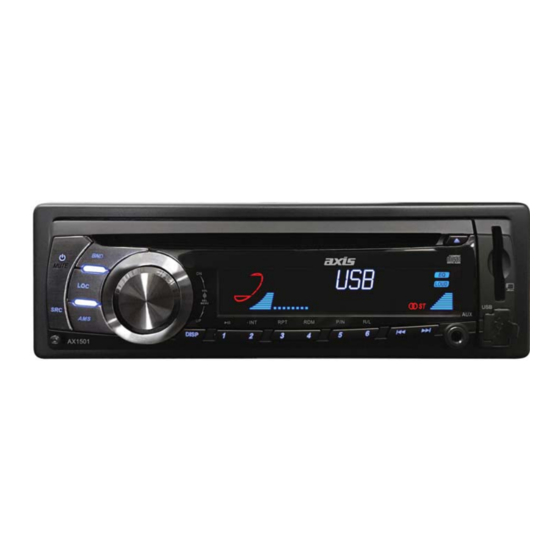
Page 3: Panel Controls
Panel Controls Power on/off: Press to turn on/off the unit. - Power On/Off (press more than 2 seconds) - ress to switch to clock display - Track seek - Mute ress again to exit. - AUX IN ( - Radio local/distant to enter clock setting. -
Page 4: General Operation
General Operation SOUND SETTING or AUX play, etc. Power On/Off Button the [ VOL ] button to enter sound effect mode. Rotate the knob to change Press the /MUTE button to turn the unit Auxiliary Input BEAT EQ in this order: when the vehicle ignition switch is To access an auxiliary device: DSP OFF ->... -
Page 5: Cd Player Operation
CD Player Operation Inserting a Disc Seek Up/Next Track Track Repeat Play Select With the label surface facing up, fully insert Press the next track >>| button during disc During disc play, press the 3/RPT button to a compact disc into the slot until the play to select the beginning of the next track. -
Page 6: Playing Mp3/Wma Files
Playing MP3/WMA Files desired directory/song. disc contains both audio tracks and MP3 Display Information Press the VOL control to view the files les. During playback, ID3 tag information inside the selected directory. When playing a disc of 8kbps or VBR*, display scrolling on the screen Rotate the VOL control to select the song/ the elapsed playing time in the display... -
Page 7: Menu Function
Playing MP3/WMA Files Menu Function In this case, data may not be Press and hold the VOL knob more than 2 LOUD ON/OFF seconds to enter menu mode , then each reproduced. Rotate the VOL knob to choose loudness on High quality CD-R disc press changes the mode as follows: or off. -
Page 8: To Direct Sunlight Or Usb/Sd/Mmc Mp3 Playback
USB/SD/MMC MP3 Playback Anti-Theft System This unit is equipped with a detachable panel. Removing this panel makes the radio totally inoperable. Insert the SD/MMC card into the slot, with the front side right. Remove the detachable panel The unit will play the music and Press button. - Page 9 Tuner Operation Band During radio play, press the BAND button to choose between three FM, two AM bands. The indication “AM”, “FM” appears on the display panel according to your selection. Up Tuning Press the seek up >>| button to tune stations upward step-by-step.
- Page 10 Electrical Connections Wiring Diagram NOTE: The REAR AUX IN FRONT AUX IN Rear Left AUX IN (White) Rear Right AUX IN (Red) ANTENNA Rear Right Line-out (Red) Rear Left Line-out (White)
- Page 11 Installation Guide Installation Procedures Important: Remove these two screws before installation. Otherwise, the player will not work. First complete the electrical connections, and then check for correctness. Reset Press button to ip down the panel. Then press the RESET button with a pointed object lock lever to reset the unit to the original status.
- Page 12 Troubleshooting The following checklist can help you solve some problems which you may encounter when using the unit. Before consulting it, check the connections and follow the instructions in the user manual. Do not use the unit in abnormal condition, for example without sound, or with smoke or foul smell can cause re or electric shock, immediately stop using it and call the store where you purchased it.
- Page 13 General AM(MW) Radio Components Frequency range Power supply 12V DC (11V-16V) Mounting collar Usable sensitivity z 30dB Test voltage 14.4V, Machine screws M5x6 mm (S/N=20dB) negative ground Mounting bolt (50 mm) Maximum power output 45Wx4 channels Wire connector Continuous power 20Wx4 channels (4 Trim plate Disc Player...
- Page 14 AX150 P/N.: 127075006994...
Need help?
Do you have a question about the AX1501 and is the answer not in the manual?
Questions and answers