Table of Contents
Advertisement
AM/FM STEREO RECEIVER
with
Compatible with audio output of iPod and other MP-3 players
SPECIFICATIONS:
GENERAL:
Detachable Face Panel
Includes Black and Silver Trim Frames
ISO DIN Chassis
ISO Wiring Connector
12 Volt DC - Negative Ground
Chassis: 178(W)x50(H)x158(D) mm
Capacitor Ultra-Memory Back Up
TUNER:
AM/FM Stereo
PLL Frequency Display
30 Station Presets (18FM/12AM)
Station Seek/Scan/Auto Store
Digital Clock
Stereo/Mono
Long Range XTREME Tuner
FRONT PANEL AUX INPUT
DESIGNED FOR AUSTRALASIAN CONDITIONS
AUDIO CONTROL:
Electronic Volume/Balance/Fader
Treble/Bass/Mute/Loud Controls
Subwoofer Output
4 Channel RCA Line-out
5 Volt Preamp Output
2 RCA Line-in
Front AUX IN
Speaker Impedance 4-8 Ohms
4 Band Preset EQ Levels
High Power 40 Watts x 4 ch
AX-900
Advertisement
Table of Contents

Related Manuals for Axis Car Audio AX-900


Summary of Contents for Axis Car Audio AX-900
-
Page 1: Specifications
Speaker Impedance 4-8 Ohms TUNER: 4 Band Preset EQ Levels AM/FM Stereo High Power 40 Watts x 4 ch PLL Frequency Display 30 Station Presets (18FM/12AM) Station Seek/Scan/Auto Store Digital Clock Stereo/Mono Long Range XTREME Tuner DESIGNED FOR AUSTRALASIAN CONDITIONS AX-900... -
Page 2: Installation
INSTALLATION PRECAUTIONS • Carefully choose the mounting location so normal driving is not hindered. • Avoid installing the unit where it would be subject to high temperatures (direct sunlight or hot air from the heater) or where it would be subject to dust, dirt or excessive vibration. • Only use the supplied mounting hardware for a safe and secure installation. • Be sure to remove the front panel before installing the unit. NOTE: Angle for car radio installation must not exceed 30˚ otherwise the front panel may not open. * Use only the supplied fixing screws. Use of screws any longer than those supplied may result in damage to internal components. -
Page 3: Detaching The Front Panel
DETACHING THE FRONT PANEL The front panel of this unit can be detached in order to prevent theft Before detaching the front panel, press the POWER OFF button. Then press button (16) and remove the panel by pulling it towards you as illustrated. Note: Do not drop the panel when it is detached from the unit. ATTACHING THE FRONT PANEL Apply the left hand side of the front panel to the unit by attaching part B of the front panel to part A of the unit as illustrated and push until it clicks. Pay attention not to put pressure on the display or control buttons Front panel Rear of the front panel Main unit Notes: • Make sure that the front panel is the right way up • Do not use excessive force • Use the front panel case supplied when panel is removed. -
Page 4: Wire Connection
WIRE CONNECTION LINE OUT SUB-W (FRONT) ISO CONNECTOR L (WHITE) R (RED) ANTENNA LINE OUT CONNECTOR (REAR) L (WHITE) R (RED) LINE IN L (WHITE) R (RED) ISO A/B PLUG BLUE BLACK POWER ANTENNA GROUND (–) YELLOW MEMORY IGNITION SWITCH (B+) BACK UP + WHITE GREY +... -
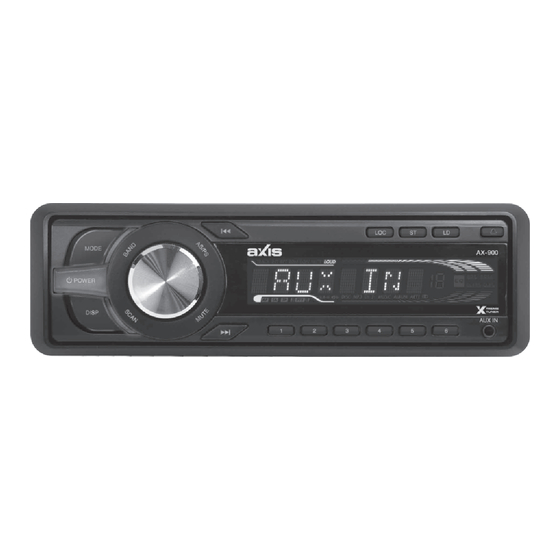
Page 5: Control Functions
CONTROL FUNCTIONS (1-6) LOCATIONS OF PARTS 1. POWER ON/OFF ( 2, 3. SELECT FOR BASS/TREBLE/BALANCE/FADER AND CONTROL MODE 4. LOUDNESS BUTTON (LD) 5. LCD DISPLAY 6. BAND SELECTOR (BAND) 7. AUTOMATIC OR MANUAL TUNING (FREQ UP OR FREQ DOWN 8. LOCAL/DISTANT BUTTON (LOC) 9. DISPLAY BUTTON (Set the Clock) 10. PRESET BUTTON 11. ‘SCAN’ AUTOMATIC TUNING CONTROL (SCAN) 12. AUTO SEEK SEARCH TUNING (AS/PS) 13. STEREO / MONO SELECT (ST) 14. MODE BUTTON (MODE) 15. MUTE BUTTON (MUTE) 16. PANEL RELEASE BUTTON ( 17. AUX IN... -
Page 6: Power On/Off
OPERATING INSTRUCTIONS 1. POWER ON/OFF ( Press any key to power up the unit. Press this key for more than one second to turn off. 2,3 “SEL” (control mode select) / AUDIO DSP FUNCTION Press to select the desired mode, VOL (volume), BAS (bass), TRE (treble), BAL (balance), or FAD . This button normally functions as the volume control. Adjust the level AUDIO AUDIO AUDIO AUDIO CONTROL CONTROL CONTROL CONTROL (3) after selecting the desired mode. The unit will return to the volume mode after a few seconds. Control Mode AUDIO AUDIO AUDIO AUDIO CONTROL CONTROL CONTROL CONTROL For less volume For more volume Volume Control For more bass... -
Page 7: Lcd Display
PRESET VOLUME LEVELS It is possible to preset the volume when unit is powered up. Press the SEL button until unit is in DSP mode. To select the volume to remain at the same levels at switch off, press “SEL” until VOL LAST is displayed. The volume will resume at the level it was when the unit was turned off. To set the volume to a predetermined level at switch on, press SEL again so that VOL ADJ is displayed. Then rotate to select the desired volume levels. AUDIO AUDIO AUDIO AUDIO CONTROL CONTROL CONTROL CONTROL 4. LOUDNESS BUTTON (LD) Press this button for bass and treble boost. Push button again to return to normal operation. This function is useful when listening at low levels. Loudspeakers are inefficient at low power levels and will tend to sound flat. The loudness control will boost the bass and treble response for a more lively performance. While this function is operating, the display shows “LOUD”... - Page 8 12. AUTOMATICALLY STORE STATIONS (AS/PS) Select six strong stations and store them in current band. 1. Select a band (if needed) 2. Hold AS/PS button for more than three seconds. The new stations replace those already stored in that band. Preset Scan To scan stations stored in current band. 1. Select a band (if needed) 2. Press AS/PS for more than one second but less than three. The radio pauses for five seconds at each station. Touch AS/PS again to stop scanning when desired station is found. 13. STEREO/MONO SELECTOR (ST) This function will only affect FM reception. Press this button if the FM reception becomes noisy/ hissy. If the station being received is in stereo, it will now be heard in mono. Press this button again for normal reception. 14. MODE BUTTON (MODE) Press this key, to select RADIO mode or AUX IN mode.
-
Page 9: Troubleshooting Guide
CAUTION & MAINTENANCE This detachable panel AM/FM car radio is an example of superior design and craftsmanship. The following suggestions will help you care for the product so that you can have many years of enjoyment. 1. Do not touch the contacts on the front panel or the unit body. 2. The product can only operate on 12V-14V DC power supply, negative ground. 3. Avoid exposing your system to high temperature and humidity. 4. Handle with care. Dropping it can damage circuit boards and create faults. 5. Modifying or tampering with internal components can cause damage and may invalidate the warranty. -
Page 10: Technical Specifications
TECHNICAL SPECIFICATIONS FM SECTION Frequency Range 87.5 - 108 MHz Intermediate Frequency 10.7 MHz Usable Sensitivity (S/N 30dB) less then 1.7µV Image Rejection Ratio 45 dB IF Rejection Ratio 60 dB AM SECTION Frequency Range 522 - 1710 KHz Intermediate Frequency 450 KHz Usable Sensitivity 32 dBμV GENERAL Power Supply Voltage 12V DC (10.8 - 15.6V allowable) Speaker Impedance 4 - 8 Ohm Output Power 4 x 40W (MAX) SUB OUT Frequency Response 20 Hz - 50 Hz Sensitivity 300 mV Max Output RCA OUT Frequency Response 20 Hz - 20 KHz Sensitivity... -
Page 11: Terms Of Warranty
WARRANTY Congratulations on your purchase of a quality aXis Car Audio product! You’re joining thousands of satisfied audiophiles who experience pleasure from the audio products we distribute. In the unlikely event that some technical difficulty arises with your purchase, be assured that we are most anxious to see that the problem is quickly rectified to your satisfaction.
Need help?
Do you have a question about the AX-900 and is the answer not in the manual?
Questions and answers