LG LSXS26326 Series Owner's Manual
Side by side refrigerator
Hide thumbs
Also See for LSXS26326 Series:
- User manual ,
- Owner's manual (54 pages) ,
- Service manual (79 pages)
Table of Contents
Advertisement
Quick Links
Advertisement
Table of Contents

Related Manuals for LG LSXS26326 Series


Summary of Contents for LG LSXS26326 Series
- Page 1 OWNER’S MANUAL SIDE BY SIDE REFRIGERATOR Read this owner’s manual thoroughly before operating the appliance and keep it handy for reference at all times. ENGLISH LSXS26326*/LSXS26366*/LSXS26386*/LSXS26336* www.lg.com MFL67653497-2 Copyright © 2020 LG Electronics Inc. All Rights Reserved.
-
Page 3: Table Of Contents
TABLE OF CONTENTS TABLE OF CONTENTS 35 MAINTENANCE PRODUCT FEATURES SAFETY INSTRUCTIONS 35 Cleaning 36 Replacing the Water Filter 37 Performance Data Sheet Operation Maintenance Caution 31 TROUBLESHOOTING PRODUCT OVERVIEW FAQs Exterior 40 Before Calling for Service Interior 43 Ice & Water Product Specification 45 Parts &... -
Page 4: Product Features
PRODUCT FEATURES PRODUCT FEATURES DOOR ALARM The Door Alarm function is designed to prevent refrigerator malfunctioning that could occur if a refrigerator door or freezer door remains open. If a refrigerator door or freezer door is left open for more than 60 seconds, a warning alarm sounds at 30-second intervals. -
Page 5: Safety Instructions
SAFETY INSTRUCTIONS SAFETY INSTRUCTIONS READ ALL INSTRUCTIONS BEFORE USE Safety Messages Your safety and the safety of others are very important. We have provided many important safety messages in this manual and on your appliance. Always read and follow all safety messages. This is the safety alert symbol. -
Page 6: Operation
6 SAFETY INSTRUCTIONS Operation • This appliance is intended to be used in household and similar applications such as : - staff kitchen areas in shops, offices and other working environments; - farm houses and by clients in hotels, motels and other residential type environments; - bed and breakfast type environments;... -
Page 7: Maintenance
SAFETY INSTRUCTIONS Maintenance • Do not use a hair dryer to dry the inside of the refrigerator. • Do not light a candle to remove odors in the refrigerator. • In the event of a refrigerant leak, move flammable objects away from the refrigerator. Ensure the area is adequately ventilated and contact an authorized service center. -
Page 8: Caution
8 SAFETY INSTRUCTIONS Risk of Fire and Flammable Materials This appliance contains a small amount of isobutane refrigerant (R600a), which is combustible. When transporting and installing the appliance, care should be taken to ensure that no parts of the refrigerating circuit are damaged. Refrigerant squirting out of the pipes could ignite or cause an eye injury. -
Page 9: Product Overview
PRODUCT OVERVIEW PRODUCT OVERVIEW Product Features The images in this guide may be different from the actual components and accessories, which are subject to change by the manufacturer without prior notice for product improvement purposes. Exterior Control Panel Sets the refrigerator and freezer temperatures, the water filter condition and the dispenser mode. NOTE •... -
Page 10: Interior
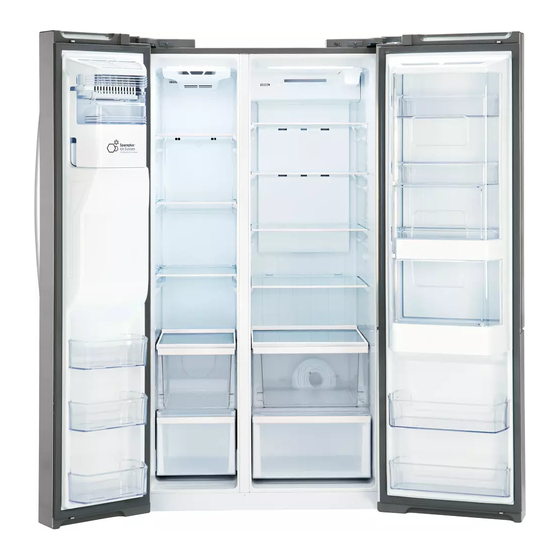
10 PRODUCT OVERVIEW Interior NOTE • Parts, functions, and options vary by model. Your model may not include all the Options, appears with a different name and / or different position. LED interior lamps Light up the inside of the refrigerator. Automatic Icemaker Automatically produce and store ice. -
Page 11: Product Specification
PRODUCT OVERVIEW Refrigerator Shelf Shelves are adjustable to suit individual storage needs. Adjust the shelf height by emptying and removing the shelf and inserting it on a different set of shelf supports. The number of refrigerator shelves varies by model. Fresh Zone Store fruit and vegetables in the crisper drawers to keep them fresh. -
Page 12: Installation
12 INSTALLATION INSTALLATION Before Installing Installation Overview Please read the following installation instructions first after purchasing this product or transporting it to another location. Unpacking the Refrigerator Choosing the Proper Location Disassembling/Assembling Connecting the Water Line Leveling and Door Alignment WARNING •... -
Page 13: Choosing The Proper Location
INSTALLATION Choosing the Proper Unpacking the Refrigerator Location WARNING • Use two or more people to move and install the Water refrigerator. Failure to do so can result in back Water supply must be easily connected for the injury or other injury. automatic icemaker. -
Page 14: Dimensions And Clearances
14 INSTALLATION Dimensions and Clearances • Check the dimensions of the appliance and the installation path to ensure there is sufficient room to move the refrigerator through doors or narrow openings. • If an opening is too narrow to fit the refrigerator through, remove the refrigerator doors. See Removing/ Assembling the Doors and Drawers in this manual. -
Page 15: Removing/Assembling The Refrigerator
INSTALLATION Removing and replacing Removing/Assembling the refrigerator doors Refrigerator Door Handles WARNING NOTE Excessive Weight Hazard: • When it is necessary to move the refrigerator • Use two or more people to remove and install through a narrow opening, removing the the refrigerator doors. - Page 16 16 INSTALLATION Pull out the water supply lines Turn the hinge lever on the clockwise. Lift the upper hinge separated from the bra of Unscrew the ground wire the hinge lever Rotate the hinge lever counterclockwise Place the door, with the inner part up, on a Lift the upper hinge free of the hinge surface that does not scratch.
-
Page 17: Moving The Appliance
INSTALLATION Disassembling/Assembling the Place the top hinge above the latch the water lines hinge lever and place it instead. Rotate the lever in direction counter clockwise and Collet secure the hinge. Tube Insert lines Tube Reconnect the water lines by inserting them into the connectors. -
Page 18: Water Pressure
18 INSTALLATION • Power drill. CAUTION • ½ in. or adjustable wrench. • To prevent burns and product damage, only • Flat-blade and Phillips-head screwdrivers. connect the refrigerator water line to a cold • Two ¼ in. outer diameter compression nuts water supply. -
Page 19: Water Line Installation Instructions
INSTALLATION Water Line Installation Instructions Fasten the shutoff valve. Install the shutoff valve on the nearest frequently • Fasten the shutoff valve to the cold water used drinking water line. pipe with the pipe clamp. WARNING NOTE • When using any electrical device (such as a •... - Page 20 20 INSTALLATION Route the tubing. Connect the tubing to the refrigerator. • Route the tubing between the cold water NOTE line and the refrigerator. Route the tubing • Before making the connection to the through a hole drilled in the wall or floor refrigerator, be sure that the refrigerator power (behind the refrigerator or adjacent base cord is not plugged into the wall outlet.
-
Page 21: Leveling And Door Alignment
INSTALLATION Leveling and Door Alignment Leveling The refrigerator has two front leveling legs. Adjust the legs to alter the tilt from front-to- back or side-to side. If the refrigerator seems unsteady, or the doors do not close easily, adjust the refrigerator’s tilt using the CAUTION instructions below: •... -
Page 22: Operation
OPERATION OPERATION Before Use Checklist Clean the refrigerator. Clean the refrigerator thoroughly and wipe off all dust that accumulated during shipping. CAUTION • Do not scratch the refrigerator with a sharp object or use a detergent that contains alcohol, a flammable liquid or an abrasive when removing any tape or adhesive from the refrigerator. -
Page 23: Control Panel
OPERATION Control Panel NOTE The refrigerator control functions as the ther- • If you close the refrigerator door, you may see the mostat for the entire appliance (refrigerator and freezer door open and close again due to freezer sections). The colder the setting, the lon- pressure from internal air flow. - Page 24 OPERATION Ice Type Control Panel Features Vertical Display * Depending on the model, some of the following Select Crushed Ice or Cubed Ice by pressing the functions may not be available. Ice Type button repeatedly to choose the Vertical Display selection desired.
- Page 25 OPERATION Lock Ice Plus • When power is initially connected to the • When you press the Ice Plus button, the graphic refrigerator, the Lock function is o . will illuminate in the display and will continue for • If you want to activate the Lock function to 24 hours.
-
Page 26: Automatic Icemacker
OPERATION Automatic Icemaker WARNING Personal Injury Hazard Ice is made in the automatic icemaker and sent to the dispenser. The icemaker will produce 7 • Do not place ngers or hands on the automatic cubes per cycle - approximately 70-120 cubes in ice making mechanism while the refrigerator a 24-hour period, depending on freezer is plugged in. - Page 27 OPERATION CAUTION • The first ice and water dispensed may include particles or odor from the water supply line or the water tank. • Throw away the first few batches of ice (about 24 cubes). This is also necessary if the refrigerator has not been used for a long time.
-
Page 28: Ice And Water Dispenser
OPERATION Ice and Water Dispenser Incorrect Way Correct Way NOTE • Depending on the model, some of the following Water functions may not be available. CAUTION • Keep children away from the dispenser. Children may play with or damage the controls. Dispenser structure Ice &... -
Page 29: Food Storage Tips
OPERATION Food Storage Tips Food How to Store Fish Freeze fresh fish and shellfish if they Wrap or store food in the refrigerator in airtight are not being eaten the same day and moisture-proof material unless otherwise purchased. Eating fresh fish and shellfish the same day purchased is noted. -
Page 30: Detaching/Assembling The Storage Bins
OPERATION To remove the Fresh Zone drawers, pull out Follow package or container instructions for the drawer to full extension , lift the front proper freezing methods. , and pull straight out. Do not use • Bread wrappers • Non-polyethylene plastic containers •... -
Page 31: Water Tank
OPERATION Dairy Corner (Basic Model) To remove the bin, simply lift the bin up and pull straight out. To replace the bin, slide it in above the desired support and push down until it snaps into place. To remove the Dairy Corner, simply lift the bin up and pull straight out. -
Page 32: Door-In-Door Case
OPERATION Door-in-Door Case Door-in-Door Door Bins (Only in some models) (Only in some models) To open the Door-in-Door case, pull evenly on the The Door-in-Door inner and outer door bins are marked area. The Door-in-Door Case is removable removable for easy cleaning. for easy cleaning and adjustment. -
Page 33: Adjusting The Refrigerator Shelves
OPERATION Adjusting the Refrigerator CAUTION Shelves • Make sure that shelves are level from one side to the other. Failure to do so may result in the shelf falling or spilled food. The shelves in the refrigerator are adjustable to meet individual storage needs. -
Page 34: Smart Functions
Diagnosis logo located on the right hinge of • Follow instructions to download and install the the refrigerator door. application. • Run the LG ThinQ application and follow the instructions in the application to register the appliance. Smart Diagnosis This feature is only available on models with the logo. -
Page 35: Maintenance
MAINTENANCE MAINTENANCE For products with a standard stainless steel exterior, use a damp microfiber cloth and rub in the direction of the grain. Dry with a paper towel to avoid streaks. For stubborn stains and Cleaning fingerprints, use a few drops of liquid dish soap in water, and rinse with hot water before drying. -
Page 36: Replacing The Water Filter
• To purchase a replacement water filter: Visit your local dealer or distributor web: • Pull the water filter Find Parts & Accessories from Support downward and turn section of lg.com it counterclockwise Call: 1-800-243-0000 (USA) to pull it out. Make 1-888-542-2623 (Canada) -
Page 37: Performance Data Sheet
MAINTENANCE Performance Data Sheet Model: LT1000P, LT1000PC, LT1000PCS NSF System Trade Name Code: MDJ64844601 The concentration of the indicated substances in water entering the system was reduced to a concentration less than or equal to the permissible limit for water leaving the system as specified in NSF/ ANSI Standard 42, Standard 53 and Standard 401. - Page 38 NOTE • While the testing was performed under standard laboratory conditions, actual performance may vary. For replacement filters, visit your local dealer or distributor or search under “water filters” on the lg.com website. For further assistance, contact the LG Electronics Customer Information Center.
-
Page 39: Troubleshooting
TROUBLESHOOTING TROUBLESHOOTING FAQs Frequently Asked Questions How do I unclog the ice dispenser chute? Eliminate the frost of ice fragments by removing the ice bin and clearing the chute with a plastic utensil. Dispensing cubed ice can also help prevent frost or ice fragment buildup. Make sure that the refrigerator doors are closed before attempting to dispense ice. -
Page 40: Before Calling For Service
TROUBLESHOOTING Before Calling for Service Cooling Problem Possible Cause & Solution Refrigerator and The refrigerator control is set to OFF (some models). Freezer section are • Turn the control ON. Refer to the Setting the Controls section for proper temperature not cooling. - Page 41 TROUBLESHOOTING Problem Possible Cause & Solution Interior moisture Doors are opened often or for long periods of time. buildup. • When the doors are opened often or for long periods of time, warm, humid air enters the compartment. This raises the temperature and moisture level within the compartment. To lessen the effect, reduce the frequency and duration of door openings.
- Page 42 TROUBLESHOOTING Problem Possible Cause & Solution Refrigerator or Refrigerator was recently installed. Freezer section is too • It may take up to 24 hours for each compartment to reach the desired temperature. warm. The air vents are blocked. Cold air circulates from the freezer to the fresh food section and back again through air vents in the wall dividing the two sections.
-
Page 43: Ice & Water
TROUBLESHOOTING Ice & Water Problem Possible Cause & Solution Icemaker is not Demand exceeds ice storage capacity. making enough ice. • The icemaker will produce approximately 70-184 cubes in a 24 hour period. House water supply is not connected, valve is not turned on fully, or valve is clogged. •... - Page 44 TROUBLESHOOTING Problem Possible Cause & Solution Icemaker is not Refrigerator was recently installed or icemaker recently connected. making ice • It may take up to 24 hours for each compartment to reach the desired temperature and for the icemaker to begin making ice. Icemaker is not turned on.
-
Page 45: Parts & Features
TROUBLESHOOTING Parts & Features Problem Possible Cause & Solution Doors will not close Food packages are blocking the door open. correctly or pop • Rearrange food containers to clear the door and door shelves. open. Ice bin, crisper cover, pans, shelves, door bins, or baskets are out of position. •... - Page 46 TROUBLESHOOTING Problem Possible Cause & Solution Doors are not closed completely. Ice is not dispensing. • Ice will not dispense if any of the refrigerator doors are left open. Infrequent use of the dispenser. • Infrequent use of the ice dispenser will cause the cubes to stick together over time, which will prevent them from properly dispensing.
- Page 47 TROUBLESHOOTING Problem Possible Cause & Solution New installation or water line recently connected. Water is not dispensing. • Dispense 2.5 gallons of water (fl ush for approximately 5 minutes) to remove trapped air and contaminants from the system. Do not dispense the entire 2.5 gallon amount continuously.
-
Page 48: Noises
TROUBLESHOOTING Noises Problem Possible Cause & Solution The defrost control will click when the automatic defrost cycle begins and ends. The Clicking thermostat control (or refrigerator control on some models) will also click when cycling on and off. • Normal Operationchimney or candle. Rattling noises may come from the flow of refrigerant, the water line on the back of Rattling the unit, or items stored on top of or around the refrigerator. -
Page 49: Limited Warranty
Should your LG Refrigerator (“Product”) fail due to a defect in materials or workmanship under normal and proper use, during the warranty period set forth below, LG Electronics (“LG”) will, at its option, repair or replace the Product. This limited warranty is valid only to the original retail purchaser of the Product and applies only when purchased and used within the United States including U.S. - Page 50 Limited Warranty. Notice of Dispute. In the event you intend to commence an arbitration proceeding, you must first notify LG in writing at least 30 days in advance of initiating the arbitration by sending a letter to LG at LG...
- Page 51 If you and LG are unable to resolve the dispute within 30 days, either party may proceed to file a claim for arbitration.
- Page 52 LIMITED WARRANTY the serial number (the serial number can be found (i) on the product; or (ii) online by accessing https:// www.lg.com/us/support/repair-service/schedule-repair continued and clicking on “Find My Model & Serial Number”). You may only opt out of the dispute resolution procedure in the manner described above (that is, by e-mail or telephone);...
-
Page 53: For Canada
ARE NOT PERMITTED. PLEASE SEE THE SECTION TITLED “PROCEDURE FOR RESOLVING DISPUTES” BELOW. Should your LG Refrigerator (“Product”) fail due to a defect in materials or workmanship under normal and proper use, during the warranty period set forth below, LG Electronics Canada, Inc. (“LGECI”) will, at its option, repair or replace the Product upon receipt of proof of the original retail purchase. - Page 54 (ASC), as determined by LG Canada. If your Product is located outside a 150 km radius from a ASC, as determined by LG Canada, it will be your responsibility to bring the Product, at your sole expense, to the ASC for in-warranty repair.
- Page 55 If you and LG are unable to resolve the dispute within 30 days of LG’s receipt of the Notice of Dispute, the dispute shall be resolved by binding arbitration in accordance with the procedure set out herein.
- Page 56 Except as otherwise provided for, LG waives any rights it may have to seek attorneys’ fees and expenses from you if LG prevails in the arbitration.
-
Page 57: Note
NOTE... - Page 58 NOTE...
- Page 59 NOTE...
- Page 60 LG Customer Information Center For inquiries or comments, visit www.lg.com or call: 1-800-243-000 0 U.S.A. 1-888-542-262 3 CANADA ¡Register your product Online! www.lg.com...
Need help?
Do you have a question about the LSXS26326 Series and is the answer not in the manual?
Questions and answers