Table of Contents
Advertisement
Quick Links
Advertisement
Table of Contents

Related Manuals for Rain Bird WR2RFC-48


Summary of Contents for Rain Bird WR2RFC-48
- Page 1 WR2-48 Wireless Sensor User Manual Manual del usuario...
-
Page 2: Table Of Contents
Contents Safety Information ........ 1 Introduction ........... 1 WR2 Components ..............2 WR2 Benefits ................2 Mounting the Controller Interface ..2 Wiring the Controller Interface to the Irrigation Controller ......3 Initial Power Up ........4 Controller Interface Display Icons ........ 4 Sensor Status .............. -
Page 3: Safety Information
NOTE: The irrigation controller / timer commitment to this Intelligent Use of Water. should be isolated via a circuit breaker The product is part of Rain Bird’s family of or cutoff switch. water conservation solutions that include NOTE: Batteries removed from the... -
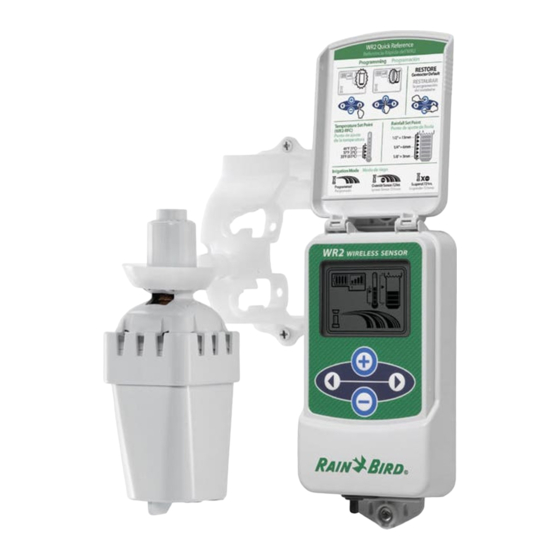
Page 4: Wr2 Components
WR2 Components WR2 Benefits All settings are programmed through the Controller Interface Controller Interface device Sensor Large easy to understand icons communicate Battery Cassette and Lithium CR2032 irrigation mode and sensor status Battery Sensor LED indicator enables one-person Sensor Mounting Bracket Assembly setup, reducing installation time Mounting Hardware Battery is easy to install / replace... -
Page 5: Wiring The Controller Interface To The Irrigation Controller
Wiring the Controller Controllers with no sensor inputs (with or without pump start / master valve) Interface to the TO VALVES Irrigation Controller COMMON FROM VALVES NOTE: This unit is designed to be installed in conjunction with 24VAC RED or WHITE BLACK GREEN... -
Page 6: Initial Power Up
Environmental Conditions Initial Power Up Rainfall Set Point: After power is applied, the Controller Interface displays the following icons. Select from six (6) set points ranging from 1/8” (3mm) to 1/2” (13mm). A set point closer to the top of the icon allows for more precipitation to occur before irrigation is suspended. -
Page 7: Irrigation Modes
Synchronize Irrigation Modes the Sensor and Programmed Irrigation Controller Interface WR2 Wireless Sensor is actively managing the irrigation After the Controller Interface is wired controller / timer. to the irrigation timer, the Sensor and Once a set point Controller Interface need to establish a is satisfied by radio communication link. -
Page 8: Programming The Set Points
Temperature Set Point The Sensor is successfully paired to the Controller Interface when the (Rain/Freeze Sensor only) “Sensor Indicator / Pairing Status” icon stops flashing. Once paired, sensor Push left or right arrow signal strength and battery life are on keypad to navigate communicated via the Controller Interface to the Temperature icons. -
Page 9: Saving, Resetting And Restoring Settings
Saving, Resetting Restore Standard Setting and Restoring – Press the Settings left arrow buttons simultaneously Save Contractor Default for five (5) seconds, or until Settings the screen goes Once the Controller blank, to cancel Interface is completely the Contractor default setting and restore programmed, press the ”Standard Setting”: temperature 37°F and right arrow... -
Page 10: Sensor Mounting Instructions
Sensor Mounting Installing the Sensor in the Instructions attachment bracket To insert the Sensor in the attachment This section provides detailed ins- bracket you must first remove the Sensor tructions on how to install the sensor. cap. Hold the sensor body in one hand; gently twist the cap with your other hand. -
Page 11: Wr2 Wireless Sensor Alerts & Troubleshooting
Controller Interface. WR2 Wireless Sensor Alerts & Troubleshooting The unique two-way communication technology of the Rain Bird Wireless Rain and Rain/ Freeze Sensor provides continuous monitoring of the Sensor status and communicates the following Controller Interface alerts. - Page 12 EN55014-1:2006 Conformity Is Declared: EN55022:2006 EN55014-2: 1997 +Al:2001 EN61000-4-2 EN61000-4-3 EN61000-4-8 EN 300 220-2 V2.1.2 Manufacturer’s Name: Rain Bird Corp. Manufacturer’s Address: 9491 Ridgehaven Court San Diego, CA 92123 619-674-4068 Equipment Description: Irrigation Controller Equipment Class: Class B Model Numbers: I the undersigned, hereby declare that the equipment specified above, conforms to the above Directive(s) and Standard(s).
Need help?
Do you have a question about the WR2RFC-48 and is the answer not in the manual?
Questions and answers