Chapters
Table of Contents

Subscribe to Our Youtube Channel
Related Manuals for German pool PHS-200


Summary of Contents for German pool PHS-200
- Page 1 PHS-200 Commercial Grade High-Speed Food Processor Online Warranty Registration Please read these instructions and warranty information carefully before use and keep them handy for future reference. U S E R M A N U A L...
- Page 2 Please register your warranty information now ! 如欲獲取更多有關本產品最新資訊及食譜,歡迎瀏覽本公司網站 。 For Warranty Terms & Conditions, For additional product information and cooking recipes, please visit our website. please refer to the last page of this user manual. w w w . g e r m a n p o o l . c o m 請即進行保用登記﹗...
-
Page 3: Table Of Contents
Table of Contents Notice Before Use Product Structure Operating Instructions Measuring Cup, Lid and Blade Mount Notice for Operation Care & Maintenance Technical Specifications Warranty Terms & Conditions... -
Page 4: Notice Before Use
2. Never submerge the unit base of the appliance in water or other fluids, nor rinse it under the tap, to avoid risk of short- circuit or electric shock. If there is water inside the unit base, please contact German Pool or a licensed technician for repair. 3. Never put the power cord or plug into water for cleaning. Do not wipe the plug prongs with damp cloth, nor plug in with wet hands. -
Page 5: Product Structure
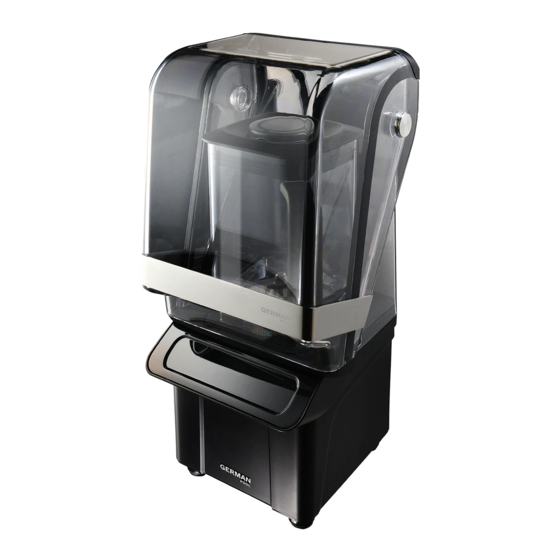
Product Structure Unit Body Measuring Cup Seal Ring Blender Handle Blender Jar Blade Assembly Blade Mount Drive Coupling Cushion Base Sound Enclosure (PHS-CVR) Control Panel Safety Lock Unit Base Anti-Skid Rubber Power Cable... - Page 6 Product Structure Control Panel Preset Programmes Preset Programmes (Dough,Sauce,Vegetable) Time Indicator (Hot Drinks,Nuts,Smoothie) On/Off Button Speed Setting Pulse Button Buttons...
-
Page 7: Operating Instructions
Operating Instructions Watch the video clip Important - Do not run the appliance without loading. It is strictly forbidden to operate this appliance without the presence of any liquids, solids or semi-solids inside the blending jar. - Under no circumstances should the blending jar be submerged in any liquids. Do not spray or splash any liquids at the blending jar base. Do not directly rinse the blending jar base under the tap. The blending jar is not suitable for the dishwasher. If the blending jar base is sprayed or splashed wet, dry immediately. - Page 8 Operating Instructions Preset Programmes In standby mode, press any preset programme icon, the corresponding indicator will flash (flash time: 30 sec), press the button in 30 sec, the unit will work in the corresponding preset programme. After the programme finishes, the unit turns back to standby mode. Icon Programme Descriptions Continuously work at speed 1 for 2 min Dough (400g flour + 240g water). Speed 8 for 2 sec and pause for 1 sec. Repeat the cycles 5 times. Sauce Then speed H for 45 sec.
- Page 9 Operating Instructions Notice for Operation Installation of Sound Enclosure Step 3 Step 1 Place the cushion mat flat to install. The cushion mat Press the two sides of the detachable rim and push it should be in the correct position by aligning the three out to the backside. buckle parts. Step 2 Remove the detachable rim from the blender.
-
Page 10: Measuring Cup, Lid And Blade Mount
Notice for Operation Operating Instructions Step 4 Slightly open the two sides of the sound enclosure to install. Make sure the cushion mat and the sound screen are being locked in the right position. Measuring Cup, Lid and Blade Mount - Insert the measuring cup to the lid (align the two bumps on the measuring cup to the two grooves on the lid and turn anti-clockwise to position). Then press down the lid of the blender jar to close. To open, pull up by the flap of the lid. -
Page 11: Notice For Operation
Notice for Operation - The appliance will not start operation until the blender jar is placed onto the unit base for safety purpose. - Insert the measuring cup to the lid (align the arrow on the cup to the symbol on the lid and turn it to position). Then press down the lid to the blender jar to close. To open, pull up by the flap of the lid. - During operation, close the lid tightly to avoid injuries due to spilling or splashing of hot liquids. - Wind excess power cord underneath the unit base to prevent the rubber foot from stepping on the power cord. - When the food is too thick or there is too little liquid in the jar, the motor will be dragged to a low speed or stop to operate. Hence, when blending thick and sticky food, start blending from low to high speed. If it is still unable to blend, disconnect the power and stir the food inside the jar using a rubber stirrer to drive out the air trapped in food. -
Page 12: Care & Maintenance
3 Easy Steps to Cleaning the Blender Jar Caution: Do not submerge the blender jar into water 1. Add 1-2 slices of lemon into 750ml water. Select “Vegetable” Programme. 2. Pour out water. Repeat Step 1. 3. Pour out water, and wipe it dry with a clean cloth. Put the jar sideways and let it air-dry. Technical Specifications Model No PHS-200 Voltage / Frequency 220-240 V ~ 50/60 Hz Rated Power 1200 W Dimensions (H) 430 mm... - Page 13 目錄 注意事項 產品結構 操作說明 量杯,杯蓋,杯座 使用注意事項 清潔與保養 技術規格 保用條款...
-
Page 14: 注意事項
注意事項 重要說明 - 為安全起見,初次使用產品前請先細閱本說明書,並保存說明書,以便作參考之用。 - 本產品只供家居使用。請必須依照說明書內的指示安裝及操作。 - 嚴禁空轉:在果汁杯內未有任何固體、流質食物或液體之情況下,切勿啟動本機。 1. 在使用本產品前,確認產品所標明的使用電壓,是否於家用的接地插座電壓一致。 2. 請勿將機體座泡在水中或對機體座澆水,以免引起短路或觸電,機體座主體內如有浸水,請洽經 銷商或服務處。 3. 機體座的電源線和插頭不可用水或其他液體清洗或浸泡,插頭不可用濕布擦拭,手部潮濕時請勿 插、拔插頭,以免引起觸電。 4. 本機在使用時,電源插頭務必要插到底,不插到底易造成觸電或由於發熱引起火災;請勿使用殘 缺或鬆動的插座。 5. 請勿損傷電線及電源插頭;使用受損的電線易引起觸電,短路或火災;如電源線損壞或發生其他 故障,切勿自行拆卸本機,必須由製造廠商或其服務處或具有類似資格的專業人員更換和維修。 6. 本機在使用時,切勿無人看管。 7. 果汁杯在主體上時,切勿將手或任何用具,金屬,異物放入果汁杯中,以免傷到人或損毀攪拌部 份。 8. 切勿將本機在無水情況下進行空轉。 9. 使用本產品時,果汁杯中的水或其他液體不能超過杯子上的最大刻度線。 10. 請勿將本機靠近熱源,請勿在機器下方放置抹布,以免造成散熱不良。 11. 本產品只適用於室內使用,請勿置於室外使用。 12. 操作時一定要蓋緊杯蓋,裝上量杯,在製作熱飲時請務必蓋好杯蓋,並確定先使用低速運轉,以 免高速會噴出熱液體,造成傷害。 13. 本產品不預備給體能弱、反應遲鈍或有精神障礙的人(包括兒童)使用,除非在對其負有安全責任 的人員的指導或幫助下安全使用。... -
Page 15: 產品結構
操作面板 產品結構 主機 量杯 杯蓋 密封圈 手柄 果汁杯 刀片組件 杯座 帶動輪 防震墊 隔音罩 (PHS-CVR) 安全開關 機座 操作面板 防滑腳墊 電源線 P.15... - Page 16 操作面板 產品結構 操作面板 智能快速 智能快速 程式輕觸鍵 程式輕觸鍵 (熱飲、堅果、冰沙) (麵糰、醬汁、蔬果) 時間顯示屏 開始/停止鍵 速度設定鍵 間歇運轉鍵 P.16...
-
Page 17: 操作說明
操作說明 觀看視頻操作 重要說明 - 嚴禁空轉:在果汁杯內未有任何固體、流質食物或液體之情況下,切勿啟 動本機。 - 任何情況下,切勿把整個果汁杯浸入任何液體泡浸;禁止向杯底澆水,不 能直接沖洗果汁杯底部。果汁杯不適用於洗碗碟機。杯底濺濕後,請立即 擦拭乾淨。 - 任何情況下,乾磨食材時不能連續操作超過1分鐘。如需連續乾磨,建議讓 機件靜置5分鐘再重複操作。 開關鍵 1) 產品通電,所有燈都亮0.5秒,蜂鳴器響1秒後,直接進入省電模式, 閃爍紅燈,其它都不亮。 觸摸 一次後, 亮紅燈, 及顯示屏亮白燈顯示00:00,速度 亮白燈,此時產品為待機模式(待機模式下如3分鐘沒有任何 操作,自動進入省電模式,每次觸摸有效一次,蜂鳴器響0.5 秒)。在任意狀態下,觸摸 圖案, 產品進入待機模式。 2) 用戶需先選擇好相應的智能快速程式或速度設定 任意檔速, 觸摸 鍵後,產品才運轉相應的功能,在各種工作模式下,觸摸 鍵,產品停止工作,自動 進入待機模式。 速度設定鍵 觸摸檔位任意一個 ,此時被觸摸鍵 以左的燈光全亮閃爍,閃爍時間為30秒, 在30秒內再 觸摸 , 長亮白燈,產品開始按相對應的檔位工作,相對應的... - Page 18 操作說明 智能快速程式 在待機狀態下,觸摸任意一個智能快速程式鍵,相對應的智能快速程式鍵燈閃爍(閃爍時間為30秒), 在30秒內再觸摸 鍵後,產品就運轉相應的智能快速程式,工作完成後,自動返回到待機狀態。 圖示 程式 程式描述 以1檔連續工作2分鐘(用400克麵粉+240克水) 麵糰 以8檔啟動運轉2秒,接著停止1秒, 反復此動作5次,接著加速至H檔並運轉45秒, 醬汁 共運行1分鐘,每次啟動都用軟啟動 H檔運轉30秒,停2秒;6檔運轉10秒,停2秒; H檔運轉60秒,停2秒;6檔運轉10秒,結束, 蔬果 共1分鐘56秒。每次啟動都用軟啟動 7秒內加速至7檔,3秒內加速至H檔, 熱飲 並維持在此檔位;總運轉時間為8分鐘。 以5檔運轉5秒; 接著以8檔運轉2秒,停止1秒,反復此動作10次;共運行35秒。 堅果 每次啟動都用軟啟動 以軟啟動運轉8秒H檔位, 停止2秒,以此循環,共運行30秒 冰沙 每次啟動都用軟啟動 P.18...
- Page 19 使用注意事項 操作說明 隔音罩安装 步驟一 步驟三 按壓機座可拆式邊框的兩端,並向後推離。 安裝矽膠墊以固定隔音罩。安裝時需把矽膠墊平放, 並對齊三個卡扣,以確保安裝到位。 步驟二 將可拆式邊框從機座上拆出來。 P.19...
-
Page 20: 量杯,杯蓋,杯座
使用注意事項 操作說明 步驟四 稍微打開隔音罩的兩邊,把隔音罩裝到機座上,並確保隔音罩 上的三個開孔均扣緊於矽膠墊的卡扣。 量杯,杯蓋,杯座 - 將量杯放入蓋中 (量杯上有兩個小凸點,將凸點對準杯蓋中心口的兩個小凹處,放入後反時針旋轉 即可)再將杯蓋上果汁口,往下按入即可。再要打開時,只需將杯蓋手柄處往上拉即可。 - 杯蓋密封圈為可拆卸部件,當清洗時可將密封圈取下單獨完後再套上杯蓋,方便徹底清除杯蓋與 密封圈上的食物殘渣。 P.20... -
Page 21: 使用注意事項
使用注意事項 - 為安全起見,若果汁杯仍未放在機座上,本產品不能啟動。 - 將量杯放入杯蓋中(量杯上的箭嘴對準杯蓋上的 標誌旋轉至 扣緊),再將杯蓋蓋上果 汁杯杯口,往下按入。再要打開時,只需將杯蓋往上拉即可。 - 產品操作時,請必須將杯蓋與量杯扣緊,避免讓杯內的食物濺出甚至造成危險。 - 操作時請將機座底下之電線沿凹位繞數圈至適當長度,並從防滑腳旁的凹位繞出, 以免因機座壓著電線致令機身不能平放,影響操作。 - 低速下長時間攪拌、所打的食物太濃稠或液體太少等,都容易使摩打過熱導致停止運轉。 所以,若食物較濃稠或水份較少的話,應先使用低速再調至高速;若還是無法攪拌, 請關掉電源,取出果汁杯用塑膠工具略為攪拌,直到食物中的氣泡消除後重新開機使用即可。 - 當摩打內的溫度偵測保護系統被啟動時,摩打會自動停止轉動,此時請拔掉電源插頭, 並將機座冷卻45分鐘(可放置通風處或使用風扇使其溫度降低,以達致散熱目的),然後 才啟動操作或改以間歇運轉鍵重新進行操作。 - 產品操作時,請勿將任何器具如湯匙、手、尖硬物體等放入杯內,以免刀片在高速運轉時 遭外力撞擊而斷裂,造成危險或損壞。 - 製作豆漿、米糊、濃湯等熱飲時,一定要注意杯蓋與量杯是否扣緊。切勿一開始便將速度 設在高速段,應由低速漸進到高速段,或改以間歇運轉模式操作。 - 如製作醬類 (如杏仁醬、果醬及芝麻醬)、餡料或殼類雜糧時,材料份量必須介乎2杯和3杯 之間,切勿放入過多或過少,而打磨的時間勿超過2分鐘,以免過熱而產生焦味。如材料 太多會導致超過產品負載,有可能令摩打升溫,此時需待摩打溫度降低後產品才可再次使用。 - 使用時請先放入液體及較軟的食物,硬的食物或冰塊較後放入。 - 操作完成後按停止鍵停止運轉。請必須等待產品完全停止運轉後才將杯子拿開,否則容易 造成帶動輪損壞。 - 機座產生焦熱氣味時,請立即停止使用,那是機座上的橡皮固定墊未完全壓平而令部件 摩擦生熱造成焦味、或所放的食物超過其負載使產品過熱而形成的異味。 - 建議每次不要連續使用本產品超過10分鐘。... -
Page 22: 清潔與保養
底,造成軸承生水銹而損壞果汁杯。 - 切勿用清水沖洗機座,並切勿將機座或電源線等置於水中或其他液體中。 可用清潔軟布擦拭機座。 溫馨提示: 為更有效清潔果汁杯內及刀片上之污垢,使杯及刀更耐用,可於果汁杯內加入清水及檸檬, 然後蓋緊杯蓋,按“間歇運轉”鍵2至3次,將水倒去,再注入清水重覆之前程序便可。 簡易果汁杯清洗3部曲 注意:切勿將果汁杯浸入水中 1. 加入清水750ml,檸檬1-2片,按「蔬果鍵」(1分56秒)。 2. 倒出污水。重複步驟1。 3. 倒出污水,用乾布抹淨。完成後橫放果汁杯自然風乾即可。 技術規格 PHS-200 型號 220-240 V ~ 50/60 Hz 電壓 / 頻率 1200 W 功率 (H) 430 mm 機身尺寸 (W) 245 mm (D) 484 mm - 產品規格及設計如有變更,恕不另行通知。 - 中英文版本如有出入,一概以中文版為準。 - 本產品使用說明書以 www.germanpool.com 網上版為最新版本。... -
Page 23: Warranty Terms & Conditions
- the serial number is modified, damaged or removed from the product. - 機身編號被擅自塗改、破壞或刪除。 4. German Pool will, at its discretion, repair or replace any defective part. 4. 總代理有權選擇維修或更換配件或其損壞部份。 5. This warranty will be void if there is any transfer of 5. - Page 24 Fax:+86 757 2980 8318 HONG KONG TOP BRAND TEN YEAR ACHIEVEMENT AWARD © All rights reserved. Copying, reproducing or using the contents of this manual is not allowed without prior authorization from German Pool, violators will be prosecuted. www.germanpool.com PHS-200-M-19(1)
Need help?
Do you have a question about the PHS-200 and is the answer not in the manual?
Questions and answers