Table of Contents
Advertisement
Quick Links
Advertisement
Table of Contents

Related Manuals for Axesstel PX120N


Summary of Contents for Axesstel PX120N
- Page 1 Axesstel Fixed Wireless Phone CDMA PX120N User Manual...
-
Page 2: Table Of Contents
CDMA FWP PX120N INDEX GENERAL INTRODUCTION ......................1 IMPORTANT INFORMATION ......................2 PRODUCT OVERVIEW ........................3 ............................3 ACKING ........................3 RODUCT NTRODUCTION 3.2.1 Appearance ............................3 3.2.2 Key Definition ........................... 4 3.2.3 Display Icon ............................5 BASIC OPERATIONS ........................5 ......................... - Page 3 CDMA FWP PX120N ............................16 CHEDULE ............................ 16 LARM LOCK ............................16 ALCULATOR UTK ..............................16 ............................16 ORLD SETTINGS ............................ 17 10.1 ..............................17 ONES 10.1.1 Ring Tone ........................... 17 10.1.2 Volume ............................17 10.1.3 Alert ............................17 10.2 ..............................
-
Page 4: General Introduction
PX3x0N 1 General Introduction Thank you for choosing CDMA Fixed Wireless Phone of Axesstel. To use your phone well, please read this user manual carefully before you use. The phone has been designed to operate with the latest digital communication technology - Code Division Multiple Access (CDMA). -
Page 5: Important Information
CDMA FWP PX120N 2 Important Information The product can only be installed indoors. Do not place the phone near high temperature objects, under direct sunlight, near source of water, near fire or near inflammable and explosive materials. Avoid using the phone in high temperature or humidity. -
Page 6: Product Overview
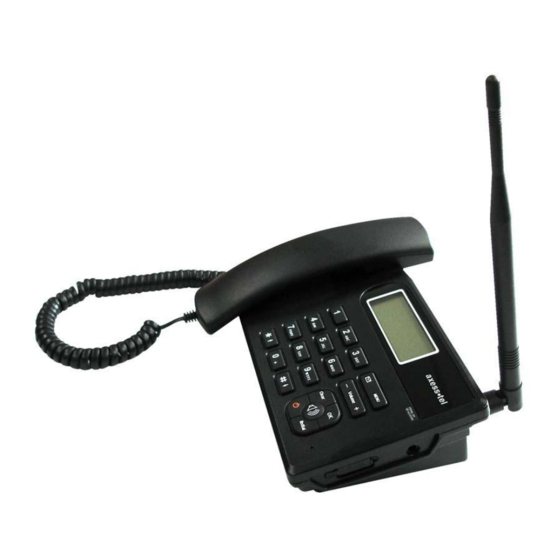
Name Qty. Remark Phone Body Handset Antenna Handset Cable Ni-MH Rechargeable Battery Li-Ion Battery if specified Charger CD Disk Prints Including one User Manual, one Warranty Card Table 1 Packing List 3.2 Product Introduction 3.2.1 Appearance Figure 1 PX120N Appearance... -
Page 7: Key Definition
CDMA FWP PX120N 3.2.2 Key Definition Figure 2 Key Layout Go into the contracts MENU CONTACTS Go into the main MENU MENU Key Press it to access the subMENU In Standby mode, press OK key go into Dialed Calls function... -
Page 8: Display Icon
CDMA FWP PX120N 3.2.3 Display Icon The following icon may appear on the display of the phone: Icon Description Current signal strength. The more bars there are, the stronger the signal is. No signal. Battery capacity indicator. The more bars there are, the more capacity the battery has. -
Page 9: Make A Call
CDMA FWP PX120N 4.3 Make a Call While your phone is power on and at standby screen, enter a destination number you wish to call and then press <Redial >Key. (Note: To modify digits you enter, you can press<CLEAR> Key to delete wrong digits first and then enter new digits). -
Page 10: Main Menu
CDMA FWP PX120N 5 Main MENU Press Left Soft Key Key to enter the main MENU from the standby screen. The main MENU includes: Contacts, Messages, Recent Calls, Tools, and Settings. The MENU tree is as follow: Create Inbox Outbox... -
Page 11: Receive A Message
CDMA FWP PX120N Options 2. After finish inputting the text, press <OK > to select the 1 Send 2 Send Message Send, Send Messages, Insert Template, Insert Contacts, 3 Insert Template or Save as Template function. Select Back 3. Press <1 Send> to send a message to one recipient,... -
Page 12: View Outbox
CDMA FWP PX120N Messages 1 Create 2 Inbox(1) 6.3 View Outbox 3 Outbox(1) 1. In Messages, press <Volume+-> to scroll to <3 Outbox> Select Back Outbox(1/1) and press <MENU> to enter (Outbox). 2. Press <volume+-> to scroll to the message you want to read, press <MENU>... -
Page 13: Memory Status
CDMA FWP PX120N <3 Draft>, <4 all>, if you want to delete them, follow the steps above. Total Free Phone 6.8 Memory Status In this MENU, you could check the phone memory status Back and UIM card memory status for messages. -
Page 14: Received Calls
CDMA FWP PX120N Send Message: Use this number to send a message. Save: Save this number to contacts. Call log Delete: Erase this number in the list. 1 Missed Calls 2 Received Calls 3 Dialed Calls Select Back Call log 7.2 Received Calls... -
Page 15: Delete Record
CDMA FWP PX120N press <Volume+->, <OK> to select <4 Reset Time>. 3. Press <OK> to select <1 Received Calls>,press <OK> to reset received calls time or <Clear> to cancel the action. Note: You can press <Volume+-> to scroll to Dialed calls, All calls .If you want to reset time, follow the steps above. -
Page 16: Add A New Contact
CDMA FWP PX120N <Volume +-> to scroll to the desired contact, press <OK> to view the contact information. Contacts 8.2 Add a New Contact 1 View 1. Press <MENU >, <Contacts>, <Volume +->, <2 Add New>, 2 Add New 3 Search Name or press <Contacts>... -
Page 17: Add A Group
CDMA FWP PX120N delete the contact. Delete? Note: You can select <3 Delete All> to delete all contacts in the group or <1 Add New> to add a new contact to the group. Cancel 8.4.3 Add a Group 1 Add Group There are 5 groups in your phone;... -
Page 18: Speed Dial
CDMA FWP PX120N 8.6 Speed Dial Memory locations 01 ~ 09 are special speed dialing locations. No.1 is voice mail number. You can edit the No.02~09 locations. 1. Make sure some contacts exist in phone book. 2. Press <MENU>, <Contacts>,<6 Speed Dial>, Speed Dial <OK>,select a contact from phone book to the Speed Dial list. -
Page 19: Tools
CDMA FWP PX120N 9 Tools 9.1 Schedule You could add your schedule in the phone, to add a schedule, please 1. In standby screen, press <MENU>, <Tools>, <1 Schedule>, <OK> Schedule to the schedule menu. 1 Add New 2. Select < 1 Add new>, <OK>to add a new schedule, press 2 List <Volume + ->... -
Page 20: Settings
CDMA FWP PX120N 10 Settings 10.1 Tones Tones Here you can set the ring tone and volume. Press <MENU>, (settings), 1 Ring Tone press <Volume+-> to select Tones. 2 Volume 3 Alert … Ring Tone 10.1.1 Ring Tone 1 In Contacts In Tones MENU, select <1 Ring Tone>, press<OK>, you can set the... -
Page 21: Backlight
CDMA FWP PX120N 10.2.2 Backlight In standby screen, Press< MENU >, <Settings>, <2 Display >, <OK> to enter display menu. Select <2 Backlight>, press<OK>, you can change the timer of turning Backlight off the backlight, and you also could turn off the backlight by selecting o 7 Seconds Always Off. -
Page 22: Security
CDMA FWP PX120N Settings 1 Tones 2 Display 10.3 Security 3 Security Select Back Select Security in Settings MENU, you will be prompted to enter password; the initial password is “0000”, input the password, press <OK> key, then you can enter the... -
Page 23: Outgoing Call Setting
CDMA FWP PX120N Security 4 incoming call Setting 10.3.5 Outgoing Call Setting 5 Outgoing Call Setting 6 Change Password In Security menu, select <4 Outgoing Call Setting>, press <OK> to 7 Load Default do the Outgoing Call Limit, Outgoing Call Number List or Dial Delay... -
Page 24: Call Settings
CDMA FWP PX120N List Default In Contacts Tone 1 Ring Tone Not In Contacts Tone 2 Messages Tone 2 Ring Tone Key Beep Tones Volume Handset Handsfree Minute Beep Alert Call Connect Power On/Off Banner welcome Backlight 7 Seconds Display... -
Page 25: Network Service
CDMA FWP PX120N Settings 5 Network Service 6 Phone Info 7 Port Speed 10.5 Network Service Select Back In Call Settings menu, select <5 Network Service>, press <OK>. 1. Press <OK> to select <1 call Forward>, press <OK> to select <1 Activate> or <2 Cancel> to enable call forward if busy or disable it. -
Page 26: Quick Troubleshooting Guide
CDMA FWP PX120N Range of Humidity 5% ~ 95% RH 12 Quick Troubleshooting Guide Unable to send/receive data/fax calls: Check the connections to computer and verify that necessary software has been properly installed and configured. Moisture or ventilation problems: Visually inspect the phone body, moisture can damage the phone.
Need help?
Do you have a question about the PX120N and is the answer not in the manual?
Questions and answers