Table of Contents
Advertisement
Quick Links
1
APPLIANCE .................................................................................... 3
2
DESCRIPTION (FIG. A, B & C) ...................................................... 3
3
PACKAGE CONTENT LIST ............................................................ 3
4
SYMBOLS ....................................................................................... 4
5
GENERAL SAFETY WARNINGS ................................................... 4
5.1
Working environment ............................................................................................ 4
5.2
Personal safety ...................................................................................................... 4
5.3
Correct use and care ............................................................................................. 5
6
PRESSURE WASHERS .................................................................. 5
7
SAFETY WARNINGS GASOLINE .................................................. 6
8
SAFETY FEATURES ...................................................................... 6
8.1
Thermal relief valve ............................................................................................... 6
8.2
Safety lock off latch ............................................................................................... 6
8.3
Water temperature protection ............................................................................... 6
9
ASSEMBLY INSTRUCTIONS ......................................................... 6
9.1
Assembly of the wheels (Fig. 1) ............................................................................ 6
9.2
Assembly of the foot (Fig. 2) ................................................................................. 6
9.3
Assembly of the handle (Fig. 3) ............................................................................ 7
9.4
Assembly of the panel and lance hook (Fig. 4) .................................................... 7
9.5
Assembly of the spray gun (Fig. 5-6) .................................................................... 7
10
BEFORE OPERATION ................................................................... 7
10.1
Add oil to the engine crankcase (Fig. 6A) ............................................................ 7
10.2
Add oil plug (Fig. 7) ............................................................................................... 7
10.3
Add fuel to fuel tank (Fig. 8) .................................................................................. 7
10.4
Connecting the water hose to the High pressure washer (Fig. 9) ....................... 7
10.5
Connect the high-pressure hose to the delivery pipe outlet (Fig .10) ................ 8
11
OPERATING INSTRUCTIONS ....................................................... 8
11.1
Pressure washer location...................................................................................... 8
11.2
11.3
Stopping pressure washer (Fig. 13) ...................................................................... 8
Copyright © 2018 VARO NV
POWXG9009
P a g e
| 1
EN
www.varo.com
Advertisement
Table of Contents

Related Manuals for VARO Powerplus GardenPro POWXG9009


Summary of Contents for VARO Powerplus GardenPro POWXG9009
-
Page 1: Table Of Contents
Connect the high-pressure hose to the delivery pipe outlet (Fig .10) ....8 OPERATING INSTRUCTIONS ............8 11.1 Pressure washer location..................8 11.2 Start-up procedure (Fig. 11 &12) ................8 11.3 Stopping pressure washer (Fig. 13) ..............8 Copyright © 2018 VARO NV www.varo.com P a g e... - Page 2 Air filter ........................11 14.3.4 Fuel tank filter ......................11 STORAGE ..................12 PREPARATION FOR WINTER AND LONG TERM STORAGE .. 12 WARRANTY .................. 12 ENVIRONMENT ................13 DECLARATION OF CONFORMITY ..........13 Copyright © 2018 VARO NV www.varo.com P a g e...
-
Page 3: Appliance
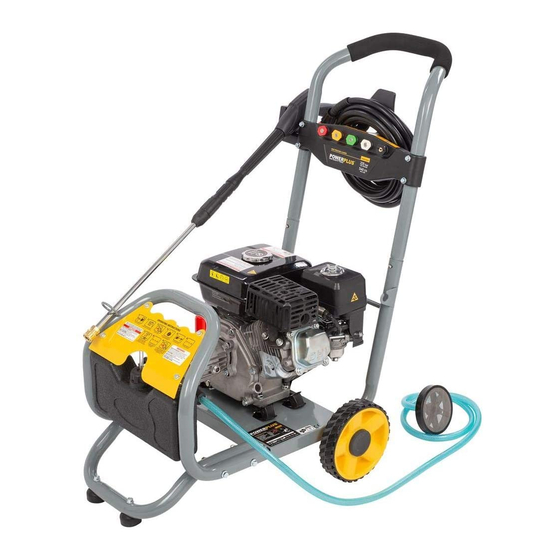
High pressure hose Spray nozzles and soap nozzle ▪ ▪ Water inlet connecter Upper lance hook ▪ ▪ Nozzle cleaning tool Foot ▪ ▪ Gun self-assembly Self-priming tube ▪ Operating instruction manual Copyright © 2018 VARO NV www.varo.com P a g e... -
Page 4: Symbols
Do not operate pressure washing equipment if you have consumed alcohol or taken medication. ▪ Remove the spark plug or cable from the spark plug to prevent accidental starting. When not in use, or prior to detaching the high pressure hose. Copyright © 2018 VARO NV www.varo.com P a g e... -
Page 5: Correct Use And Care
WARNING: High Pressure jets can be dangerous if subject to miss use. The jet must not be directed at persons, live electrical equipment or the appliance itself. Do not direct the jet against yourself or others in order to clean shoes or clothes. Copyright © 2018 VARO NV www.varo.com P a g e... -
Page 6: Safety Warnings Gasoline
Drive the axle through the centre hole of the wheel until the pin is blocked. Assembly of the foot (Fig. 2) Mount the foot frame with supplied 4 bolts M8x75 and 4 nuts M8 (tilt the machine backwards). Copyright © 2018 VARO NV www.varo.com P a g e... -
Page 7: Assembly Of The Handle (Fig. 3)
Run water through the hose for a few seconds to flush any debris from the hose. ▪ Inspect inlet screen and remove any debris. ▪ Connect hose to water inlet and tighten by hand. ▪ Turn on water. Copyright © 2018 VARO NV www.varo.com P a g e... -
Page 8: Connect The High-Pressure Hose To The Delivery Pipe Outlet (Fig .10)
This nozzle delivers a pinpoint stream and is extremely powerful. It covers a very small area of cleaning. This nozzle should only be used on surface that can withstand this high pressure such as metal or concrete. Do not use on wood. Copyright © 2018 VARO NV www.varo.com P a g e... -
Page 9: 15° Nozzle (Coloured Yellow)
If no water flows out after 1 minute, switch the appliance off and check the appliance. Once the water flows, switch off the appliance and attach the hand spray gun and the jet pipe so you can work. Copyright © 2018 VARO NV www.varo.com P a g e... -
Page 10: Technical Data
Disconnect high pressure hose, spray gun and nozzle. Drain water from items and use a rag to wipe down the outside of the hose and spray gun. ▪ Empty the water from the pump by pulling the recoil starter 6 times. Copyright © 2018 VARO NV www.varo.com P a g e | 10... -
Page 11: Clearing A Blockage (Fig. 17)
After every 150 hours of running or every three months the fuel tank filter should be removed and cleaned. Remove the fuel tank filler cap and the filter, clean the filter thoroughly using environmentally friendly water based degreasing agent and re-fit Copyright © 2018 VARO NV www.varo.com P a g e... -
Page 12: Storage
▪ Devices or parts which are replaced under the warranty therefore remain the property of Varo NV. Copyright © 2018 VARO NV www.varo.com P a g e | 12... -
Page 13: Environment
EN60335-1 : 2012 EN60335-2-79 : 2012 EN55012 : 2007 EN61000-6-1 : 2007 Keeper of the Technical Documentation: Philippe Vankerkhove, VARO – Vic. Van Rompuy N.V. The undersigned acts on behalf of the company CEO, Hugo Cuypers Regulatory Affairs – Compliance Manager Date: 22/11/2017 Copyright ©...
Need help?
Do you have a question about the Powerplus GardenPro POWXG9009 and is the answer not in the manual?
Questions and answers