Celestron NexStar 80GTL Instruction Manual
Celestron nexstar 80gtl instruction manual
Hide thumbs
Also See for NexStar 80GTL:
- Communication protocol manual (8 pages) ,
- Installation instructions (1 page) ,
- Quick setup manual (2 pages)

Related Manuals for Celestron NexStar 80GTL


Summary of Contents for Celestron NexStar 80GTL
-
Page 2: Table Of Contents
INTRODUCTION ...4 g ...4 ASSEMBLY...5 Assembling the NexStar ...6 Attaching the Telescope to the Tripod...7 Balancing the Telescope tube ...7 The Erect Image Diagonal...7 The Eyepiece ...8 Focusing ...8 The Star Pointer Finderscope ...8 Star Pointer Installation ...9 Star Pointer Operationn ...9 Using your Solar Filter ...10... - Page 3 Terrestrial (Land) Viewing Hints ...25 Seeing Conditions...25 Transparency ...25 Sky Illumination ...26 Seeing...26 TELESCOPE MAINTENANCE...27 Care and Cleaning of the Optics...27 OPTIONAL ACCESSORIES ...28 APPENDIX A - TECHNICAL SPECIFICATIONS ...30 APPENDIX B – GLOSSARY OF TERMS ...31 APPENDIX C – RS 232 CONNECTION ...34 Communication Protocol:...34...
-
Page 4: Introduction
• Never look directly at the sun with the naked eye or with a telescope (unless using your Celestron solar filter). Permanent and irreversible eye damage may result. -
Page 5: Assembly
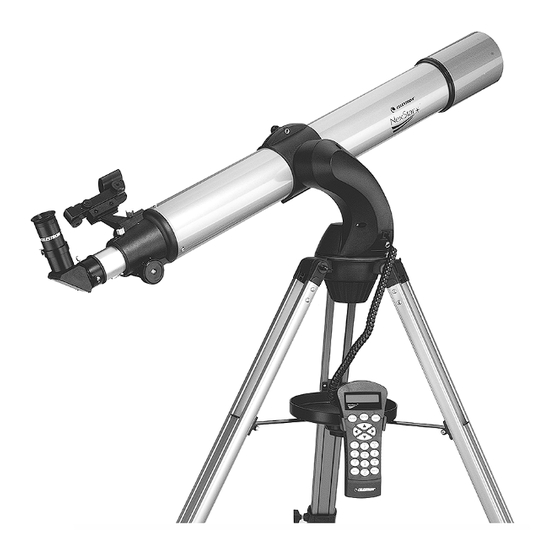
Objective Lens Fork Arm Power Outlet Tripod Hand Control Accessory Tray w/ hand control holder The NexStar 80GTL Refractor Telescope Focuser Knob Erect Image Diagonal - 90˚ Eyepiece Star Pointer Finderscope Optical Tube Tube Ring Clamp... -
Page 6: Assembling The Nexstar
Remove all of the accessories from their individual boxes. Remember to save all of the containers so that they can be used to transport the telescope. Before attaching the visual accessories, the telescope tube should be mounted to its tripod. -
Page 7: Attaching The Telescope To The Tripod
Hold the telescope tube assembly by the fork arm and place the fork arm base inside the tripod mounting platform. See Figure 2-1. Thread the coupling screw into the hole at the bottom of the fork arm base and hand tighten. -
Page 8: The Eyepiece
1-1/4" barrel diameter. To focus your telescope, simply turn either of the focus knobs on the sides of the focuser (see figures 2-4). Turn the focus knob until the image is sharp. Once sharp, turn the knob towards you to focus on an object that is closer than the one you are currently observing. -
Page 9: Star Pointer Installation
The Star Pointer comes equipped with a variable brightness control, two axes alignment control and mounting brackets. Before the Star Pointer is ready to be used, it must be attached to the telescope tube and properly aligned: Slide the Star Pointer bracket into the dovetail mounting platform on top of the focuser assembly (see figure 2-6). -
Page 10: Using Your Solar Filter
About the Filter The Celestron AstroSolar ™ solar filter by Baader allows direct observations of the Sun in complete safety. The filter, which transmit .00001% of the Sun’s visible light, allows you to see the outer atmosphere of the Sun including such features as sunspots, granules and faculae. -
Page 11: Hand Control
The NexStar GT hand control has a phone jack type connector at the end of its cord. Plug the phone jack connector into the outlet at the base of the telescope’s fork arm. Push the connector into the outlet until it clicks into place and place the hand control into its holder as described previously in the Assembly section of the manual. - Page 12 Enter: Pressing Enter allows you to select any of the NexStar functions, accept entered parameters and slew the telescope to displayed objects. Undo: Undo will take you out of the current menu and display the previous level of the menu path. Press Undo repeatedly to get back to a main menu or use it to erase data entered by mistake.
-
Page 13: Hand Control Operation
The NexStar will then automatically choose two stars for alignment and roughly center the stars in the field of view of the Star Pointer. Before the telescope is ready to be aligned, it should be set up in an outside location with all accessories (eyepiece, diagonal and Star Pointer) attached and lens cover removed as described in the Assembly section of the manual. -
Page 14: Two Star Alignment
Based on this information, the NexStar will automatically select a bright star that is above the horizon and slew towards it. At this point the telescope is only roughly aligned, so the alignment star should only be close to the field of view of the Star Pointer finder. -
Page 15: Quick-Align
ENTER. 2. The NexStar display will ask you to move the telescope tube until it is horizontal to the ground. To do this, use the direction keys (3) to move the telescope until it is roughly level with the ground. Press ENTER. -
Page 16: Object Catalog
Object Catalog Now that the telescope is properly aligned, you can choose an object from any of the catalogs in the NexStar's database. The hand control has a key designated for each of the catalogs in its database. There are two ways to select objects from the database;... -
Page 17: Direction Buttons
Direction Buttons The NexStar has four direction buttons in the center of the hand control which controls the telescope motion in altitude (up and down) and azimuth (left and right). The telescope can be controlled at nine different speed rates. -
Page 18: Rs-232
Save Sky Object: The NexStar stores celestial objects to its database by saving its right ascension and declination in the sky. This way the same object can be found each time the telescope is aligned. Once a desired object is centered in the eyepiece, simply scroll to the "Save Sky Obj"... -
Page 19: Get Ra/Dec
To save land objects, once again center the desired object in the eyepiece. Scroll down to the "Save Land Obj" command and press ENTER. -
Page 20: Slew Limits
Sets the limits in altitude that the telescope can slew without displaying a warning message first. The NexStar hand control will warn you before allowing the telescope tube to slew to an object below the horizon or slew to an object that is high enough that the tube might hit one of the tripod legs. - Page 21 NexStar Ready MENU ALIGNMENT TRACKING AUTO ALIGN MODE ALT-AZ EQ NORTH EQ SOUTH RATE SIDEREAL SOLAR LUNAR VIEW TIME-SITE SIDEREAL TIME FILTER LIMITS ALTMAX IN LIST ALTMIN IN LIST UTILITIES SETUP TIME/SITE ANTI-BACKLASH SLEW LIMITS DIRECTION BUTTONS LIGHT CONTROL SELECT MODEL TWO-STAR ALIGNMENT RS-232 USER OBJECTS...
-
Page 22: Telescope Basics
Once you have found an object in the telescope, turn the focusing knob until the image is sharp. To focus on an object that is nearer than your current target, turn the focusing knob toward the eyepiece (i.e., so that the focusing tube moves away from the front of the telescope). -
Page 23: Determining Field Of View
1.4° by 52.5. This produces a linear field width of 73.5 feet at a distance of one thousand yards. The apparent field of each eyepiece that Celestron manufactures is found in the Celestron Accessory Catalog (#93685). -
Page 24: Celestial Observing
Sun is so bright, special precautions must be taken when observing our star so as not to damage your eyes or your telescope. For safe solar viewing, use your Celestron solar filter to reduces the intensity of the Sun's light, making it safe to view. For proper installation of your solar filter refer to the Assembly section earlier in this manual. -
Page 25: Solar Observing Hints
Your NexStar 80GTL also makes an excellent daytime spotting scope. For daytime viewing, the 90˚ erect image diagonal must be inserted into the telescope's focuser. For correct viewing of land objects make sure the eyepiece is pointing straight up out of the diagonal. -
Page 26: Sky Illumination
objects. Aerosols ejected into the upper atmosphere from volcanic eruptions also affect transparency. Ideal conditions are when the night sky is inky black. General sky brightening caused by the Moon, aurorae, natural airglow, and light pollution greatly affect transparency. While not a problem for the brighter stars and planets, bright skies reduce the contrast of extended nebulae making them difficult, if not impossible, to see. -
Page 27: Telescope Maintenance
Care and Cleaning of the Optics Occasionally, dust and/or moisture may build up on the lens of your telescope. Special care should be taken when cleaning any instrument so as not to damage the optics. If dust has built up on the objective lens, you can remove it with a brush (made of camel’s hair) or a can of pressurized air. Spray at an angle to the lens for approximately two to four seconds. -
Page 28: Optional Accessories
The adapter attaches to the cigarette lighter of your car, truck, van, or motorcycle. Barlow lens, OMNI 1.25" (#93326) - Double the magnification of any of your Celestron eyepieces with this fully multi- coated, low profile Barlow lens Eyepieces - Like telescopes, eyepieces come in a variety of designs. - Page 29 A full description of all Celestron accessories can be found in the Celestron Accessory Catalog (#93685) or visit our web site at www.celestron.com...
-
Page 30: Appendix A - Technical Specifications
Slew speeds Hand Control Fork Arm Software Specifications Software Precision Ports Tracking Rates Tracking Modes Alignment Procedures Database Total Object Database NexStar 80GTL Refractor 80mm 900mm F/11 Fully Coated 189x 1.73 arc seconds 1.45 arc seconds 131x unaided eye 1.4º... -
Page 31: Appendix B - Glossary Of Terms
Sun against the stars". Equatorial mount A telescope mounting in which the instrument is set upon an axis which is parallel to the axis of the Earth; the angle of the axis must be equal to the observer's latitude. - Page 32 1 and those increasingly fainter from 2 down to magnitude 5. The faintest star that can be seen without a telescope is about magnitude 6. Each magnitude step corresponds to a ratio of 2.5 in brightness. Thus a star of magnitude 1 is 2.5 times brighter than a star of magnitude 2, and 100 times brighter than a magnitude 5 star.
- Page 33 Terminator The boundary line between the light and dark portion of the moon or a planet. Universe The totality of astronomical things, events, relations and energies capable of being described objectively. Variable Star A star whose brightness varies over time due to either inherent properties of the star or something eclipsing or obscuring the brightness of the star.
-
Page 34: Appendix C - Rs 232 Connection
Cancel Goto Is Goto in Progress Is Alignment Complete The cable required to interface to the telescope has an RS-232 male plug at one end and a 4-4 telephone jack at the other end. The wiring is as follows: PC Command... -
Page 35: Appendix D - Maps Of Time Zones
APPENDIX D – MAPS OF TIME ZONES... -
Page 43: Celestron Two Year Warranty
Parts or product for which replacement is made shall become the property of Celestron. The customer shall be responsible for all costs of transportation and insurance, both to and from the factory of Celestron, and shall be required to prepay such costs. - Page 44 Celestron 2835 Columbia Street Torrance, CA 90503 Tel. (310) 328-9560 Fax. (310) 212-5835 Web site at http//www.celestron.com Copyright 2004 Celestron All rights reserved. (Products or instructions may change without notice or obligation.) This device complies with Part 15 of the FCC Rule. Operation is subject to the following two conditions: 1) This device may not cause harmful interference, and 2) This device must accept any interference received, including interference that may cause undesired operations.
Need help?
Do you have a question about the NexStar 80GTL and is the answer not in the manual?
Questions and answers