Table of Contents
Advertisement
Quick Links
使用說明書
電風扇 (30 cm 起居室電風扇)
Operating Instructions
Electric Fan (30 cm Living Fan)
型號 / Model No.
F-30SMH
非常多謝你購買此 Panasonic 產品。
使用本產品前,請詳細閱讀本說明書,並保留作日後參考之用。
本產品只可在室內使用
目錄
各部件名稱
使用方法
在必要時
. 保養
. 如何更換電池
. 排解疑難
規格
Thank you very much for purchasing this Panasonic product.
Before operating this product, please read the instructions carefully,
and save this manual for future use.
This product is for indoor use only.
Contents
Safety precautions
2-3
6-9
10-11
12-21
22-23
封底
4-6
6-9
10-11
12-21
22-23
Back cover
Advertisement
Table of Contents

Related Manuals for Panasonic F-30SMH


Summary of Contents for Panasonic F-30SMH
-
Page 1: Table Of Contents
․ 保養 ․ 如何更換電池 ․ 排解疑難 規格 封底 Thank you very much for purchasing this Panasonic product. Before operating this product, please read the instructions carefully, and save this manual for future use. This product is for indoor use only. Contents Safety precautions 4-6 ... -
Page 2: 安全注意事項
安全注意事項 請務必遵守這些指示 ■ ■ 此產品不適合身體、感官或精神功能遲緩, 清潔前確保已拔除 AC 配接器。 ■ 或缺乏經驗與知識的人(包括兒童)使用, 請使用指定電池類型。 除非他們在負責其安全的人的監督或指引 (鈕扣型鋰電池 (CR2025)) 下使用。 ■ 拉出電池座並更換電池。 (第 22 頁) ■ 請看管好兒童,確保他們不會以本產品玩耍。 ■ 確認正負極方向插入電池。 ■ 本電器只可使用隨附的電源裝置。 ■ 耗盡的電池從本產品中取出並妥善處理。 ■ 本電器必須使用對應本電器上的標記的安 ■ 若長時間不使用本產品,請把電池取出。 全特低電壓。 ■ 電源端子不可短路。 出現故障時,立即停止使用本產品, 為避免引致使用者受傷或財物損壞的可能性,請務必遵守下 列注意事項。 並拔除 AC 配接器。 ․... - Page 3 手濕時不要連接或拔除 AC 配接器。 注意 此舉可能引致觸電。 切勿在以下場所使用本產品: 不要將本產品放置在 AC 配接器的電線上。 此舉可能令電源線損壞,引致短路並造成觸電或火災。 ․ 接近易燃氣體或火源如爐具等場所。 ․ 暴露於雨點或水的場所。 使用本產品時不要把機身連接插頭推 可能引致熄火、起火、爆炸、短路等,並造成觸電 向牆壁等的地方。 或火災。 ․ 不平坦或障礙物附近的場所。 此舉可能令電源線損壞,引致短路並造成觸電或火災。 本產品可能會跌下來,並導致身體受傷。 請勿把本產品浸於水中或沾水。 ․ 直接陽光照射、雨淋風吹的位置。 可能引致過熱等並造成觸電或火災。 可能引致短路並造成觸電或火災。 拔除 AC 配接器時,握住 AC 配接器並 請勿把本產品放置在發熱電器旁邊。 將它拉出,而不是拉電線。 塑膠部件可能溶化而起火。 此舉可能令電源線損壞,引致短路並造成觸電或火災。 移動或收起本產品時請勿拉扯電源線。 當 AC 配接器已經連接了電源時,皮膚 此舉可能令電源線損壞,引致短路並造成觸電或火災。...
- Page 4 Safety precautions Always follow these instructions ■ ■ This appliance is not intended for use by Make sure to disconnect the AC adaptor persons (including children) with reduced before cleaning. ■ physical, sensory or mental capabilities, Use the specifi ed battery type. or lack of experiences and knowledge, (Lithium Button Cell Battery (CR2025)) ...
- Page 5 Do not damage the power cord or plug Make sure to disconnect the AC of AC adaptor. adaptor when assembling, cleaning and storing away the product. (Do not cut, modify. Do not forcefully bend, twist or pull. Do not put near heating appliances, or put anything The product may start operating unexpectedly and cause heavy on.
- Page 6 Safety precautions 組裝方法 How to assemble Always follow these instructions Do not expose yourself to wind generated by the product for a long time. It may cause health related issue. Do not operate with the remote control unit other than the supplied. The product may start operating unexpectedly and cause discomfort or injury.
- Page 7 裝嵌前 確保所有零件及配件齊備。 所有零件及配件均如左邊圖包裝著。 遙控器 遙控器支架 旋轉器 AC 配接器 底座 後保護網 扇葉 前保護網 螺帽(將後保護網與馬達接合) 架子 螺帽(將架子與底部接合) Before assembling Make sure that all the parts and accessories are provided thoroughly. They are packed as shown in the fi gure on the left. Remote control Remote control holder Spinner...
-
Page 8: 組裝方法
組裝方法 How to assemble ■ 安裝架子 如圖將機身安放。 將架子 底部的螺帽 將底座的凸桿 插入架子的 移除。 確切地將螺帽 ,將架子固定到底座。 凹槽 中。 ․ 輕輕地安放機身,以免架子從底座跌出。 ․ 將架子推入底座並固定好。 ■ 注意事項 : ․ 確切地將螺帽擰緊,確保不會鬆脫。 ■ Installing the stand Lay the main body as shown in the fi gure. Remove the nut at the Insert the projection Tighten the nut... - Page 9 ■ ■ 裝上遙控器支架 安裝後保護網 將遙控器支架 安裝在架子的背面。 對齊 3 個凸桿 及 3 個孔洞 ,然後將後保 移除保護網停止器 護網 裝入馬達。 螺帽 。 擰緊保護網停止器螺帽 。 ■ 注意事項 : ․ 確切地擰緊保護網停止器螺帽,確保電風扇運作時不會鬆脫。 ■ ■ Attach the remote control holder Installing the rear guard Attach the remote control holder at rear Remove the guard Align each of 3 projections...
-
Page 10: Name Of Parts
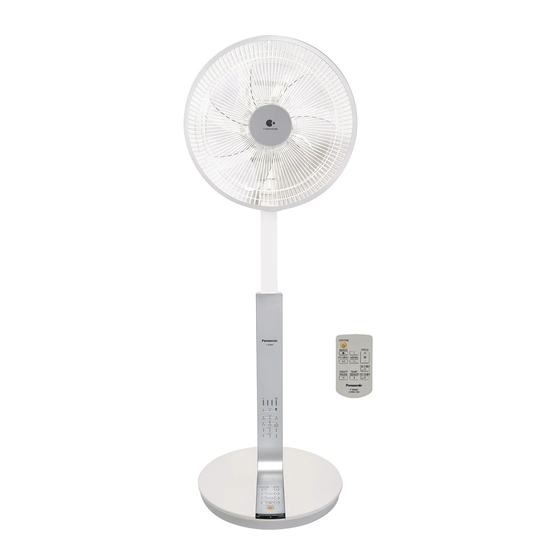
各部件名稱 Name of parts 扇葉 前保護網 夾子 架子 指示器 溫度感應器 控制板 底座 nanoe ( 納米離子 ) 出風口 後保護網 升降桿 手柄 高度調整鈕 遙控器 遙控器支架 機身連接插頭用插座 AC 配接器 AC 配接器器身 電源插頭 電源線 機身連接插頭 只應使用隨附的 AC 配接器。隨附的 AC 配接器只供本產品使用,不要用在其他電器上。 Blade Front guard Clip Stand Display Temperature Sensor... - Page 11 指示器 [ 風速 ] 指示燈 [ 上下擺動 ] 指示燈 [1/f Yuragi] 指示燈 [nanoe ( 納米離子 )] 指示燈 [ 左右擺動 ] 指示燈 [ 溫度感應器 ] 指示燈 [ 開機定時器 ] 指示燈 [ 關機定時器 ] 指示燈 Display [Speed] lamp [Vertical swing] lamp [1/f Yuragi] lamp [nanoe ] lamp [Horizontal swing] lamp...
-
Page 12: How To Use
使用方法 How to use 使用前 將機身連接插頭 完全插入底座背面的插座 。 ․ 注意要正確地接駁機身連接插頭。 (有凹槽 的那一面向上) 接駁 AC 配接器至電源。 Before use Insert fully the main body connection plug into the socket at the back of the base. • Note that the main body connection plug should be connected correctly. (the side with groove facing up) Connect the AC adaptor to the power supply. - Page 13 Off/On(開/關) 每次按下按鈕時,進行開關。 ․ 第一次使用時,電風扇的運作設定是風速“1"及 nanoe ( 納米離子 )“開" 。 ․ 風速、定時器、溫度感應器 及 NANOE 鈕只能夠在電風扇開啟時使用。 記憶功能 ․ 電源開啟時,電風扇會使用之前設定的 風速、1/f Yuragi、nanoe ( 納米離子 )、溫度 感應器 及 搖頭 開始操作。 ․ 計時器的設定將不會被儲存。 ․ 拔出插頭後,記憶將會消除。 ■ 說明 : ․ 使用計時器功能以節省能源或避免睡眠時過涼。 ․ 為了提高升降溫效果,建議使用電風扇時同時開冷氣。 ․ 按住任何按鈕 8 秒,電風扇會基於安全理由而關閉。 ․...
- Page 14 使用方法 How to use (Speed “1”) (Speed “2”) (Speed “8”) Speed (風速) : 減弱 : 增強 按掣可轉換至另一個風速設定。 ․ 風速有 8 個級別可供調校。 ([ 風速 ] 指示燈顯示目前風速。) Speed (Wind speed) : To moderate : To strengthen Each press of the button will switch to next wind speed setting. •...
- Page 15 ․ nanoe ( 納米離子 ) 運作時會產生少量臭氧。此臭氧量與存在於自然世界的量相同,不會對人有害。 ■ 說明 : ․ nanoe ( 納米離子 ) 及 nanoe ( 納米離子 ) 標誌是 Panasonic Corporation 的商標。 nanoe Control panel Press the buttons simultaneously and hold for 3 seconds. Remote control Press NANOE button.
- Page 16 使用方法 How to use Swing(搖頭) 上下擺動 左右擺動 按一下使電風扇上下擺動。 按一下使電風扇左右擺動。 ([ 上下擺動 ] 指示燈會亮起。) 每按一下按鈕將會切換至下一個角度設定。 再按一下使電風扇停止擺動。 ․ [ 左右擺動 ] 指示燈顯示目前的設定角度。 ․ 擺動角度為向上約 15∘及向下約 5∘。 ․ 取消時,所有燈會熄滅。 Swing (Oscillation) Vertical swing Horizontal swing Press to swing vertically. Press to swing horizontally. ([Vertical swing] lamp is lit.) Each press of the button will switch to next angle setting.
- Page 17 ■ 說明 : 組合 ․ 設定左右擺動角度或恢復左右擺動運作後,電風扇可能會在最盡的位置停止 上下及左右擺動按鈕的組合可造出立體擺動 擺動以偵測角度,又或者會發出咔嗒聲。 的運作。 ■ Note: Combination • After setting horizontal swing angle or resuming operation with horizontal swing, it may stop swing at the end position temporarily to detect the angle, or clicking Combination of vertical and horizontal sound may be heard.
- Page 18 使用方法 How to use 8:00 10:00 Off timer(關機定時器) 按掣可轉換至另一個定時設定。 ([ 關機定時器 ] 指示燈顯示設定時間。) ․ 取消時,所有燈會熄滅,但風扇會繼續運作。 ․ 隨著時間經過,指示燈會顯示大約的剩餘時間。 ․ 過了預設的時間後,電風扇會停止運作。 ․ 此按鈕只能夠在電風扇開啟時使用。 (電風 扇關閉時無法設定。 ) ( 例子 ): 於 8:00 設定關機定時器為 [2] Off timer Each press of the button will switch to next timer setting. ([Off timer] lamp indicates the setting hours.) •...
- Page 19 11:00 12:00 13:00 16:00 11:00 12:00 14:00 15:00 11:00 14:00 16:00 開機/關機定時器設定的組合 ․ 開機及關機定時器可以同時設定。 ․ 過了預設的關機定時器時間後,電風扇會停止運作。 過了預設的開機定時器時間後,電風扇會恢復運作。 ( 例子 ): 於 11:00 設定關機定時器為 [2],並於 12:00 設定開機定時器為 [4] ․ 電風扇於 13:00 停止運作,並於 16:00 恢復運作。 ( 例子 ): 於 11:00 設定開機定時器為 [4],並於 12:00 設定關機定時器為 [2] ․...
- Page 20 使用方法 How to use Child lock(兒童安全鎖) 按住 1/f Yuragi 鈕 3 秒。([ 兒童安全鎖 ] 指示燈會亮起。) 再按住 1/f Yuragi 鈕 3 秒以取消。 ․ 只可使用控制板設定兒童安全鎖。 ․ 如果在電風扇運作時設定兒童安全鎖,唯一可做到的是關閉電風扇或取消兒童安全鎖。 (關閉電風扇後,如果想恢復運作,必須取消兒童安全鎖。 ) ․ 如果電風扇關閉時設定兒童安全鎖,唯一可做到的是取消兒童安全鎖。 Child lock Press and hold 1/f Yuragi button for 3 seconds. ([Child lock] lamp is lit.) Press and hold the button for 3 seconds again to cancel.
- Page 21 1/f Yuragi 按一下按鈕以開啟或關閉 1/f Yuragi 運作。([1/f Yuragi] 指示燈會亮起。) 1/f Yuragi ․ 1/f Yuragi 能夠精細地及自動控制風速,讓人享受自然及舒適的微風。 1/f Yuragi 1/f Yuragi operation is turned on or off with the button pressed. ([1/f Yuragi] lamp is lit.) 1/f Yuragi • 1/f Yuragi enables you to enjoy natural, comfortable breeze by controlling the wind speed fi...
-
Page 22: When Necessary
在必要時 When necessary 保養 清潔前確保已拔除 AC 配接器。 使用以加入了廚房用清潔劑的溫水浸濕的軟布擦去污漬,並用乾布擦淨。 ■ 注意事項 : ․ 為了避免留痕,使用乾布擦表面時,切勿過度用力。 ․ 請勿使用稀釋劑(天拿水) 、揮發油、酒精、去污粉或鹼性洗潔劑等。 ․ 如用化學清潔劑時,必須按照所指示來進行。 Cleaning Make sure to disconnect the AC adaptor before cleaning. Use soft cloth soaked in warm water with detergent. Wipe with dry cloth. ■... -
Page 23: Troubleshooting
排解疑難 要求維修服務前,請檢查以下項目。如果問題仍然存在,請拔除 AC 配接器的電源及底座上的機身連接插頭,然後聯絡零售商安排維修。 故障現象 檢查 ․ AC 配接器是否已經完全及正確地連接? ․ [ 兒童安全鎖 ] 指示燈亮起了嗎?(20 頁) 按開/關鈕啟動時扇葉不轉動。 ․ 保護網是否變了形,或碰到扇葉? ․ 溫度感應器運作是否被設為「開」?(21 頁) ․ 扇葉及保護網是否已經正確地安裝?(8-9 頁) ․ 保護網是否變了形,或碰到扇葉? 扇葉轉動時發出異常聲音。 ․ [ 兒童安全鎖 ] 指示燈亮起了嗎?(20 頁) 按鈕後電風扇沒有運作。 ․ 保護膠紙是否已經被拿走?(12 頁) ․ 電池是否已經正確地安裝?(22 頁) 遙控器沒有反應。... -
Page 24: Specifi Cations
/ min.) (k ) (mm) 60° 905-1100 220-240 1100 75° 90° • When connecting the fan to power supply but turning off, the consumption power is about 0.4 W. Panasonic Corporation Web site: http://www.panasonic.com 30SMH8991AC © Panasonic Corporation 2014 M1113Y1087...
Need help?
Do you have a question about the F-30SMH and is the answer not in the manual?
Questions and answers