Advertisement
Thank you for purchasing a BOSS Audio Systems product. Please read through
these instructions carefully so you will know how to install this product properly.
Package Contents
• 1x Marine radio cover
• 4x Mounting screws and clip nuts
Introduction and Features
• Mounting cut-out in the dash (W x H): 8.7" x 3.3" ( 220 x 83 mm)
• Fits single DIN head units (W x H): 7" x 2.0" (178 x 51 mm)
• Marine radio cover dimensions (W x H x D): 10" x 4.1 x 2.6" (249 x 105 x 67 mm)
• Push button activates auto-slide lens cover (spring activated door)
• UV-stabilized ABS plastic housing
• Impact-resistant ABS
• Sealed with an EVA gasket
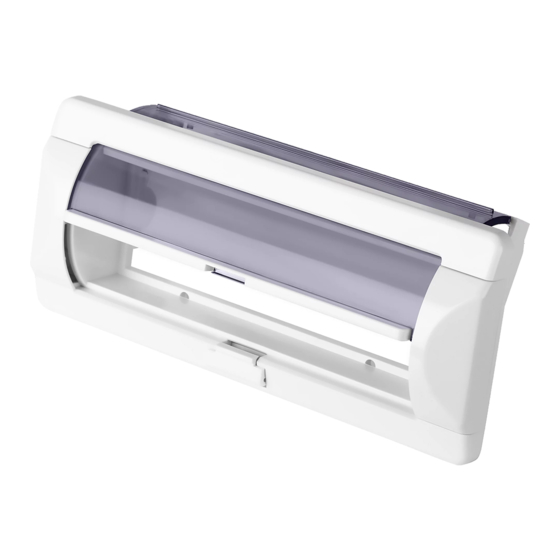
Product Overview
Tab to cover
screw holes
Push-to-open button
Installation Instructions
• Installation Instructions and warranty
Spring activated flip-up door
MRC10
Marine Radio Cover
Tab to cover
screw holes
Advertisement
Table of Contents

Subscribe to Our Youtube Channel
Related Manuals for Boss Audio Systems MRC10


Summary of Contents for Boss Audio Systems MRC10
- Page 1 MRC10 Installation Instructions Marine Radio Cover Thank you for purchasing a BOSS Audio Systems product. Please read through these instructions carefully so you will know how to install this product properly. Package Contents • 1x Marine radio cover • Installation Instructions and warranty •...
- Page 2 Installation Step 1 Remove two plastic tabs on the front of the marine radio cover to access four mounting screw holes. You need to fasten the radio cover to the dash through the screw holes. Note: Use a plastic prying tool to remove the tabs. Exercise caution when prying the tabs off to prevent damage on the radio cover.
Need help?
Do you have a question about the MRC10 and is the answer not in the manual?
Questions and answers