Table of Contents
Advertisement
Quick Links
Advertisement
Table of Contents

Subscribe to Our Youtube Channel
Related Manuals for Kalorik Rotisserie USK DGR 31031


Summary of Contents for Kalorik Rotisserie USK DGR 31031
- Page 1 Rotisserie I/B Version 070305 USK DGR 31031 www.KALORIK.com 120V~ 60Hz 1420 W...
-
Page 2: Important Safeguards
IMPORTANT SAFEGUARDS When using electrical appliances, basic safety precautions should always be followed, including the following: 1. READ ALL INSTRUCTIONS. 2. Check that your mains voltage corresponds to that stated on the appliance. 3. Do not touch hot surfaces. Use handles or knobs. 4. - Page 3 15. Oversize foods or metal utensils other than the one supplied must not be inserted in a rotisserie as they may create a fire or risk of electric shock. 16. A fire may occur if the rotisserie is covered or touching flammable material, including curtains, draperies, walls, and the like, when in operation.
-
Page 4: Polarized Plug Instructions
POLARIZED PLUG INSTRUCTIONS This appliance is equipped with a polarized plug (one blade is wider than the other). To reduce the risk of electric shock, this plug will fit into the polarized outlet only one way. If the plug does not properly fit into the outlet at first, reverse it. -
Page 5: Part Description
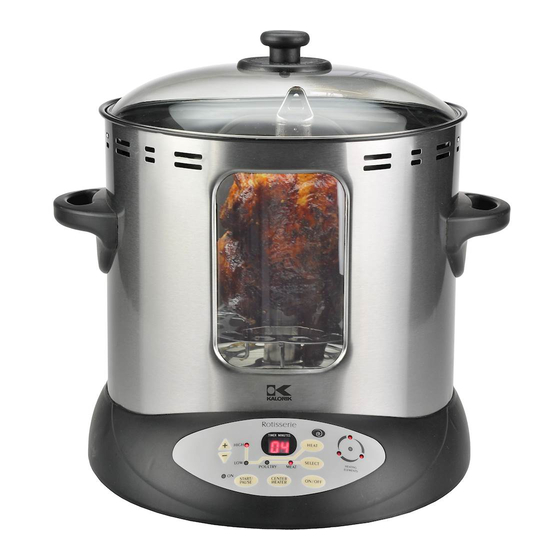
PART DESCRIPTION Glass Lid Housing in Skewers stainless steel Control panel Drip pan Tower Center heating Hook handle element cover KNOW YOUR APPLIANCE Temperature control range is 390°F (Low setting) – 515°F (High • setting) Timer range is 0 to 99 minutes. •... - Page 6 Removable parts are dishwasher safe (except main housing), • making cleaning up easy Contrary to traditional rotisserie systems, this appliance has no • moving parts (pit or fan) which make it very silent. Hot air will circulate around the roast to enable even cooking results. IMPORTANT GUIDELINES FOR COOKING MEAT AND POULTRY –...
- Page 7 the roast is not evenly shaped. Position the larger end of the roast at the top, not at the bottom. If the roast is short, please leave it positioned near the top instead • of near the bottom end of the center heating element. Do not serve immediately after cooking is finished.
- Page 8 A - PREPARE MEAT Place meat (roast) on a plate or cutting board. With a knife, cut • and X-shaped slit through the center of the roast, large enough for the center heating element cover to fit in. NOTE : if using smaller roasts or meat cut in pieces, you can use •...
- Page 9 USING THE ROTISSERIE Place the lid, plug the unit on and press “ON/OFF” once. The unit • will beep twice and the digital display will start flashing “00”. The “HIG” and “POULTRY” indicator turn on, and the 4 light indicators for the heating elements will flash on.
-
Page 10: Recommended Settings
Insert the hook handle into the loop at the end of the heating • element cover or at the top of the drip tray to lift the food, using 2 hands for large birds or roasts. Place on a large tray or shallow pan. -
Page 11: Troubleshooting
Carefully remove Drip Tray from Main Body and pour grease into • a suitable container. All removable parts are dishwasher safe or may be washed by • hand in hot soapy water. Over time, the tower, center cover and skewers will discolor - this •... - Page 12 slip the shaft out. Cut the roast on the other side so that you have 2 long pieces. Slice the roast thinly to serve. Turkey will not fit in unit. Some turkey breasts are hard to position. Try to centre them as •...
- Page 13 Is fat and dripping spattering onto the heating elements during • cooking? Grease/drippings may ooze out onto counter. Make sure the drip tray is properly in place. • During use, some dripping may spatter onto interior walls and run • down into the bottom of the unit, bypassing the drip tray.
-
Page 14: Warranty
You can also fill this warranty card online, at the following address: www.KALORIK.com This KALORIK product is warranted in the U.S.A. for 1 year from the date of purchase against defects in material and workmanship. This warranty is not transferable. - Page 15 Consumer Service Representatives, to the nearest authorized KALORIK Service Centre (please visit our website at www.KALORIK.com or call our Customer Service Department for the address of the nearest authorized KALORIK Service Centre).
- Page 16 I/B Version www.KALORIK.com 100326 Back cover page (last page) Assembly page 16/16...
Need help?
Do you have a question about the Rotisserie USK DGR 31031 and is the answer not in the manual?
Questions and answers