Table of Contents
Advertisement
Quick Links
Advertisement
Table of Contents

Related Manuals for Renogy ONE M1


Summary of Contents for Renogy ONE M1
- Page 1 Renogy ONE VERSION A0 User Manual...
- Page 2 Renogy ONE collects and uses your data in accordance with the Privacy Policy. Copyright Renogy ONE M1 User Manual © 2022 Renogy. All rights reserved. All information in the user manual is subject to copyright and other intellectual property rights of Renogy and its licensors.
-
Page 3: Table Of Contents
General Information ........................07 Key Features ...........................07 Package Contents ........................08 Product Overview ........................09 Wiring Diagram ..........................11 Communication Diagram ......................12 Renogy ONE Communication Architecture ................12 Energy Device Communication Connections ................12 Preparation ..........................14 Required Tools ........................14 Inspection ..........................14 Mounting Location ........................15 Power Wiring ..........................18 Communication Wiring (Optional)....................20... - Page 4 Pairing with App ........................33 Add Devices/Smart Accesories ....................33 Power On/Off ..........................35 Control External Loads ........................36 Technical Specifications ......................37 Troubleshooting ...........................38 FAQ .............................40 Maintenance ..........................42 Inspection ..........................42 Cleaning ..........................42 Storage ............................42 Emergency Responses .......................43 Fire ............................43 Flooding ..........................43 Smell ............................43 Noise ............................43 Technical Support ........................44 Dimensions ..........................45...
-
Page 5: Important Safety Information
The user manual provides important installation, operation, and maintenance instructions for Renogy ONE M1. Read the user manual carefully before installation and operation and save it for future reference. Failure to observe the instructions or precautions in the user manual can result in electrical shock, serious injury, or death, or can damage Renogy ONE M1, potentially rendering it inoperable. - Page 6 In the event of fire, use fire extinguishers suitable for electrical equipment. z If Renogy ONE is installed improperly on a boat, it may cause damage to the corrosive agents of the boat. Please have Renogy ONE installed by a qualified electrician.
-
Page 7: Introduction
DC Home app. z Connected Living Renogy ONE integrates with three panel switches that allow you to turn on or off up to three DC appliances. When pairing Renogy ONE with the DC Home app, you can set up smart scenes to control devices together depending on how you live. -
Page 8: Package Contents
Package Contents Package Contents Renogy ONE M1 × 1 Quick Guide × 1 12V Power Cable (5m) × 1 M2 Screws × 4 ST2 x 1.2 x 6.5 mm M4 Mounting Screws × 4 ST4 x 2 x 13 mm... -
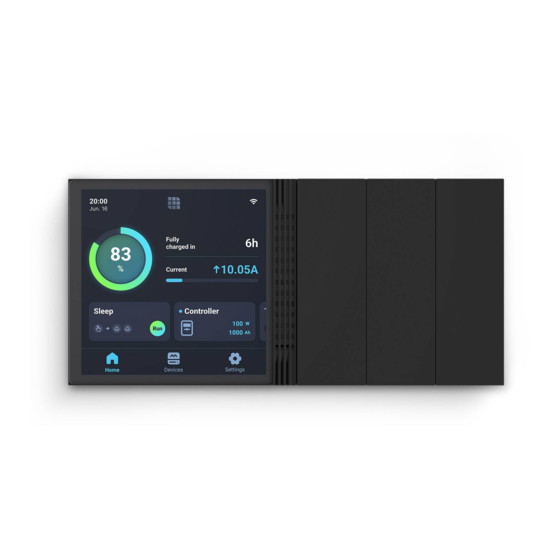
Page 9: Product Overview
Product Overview Product Overview Part Part Power Button Panel Switch 2 Touch Screen Panel Switch 3 Panel Switch 1... - Page 10 Product Overview IN 1 O U T 1 IN 2 O U T 2 IN 3 O U T 3 C A N /R S 4 8 5 T Y P E -C Part Part Mounting Holes IN 3 (External Load Input Terminal) IN 1 (External Load Input Terminal) OUT 3 (External Load Output Terminal) OUT 1 (External Load Output Terminal)
-
Page 11: Wiring Diagram
Wiring Diagram Wiring Diagram ≤30V Power Power Supply Supply IN 1 OUT 1 IN 2 OUT 2 IN 3 OUT 3 CAN/RS485 TYPE-C DC Load (≤30V DC, ≤5A) Positive Devices with RV-C or Negative RS485 communication Communication... -
Page 12: Communication Diagram
Battery Charge Controller Inverter Battery Charger Devices To ensure good compatibility, it is recommended to use Renogy's energy devices and smart accessories. Energy Device Communication Connections Bluetooth 1. For devices with a built-in Bluetooth 2. For devices connected to Renogy... - Page 13 2. For REGO devices connected in RV-C backbone topology: RV-C Backbone Topology Drop Tap RV-C RV-C RV-C RV-C Communication Communication Communication Communication Cable Cable Cable Cable Device 1 Device 2 Device N Renogy ONE For backbone topology, please contact our customer service through renogy.com/contact-us/.
-
Page 14: Preparation
Inspect Renogy ONE for any visible damage including cracks, dents, deformation, and other visible abnormalities before installation. All connector contacts shall be clean, dry, and free of dirt and corrosion. WARNING z Do not use Renogy ONE if it appears to be damaged. -
Page 15: Mounting Location
NOTE z Install Renogy ONE on a vertical surface. z Mounting Renogy ONE requires installation holes. Make sure that you can drill holes on the mounting position. z To ensure quality wireless communication for Renogy ONE, keep it away from metal objects at a minimum distance of 200 mm or 7.9 inch. - Page 16 5. Use the drill and skill saw to dig the installation hole according to the gray mark on the mounting template. 6. Tear off the mounting template. 7. Remove the base cover of Renogy ONE with a Phillips screwdriver (#2).
- Page 17 Drive the screws in straight into the mounting holes to ensure the base cover perfectly fits into Renogy ONE. z Ensure that the base cover of Renogy ONE is firmly mounted to the wall to prevent it from falling off.
-
Page 18: Power Wiring
WARNING z Make sure the DC power supply is powered off before connection. z Renogy ONE can be connected to a DC power supply of up to 16V; otherwise Renogy ONE may be damaged. z Confirm the polarities of the DC power supply before connection. A reverse polarity contact will result in abnormal operations. - Page 19 For details, refer to Troubleshooting in this user manual. For additional support, please contact our customer service through renogy.com/contact-us/. WARNING z Risk of electric shock! Power off the DC power supply after the test on power-on of Renogy ONE is completed.
-
Page 20: Communication Wiring (Optional)
Prior to using a Renogy Communication Hub, read its user manual carefully. If you need to use a Renogy Communication Hub, connect every single device to the DC Home app individually through the hub first, and then reconnect all devices to the hub. Turn to the... - Page 21 The communication cable connecting the device to Renogy Communication Hub should be less than 6 meters (19.6 feet). z If the power cable of the Renogy Communication Hub is not long enough, use an extension cable. For details, see Preparation. The extension cable should not exceed 10 meters (32.8...
- Page 22 RV-C Communication 4. Connect the other end of the communication cable to the PRIMARY Port of Renogy Communication Hub. 5. If there is only one device, insert the other end of the communication cable to the communication port of the specific device in use.
-
Page 23: Rv-C Communication
Check the RV user manual for details or contact the RV manufacturer if necessary. For technical support from Renogy, please contact us through renogy.com/contact-us/. INFO z Connect devices to Renogy ONE according to the wiring diagram provided by the RV manufacturer. Choose proper communication cables according to your specific demands. Recommended Accessories... - Page 24 2. Locate the drop tap (not included) on the RV-C bus that is the closest to the Renogy ONE installation location. The drop taps are usually located above the entry door, in the bathroom, or under the bed in the RV.
- Page 25 Select the appropriate communication cable (sold separately) according to the distance between devices. The communication cable should be less than 6 meters (19.6 feet). 1. Ensure the communication cable is long enough to be connected to Renogy ONE and other devices.
- Page 26 Pin) from the first or last REGO device in the communication network. 4. Insert the LP16 Plug (7-Pin) to RJ45 Communication Adapter Cables into the communication ports of other REGO devices. 5. Connect the pre- embedded RJ45 connector to the RJ45 port of Renogy ONE.
-
Page 27: Load Wiring (Optional)
Load Wiring (Optional) Load Wiring (Optional) Renogy ONE comes with 3 relays which can be connected to 3 DC loads (appliances) (≤30V DC, ≤5A). You can power on/off the loads via Panel Switches on Renogy ONE. Recommended Accessories Ring Terminal to Bare Wire Tray Cable Bare Wire Cable Specifications... - Page 28 Ensure that the output voltage of the DC power supply for an external DC load is less than or equal to 30V; otherwise Renogy ONE may be damaged. z Make sure the DC power supply is powered off before connection.
- Page 29 Load Wiring (Optional) 5. Insert the reserved tray cable connecting to the positive terminal of the load (appliance) into the Renogy ONE output DC load terminal (OUT), and use (≤30V DC, ≤5A) a Phillips screwdriver to turn the wire hatch screw clockwise.
- Page 30 Load Wiring (Optional) 8. Make sure all connections are tight and secure.
-
Page 31: Mounting
fix the Renogy ONE on its base. NOTE z Make sure that Renogy ONE is installed securely to prevent it from falling off. 3. Align the snaps on the back of the panel switches, and press the switches... -
Page 32: Activation
CAUTION z You can tap Skip in the upper-right corner of the main interface on Renogy ONE to skip some of the wizard steps. You can re-complete the activation operations through Settings. z To monitor and operate connected devices remotely, you need to pair Renogy ONE with... -
Page 33: Operation
V1.8.8 for iOS. The actual steps of the Renogy ONE and DC Home in use prevail. Pairing with App If you did not follow the system wizard to pair Renogy ONE with your DC Home app, follow the steps below. - Page 34 WLAN Pairing with App Add Devices/Smart Accesories NOTE z To ensure good compatibility, it is recommended to use Renogy energy devices and smart accessories. INFO z For adding smart accessories to Renogy ONE via Zigbee, resetting accessories is required. For details, refer to the instructions in the user manuals of specific smart accessories.
-
Page 35: Power On/Off
Power On/Off Power On/Off Press and hold the Power Button on Renogy ONE for 3 seconds to power it on or off. -
Page 36: Control External Loads
Control External Loads Control External Loads 1. The 3 panel switches of Renogy ONE correspond to 3 panel relays respectively. IN 1 OUT 1 IN 2 OUT 2 IN 3 OUT 3 CAN/RS485 TYPE-C Control CH3 Control CH2 Control CH1 2. -
Page 37: Technical Specifications
Technical Specifications Technical Specifications Items Parameters Product Name Renogy ONE M1 Model RMS-LP4-G2-US Rated Power 3.5W Power Supply • Power Port: 8V to 16V DC • Type-C Port: 5V DC Power Consumption < 2.5W (standby) • USB Type-C (5V DC) Ports •... -
Page 38: Troubleshooting
Contact our customer service through Renogy ONE damaged renogy.com/contact-us/. Move the device closer to Renogy ONE. z Bluetooth: within 10 m in an open The device is too far away from Renogy ONE. - Page 39 1. Power on the Bluetooth device. 2. The Bluetooth device has 2. Unpair the device from the app first Failure to scan been paired with DC Home and then redo scanning on Renogy Bluetooth devices app. ONE. 3. Bluetooth on the device is 3.
-
Page 40: Faq
Q2: Are there any requirements for the installation of Renogy ONE? A: Renogy ONE is only suitable for indoor uses and in vehicles. Please do not use it at high temperatures, high humidity, or high altitudes. Please keep Renogy ONE clear of metals for optimal wireless connection with energy devices and smart accessories. - Page 41 Q8: What kind of power systems can Renogy ONE work with? A: Please power up Renogy ONE with a 12V or 5V DC power supply. Its rated power is 3.5W. If you wish to wire home appliances with Renogy ONE for one-touch control, please make sure the load is below or equal to 30V DC, 5A.
-
Page 42: Maintenance
Cleaning Follow the steps below to clean the Renogy ONE regularly. z Shut down Renogy ONE. If you clean the inside of the device, you need to disconnect the power supply. z Wipe the charger housing and connector contacts with a damp cloth or non-metallic brush. If it is not clean after wiping, use a household cleaner. -
Page 43: Emergency Responses
WARNING z Do not use type D (flammable metal) fire extinguishers. Flooding 1. If the Renogy ONE is submerged in water, stay away from the water. 2. Disconnect all cables connected to the Renogy ONE. Smell 1. Disconnect all cables connected to the Renogy ONE. -
Page 44: Technical Support
Technical Support Technical Support For additional support, contact the Renogy technical support team through renogy.com/contact- us. Have the following information available when contacting Renogy. z Owner name z Contact information z Order number z Purchase channel z Serial number z Brief description of the issue Renogy offers premium services worldwide:... -
Page 45: Dimensions
Dimensions Dimensions 181.8mm [7.16in] 86.8mm [3.42in] 140mm [5.51in] 17mm 77mm [3.03in] [0.67in] IN 1 OUT 1 IN 2 OUT 2 IN 3 OUT 3 32mm CAN/RS485 TYPE-C 68mm [1.26in] [2.68in] 28mm [1.1in] 42.2mm 107mm [4.21in] [1.66in] CAUTION z Dimension tolerance: ±0.5 mm (0.2 in) - Page 46 FCC Statement This device complies with Part 15 of the FCC Rules. FCC ID: 2ANPBRSMLP4-G2. Operation is subject to the following two conditions: (1) This device may not cause harmful interference. (2) This device must accept any interference received, including interference that may cause undesired operation.
- Page 47 Definitions z Service Service includes but not limited to, serving as a central control panel for your RENOGY ONE system, enabling you to control your entire system from one single touchscreen, connecting energy devices and smart accessories, and synchronizing this data to your RENOGY server and mobile App.
- Page 48 Legal Basis for Processing Personal Data under the General Data Protection Regulation (GDPR) If you are from the European Economic Area (EEA), UK or Switzerland, RENOGY’s legal basis for collecting and using the personal information described in this Privacy Policy depends on the...
- Page 49 █ Retention of Data RENOGY will retain your Personal Data only for as long as is necessary for the purposes set out in this Privacy Policy. We will retain and use your Personal Data to the extent necessary to comply with our legal obligations (for example, if we are required to retain your data to comply with applicable laws), resolve disputes and enforce our legal agreements and policies.
- Page 50 If you are a resident of the European Economic Area (EEA), the UK or Switzerland, you have certain data protection rights. RENOGY aims to take reasonable steps to allow you to correct, amend, delete or limit the use of your Personal Data.
- Page 51 For more details on third parties we share data with, please see the Service Providers section below. Please contact us at support@renogy.com if you have any questions about data protection or if you wish to exercise any of your rights described above.
- Page 52 "Contact Us". Renogy reserves the right to change the contents of this manual without notice. Join the Renogy Power Plus Community by downloading the DC Home App. Find your e-warranty here, and more.
Need help?
Do you have a question about the ONE M1 and is the answer not in the manual?
Questions and answers