Table of Contents
Advertisement
Quick Links
Advertisement
Table of Contents

Related Manuals for Avent Security M500


Summary of Contents for Avent Security M500
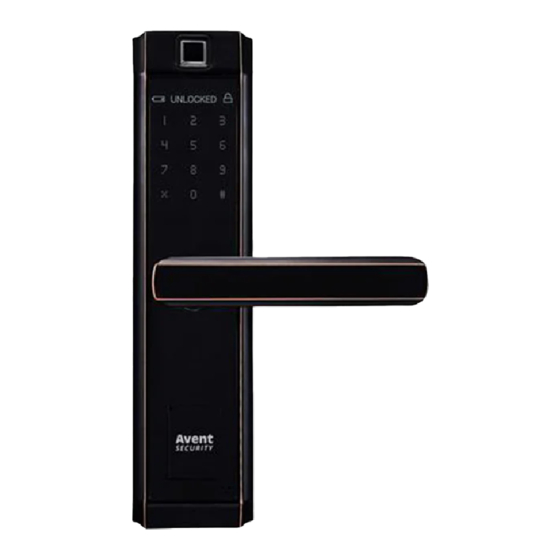
- Page 1 FINGERPRINT DOOR LOCK M500...
-
Page 2: Installation
Installation Drill the holes on the door and then Install the spindle into the handle hole install the mortise into the door; in the front panel, and then insert the rod and fasten it; Connect the cable between the front Install the front panel on the door and back panels Install the back panel on the other... -
Page 3: Product Guide
Product Guide Fingerprint Sensor Battery Case Keypad Card Reader E-Deadbolt Cylinder Micro-USB Port Brief Introduction 1. The default master password is “123-456”; 2. There are total 300 users available, 9 users are the master users, 291 are the normal users normal users in the lock; 3. -
Page 4: Operation
Operation Register Master User Input the master user for authorization, Input * + # press # to confirm Input 1 for master user Input 1 to register master user Password: input the Card: place the card Fingerprint: place the fingerprint on the sensor password, and press # close to the card for 3 times to register... - Page 5 Add Normal User Input the master user for authorization, Input * + # press # to confirm Input 2 for normal user Input 1 to register normal user Fingerprint: place the Password: input the Card: place the card fingerprint on the sensor password, and press # close to the card to confirm in 2 times...
- Page 6 Delete Master User Input the master user for authorization, Input * + # press # to confirm Input 1 for master user Input 2 to delete master user Input the ID number you want to delete, press # to confirm The master user which is used to log in the system can not be deleted.
- Page 7 Delete Normal User (Single User) Input the master user for authorization, Input * + # press # to confirm Input 2 for normal user Input 2 to delete single normal user Input the ID number you want to delete, press # to confirm Once finishing the operations, please try to unlock the lock to confirm the operation is successful.
- Page 8 Unlocking Mode Sometimes if you need a higher security level, you can set up the lock in double unlocking mode, which the unlock needs 2 registered users for unlocking each time. Input the master user for authorization, Input * + # press # to confirm Input 3 for system setting Input 2 for unlocking mode...
-
Page 9: Voice Setting
Voice Setting You can turn on/off the voice for unlocking Enable: Input the master user for authorization, Input * + # press # to confirm Input 3 for system setting Input 1 for voice setting Input 1 to turn on the voice Disable: Input the master user for authorization, Input * + #... -
Page 10: Time Setting
Time Setting Input the master user for authorization, Input * + # press # to confirm time Input the new date and time Input 3 for system setting Input 4 for time setting to the lock. The format for the date and time is 2 digits, which is Year (XX) – Month (XX) – Day (XX) -Hour (XX) –... - Page 11 Disable: Activate the lock and then input 5 + # to cancel the passage mode. Restore The Lock When the lock has problems and you can try to restore the lock to solve the problems. Option # 1 Press the reset key in the battery case for 6 seconds, and then the lock will be restored to the factory default. The master password will be restored to “123-456”.
Need help?
Do you have a question about the M500 and is the answer not in the manual?
Questions and answers