Table of Contents
Advertisement
Owner's manual
Read this manual for complete instructions
1-800-328-8251
Wagner Technical Service
Visit us on the world wide web!
http://www.wagnerspraytech.com
1770 Fernbrook Lane, Plymouth, MN 55447
Technical service hours: Monday through Friday, 8:00 am to 4:30 pm Central Time
Form No. 0515899C
1007 •
Table of Contents
Safety . . . . . . . . . . . . . . . . . . . . . . . . . . . . . . . .2-3
Components and Description . . . . . . . . . . . . . .4-5
Assembly . . . . . . . . . . . . . . . . . . . . . . . . . . . . . . .6
Before You Begin . . . . . . . . . . . . . . . . . . . . . . . . .7
Locking the Spray Gun . . . . . . . . . . . . . . . .7
Pressure Relief Procedure . . . . . . . . . . . . .7
Emptying the Hopper . . . . . . . . . . . . . . . . .7
Purging and Priming the Sprayer . . . . . . . . . . . . .8
Purging and Priming the Spray Hose . . . . . . . . . .9
Practice / Spraying Technique . . . . . . . . . . . . . .10
Spraying Troubleshooting . . . . . . . . . . . . . . .11-12
Unclogging the Spray Tip . . . . . . . . . . . . .11
Cleaning the Spray Gun Filter . . . . . . . . .12
Cleaning the Inlet Filter . . . . . . . . . . . . . .12
Cleanup . . . . . . . . . . . . . . . . . . . . . . . . . . . . .13-14
Cleaning the Spray Gun Components . . . . . . . .14
Short-Term Storage . . . . . . . . . . . . . . . . . . . . . .15
Long-Term Storage . . . . . . . . . . . . . . . . . . . . . . .15
Servicing the Inlet Valve . . . . . . . . . . . . . . . . . . .16
Replacing the Outlet Valve . . . . . . . . . . . . . . . . .16
Troubleshooting / Maintenance . . . . . . . . . . . . .17
Français . . . . . . . . . . . . . . . . . . . . . . . . . . . . . . .19
Español . . . . . . . . . . . . . . . . . . . . . . . . . . . . . . .37
Parts List . . . . . . . . . . . . . . . . . . . . . . . . . . . .54-55
Accessories . . . . . . . . . . . . . . . . . . . . . . . . . . . .55
Warranty . . . . . . . . . . . . . . . . . . . . . . . . . . . . . . .56
Need Help? Call us first for answers
fast.
Call Wagner Spray Tech toll-free if you
have any comments or problems with this product.
English
Advertisement
Table of Contents

Related Manuals for WAGNER Paint Crew Plus


Summary of Contents for WAGNER Paint Crew Plus
-
Page 1: Table Of Contents
1-800-328-8251 Need Help? Call us first for answers Wagner Technical Service fast. Call Wagner Spray Tech toll-free if you Visit us on the world wide web! have any comments or problems with this product. http://www.wagnerspraytech.com 1770 Fernbrook Lane, Plymouth, MN 55447 Technical service hours: Monday through Friday, 8:00 am to 4:30 pm Central Time Form No. - Page 2 Important Safety Information • Read all safety information before operating the equipment. Save these instructions To reduce the risks of fire or explosion, electrical shock and the injury to persons, read and understand all instructions included in this manual. Be familiar with the controls and proper usage of the equipment. Indicates a hazardous situation which, if not avoided, could result in death or serious injury.
- Page 3 Important Safety Information • Read all safety information before operating the equipment. Save these instructions HAZARD: GENERAL Grounding Instructions Can cause severe injury or property damage. This product must be grounded. In the event of an electrical short PREVENTION: circuit, grounding reduces the risk of electric shock by providing an •...
-
Page 4: Safety
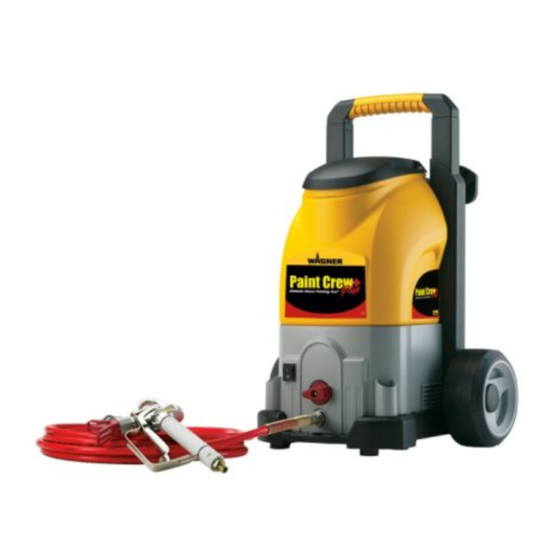
Components and Description Components Tools Needed for Assembly • Two adjustable wrenches The shipping carton for your painting system contains the following: • Spray gun with filter and spray tip assembly • Phillips screwdriver • 25’, 1/4” diameter pressure hose •... - Page 5 Components and Description Spray hose Rear View Return tube Hose bracket Handle release button Inlet valve Extendable handle pusher tool* Hopper lid **Push nut / inlet valve removal tool Hopper handles (2) Removable hopper Wheel / Axle Axle Assembly Screws (4) ON/OFF switch Axle plates (2) Spacer (2)
-
Page 6: Assembly
Assembly Do not plug in the power cord until assembly is complete. 2. Slide both ends of the axle up into the slots as shown (c). 1. Slide all parts of the wheel The lipped side of the spacers (d) should go inside of the assembly over the end of the axle in the order shown. -
Page 7: Before You Begin
Title Before you begin - This section contains instructions that will be repeated throughout this manual. Locking / Unlocking the Spray Gun Always lock the trigger off when attaching the spray tip or when the spray gun is not in use. 1. -
Page 8: Purging And Priming The Sprayer
Title Purging and Priming the Sprayer All new units are performance-tested at the factory and are shipped with test fluid in the fluid section to prevent corrosion during shipment and storage. If you have already used your pump, some water or solvent used in cleaning may remain in the fluid section. -
Page 9: Purging And Priming The Spray Hose
Title Purging and Priming the Spray Hose The spray tip SHOULD NOT be attached to the spray gun when purging the spray hose. Failure to comply could result in an injection injury. 1. Unlock the spray gun and make sure PRIME/SPRAY knob 2. -
Page 10: Practice / Spraying Technique
Title Practice / Spraying Technique NOTE - Be sure that the paint hose is free of kinks and clear of objects with sharp cutting edges. 1. Switch the pump ON (l). 2. When motor shuts off, unlock the spray gun and spray a test area to check the spray pattern. -
Page 11: Unclogging The Spray Tip
Title Spraying Troubleshooting - Unclogging the Spray Tip If the spray pattern becomes distorted or stops completely while the gun is triggered, follow these steps. Do not attempt to unclog or clean the tip with your finger. High pressure fluid can cause injection injury. NOTE - Do not use a needle or other sharp pointed instrument to clean the tip. -
Page 12: Cleaning The Spray Gun Filter
Title Spraying Troubleshooting - Cleaning the Spray Gun Filter The filter must be cleaned every time you use your sprayer. When using thicker spray materials, the filter might need to be cleaned more often. Pressure Relief Procedure, 1. Perform page 7. 2. -
Page 13: Cleanup
Cleanup Important Cleaning Notes - Read before cleaning Follow these steps whenever cleaning with mineral spirits: • When using latex materials, clean your sprayer and components with water. When using oil-based materials, use • Always flush spray gun at least one hose mineral spirits. -
Page 14: Cleaning The Spray Gun Components
Title Cleanup (continued) 12. If hopper is empty of all cleaning solution, refill with new cleaning solution. 13. Turn the PRIME/SPRAY knob to PRIME, and turn the pump ON. 14. Let the pump circulate the cleaning solution out the return tube for 2-3 minutes. Turn the pump OFF. 15. -
Page 15: Short-Term Storage
Title Short-Term Storage (up to 16 hours) Follow these steps when using latex materials only. If using materials that are oil-based, follow the Cleanup and Long- Term Storage steps. Shutdown Pressure Relief Procedure, page 7. Unplug the 1. Perform sprayer. 2. -
Page 16: Servicing The Inlet Valve
Servicing the Inlet Valve Cleaning or replacing the inlet valve may be required if the unit has priming problems. This may be caused by improper cleaning and/or storage. Replacement kits may be ordered by calling customer service (1-800-328-8251). 1. Remove the hopper. Insert the the inlet valve tool into the inlet valve area (a). - Page 17 SPRAY and there is flow through the return tube. E. The spray gun leaks. 1. Internal parts of the gun are worn 1. Take the sprayer to a Wagner Authorized Service or dirty. Center. F. The tip assembly leaks.
-
Page 18: Français
Parts List • Liste de pièces • Lista de piezas Sprayer • Pulvérisateur • Rociador Rear view Vue arrière Vista Trasera Item Part No. Quantity English - Français - Español - Article Nº de piéce Quantite Articulo Pieza No. Description Description Descripción Cantidad... - Page 19 Parts List • Liste de pièces • Lista de piezas Spray Gun • Pistolet • Pistola Item Part No. Quantity English - Français - Español - Article Nº de piéce Quantite Articulo Pieza No. Description Description Descripción Cantidad 0501011 Guard assembly Protège-embout Ensamblaje de protección 0501415...
-
Page 20: Warranty
Esta garantía no cubre los daños que sean resultado de un uso inapropiado, accidentes, negligencia del usuario o un desgaste normal. Esta garantía no cubre ningún defecto o daño que haya sido causado por los servicios o reparaciones llevadas a cabo por alguien que no sea un técnico del Centro de Servicio Autorizado de Wagner.
Need help?
Do you have a question about the Paint Crew Plus and is the answer not in the manual?
Questions and answers