
Related Manuals for Technika PDVDTWINSS10


Summary of Contents for Technika PDVDTWINSS10
- Page 1 WIDE STOP PREV 7” Twin Screen Portable DVD 7” Twin Screen Portable DVD Player PDVDTWINSS10 PDVDTWINSS10 Owner’s Owner’s Handbook Handbook NEXT MENU Player...
- Page 2 IMPORTANT SAFETY INFORMATION This symbol indicates that dangerous voltage constituting a risk of electric shock is present within this unit. This symbol indicates that there are important operating and maintenance instructions in the literature accompa- nying this unit. Read these instructions. Keep these instructions.
-
Page 3: Table Of Contents
CONTENTS SAFETY INFORMATION ... Inside Front Cover INTRODUCTION ... 1 PLAYER FEATURES ... 2 PLAYER CONTROLS AND FUNCTIONS ... 3 REMOTE MONITOR CONTROLS AND FUNCTIONS ... 4 VEHICLE OPERATION ... 5 HOME OPERATION ... 6 REMOTE HANDSET ... 7 PLAYER PREPARATION ... 8 GETTING STARTED ... -
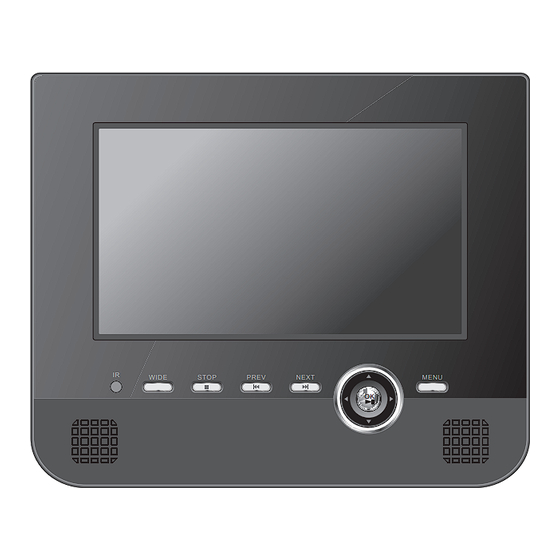
Page 4: Player Features
PLAYER FEATURES DVD, CD, CD-R, CD-RW DVD+R, DVD+RW capable TV format: NTSC (Player): PAL (Video Out) Screen format: Selectable Normal/Widescreen Video output: Composite Video output Audio output: Stereo analogue output DVD features: Multi Subtitle select Multi Language select Multi Angle select Other features: On screen display menu Multi-level zooming... -
Page 5: Player Controls And Functions
PLAYER CONTROLS AND FUNCTIONS 1). Earphone Jack: Connection for headphones. Note: Connecting headphones disables the internal speakers. 2). IR Sensor: Receives signals from the remote control. 3). Setup Button: Press to enter/leave the player Setup menu 4). Stop Button: Press once to stop the disc at a given point. Press again to completely stop the disc. -
Page 6: Remote Monitor Controls And Functions
REMOTE MONITOR CONTROLS AND FUNCTIONS 1). Power On/Off Switch: Turn the monitor ON/OFF 2). Brightness +/-: Adjust the brightness. 3). Volume +/-: Adjust the Volume. 4). Earphone Jack: Connection for headphones. Note: Connecting headphones disables the internal speakers. 5). AV Input Jack: Connects to the AV Output Jack on the DVD Player. 6). -
Page 7: Vehicle Operation
VEHICLE OPERATION SECURING THE PLAYER & REMOTE MONITOR Pass a securing strap through the slots in the rear (A). Place the strap around a vehicle front seat headrest. Ensure the screen is in the centre of the headrest and buckle the strap securely (B). OPERATE THE EQUIPMENT ONLY IN THE REAR PASSENGER COMPARTMENT. THIS EQUIPMENT MUST ONLY BE CONNECTED TO NEGATIVELY EARTHED 12V DC SUPPLIES. AV &... -
Page 8: Home Operation
HOME OPERATION PLAYER PLACEMENT Carefully swing out the stand to its maxi- mum position. Place the player as shown on a stable surface where it cannot get knocked off or pulled over by the connecting cables. AV CONNECTIONS You can connect the system to a TV to enjoy the benefits of a larger picture. You will need to purchase an interconnect with a three pole 3.5mm jack on one end and three RCA phono plugs on the other. -
Page 9: Remote Handset
REMOTE HANDSET KEY OPERATIONS 10 NUM: 11 ] 12 uII 13 } 14 p 15 ZOOM: Enlarge Image on Screen 16 MENU: Enter/Leave a DVD root menu 17 ANGLE: Change the viewing angle/ Select a transition effect 18 DISPLAY: Display/Hide On Screen Display NUMBER AND FUNCTION MODES Some function buttons are used to input numbers. -
Page 10: Player Preparation
PLAYER PREPARATION HANDSET PREPARATION Remove the safety strip from the battery compart- ment. The handset is now ready for use BATTERY REPLACEMENT If the handset behaves erratically or fails to operate the battery should be replaced. 1: Press the catch at the side of the battery compart- ment. -
Page 11: Getting Started
GETTING STARTED • Connect the supplied power adapter to the player. Plug the adaptor into the mains outlet or 12VDC supply as appropriate and switch on the power. • Open the player as described on Page 8 depending on your location. The maximum angle you can open the player is 90°. - Page 12 6) Zoom: Press ZOOM repeatedly The picture size changes ’ ’ ’ When Zoom is greater than 1: use the keys to move the image around. 7) To alter the volume Use the volume control on the player or remote monitor to alter the volume. 8) Stopping the Disc The STOP button has two modes.
- Page 13 Using the Number Keys • To enter a number from 1 to 9, (say 7): Press NUM; Press 07 • To enter 10 to 99, (say 77): Press 77 and so on. • Press NUM to leave Number Mode when you are finished. THE SEARCH FUNCTION During Play: You can select a title, chapter, or time on the disc with a combination of the number and navigation keys.
-
Page 14: Playing An Audio Cd
REPEAT PLAY Pressing REPEAT will: Repeat Chapter A: Repeat a Chapter continuously Repeat Title B: Repeat a Title continuously Repeat Disc Repeat thr Disc continuously D: Cancel REPEAT Repeat Off REPEATING A CHOSEN PASSAGE (A-B Repeat) • Press A-B at the start of the selection (point A) •... -
Page 15: Playing A Jpg Disc
5) Stopping and re-starting a disc • Press • Press PLAY (or OK) to resume play from where the disc was stopped. • To completely stop a disc: Press twice. 6) Selecting and playing a track • Press to move up/down the track list and ▲... - Page 16 THUMBNAIL VIEW Press MENU at any time. The images display in THUMB- NAILS of 9 images per screen. • Press to up or down a row • Press to move along a row • Press PLAY (or OK) to start the slideshow from the selected picture. ALTERING SLIDE SHOW TRANSITION EFFECTS During a Slide Show (in play or pause mode): Press ANGLE repeatedly to choose one of 20 available transition effects (or no effect).
-
Page 17: Playing An Xvid Disc
When the last picture has displayed the slide show will stop and the Folder Menu will display • At any time, pressing the key also returns you to the Folder Menu 1 / 20 ZOO/ Img 001 Img 001 Img 002 Img 003 Img 004 To select another folder... -
Page 18: Customising Player Settings
CUSTOMISING PLAYER SETTINGS Always access the SETUP menu when the player is FULLY stopped or when there is no disc in the drawer. Press SETUP to enter the Setup menu. The setup menu has 4 categories: • Language: Video: Rating: and Misc. •... - Page 19 VIDEO SETUP Press SETUP to enter Setup. Press or • to move to the VIDEO page ▼ to highlight “Aspect Ratio” • Press Language Aspect Ratio :16:9 View Mode : Auto Fit Video Smart Picture :Standard Language Rating Aspect Ratio :16:9 View Mode : Auto Fit...
-
Page 20: The Ratings Page (Parental Settings)
SMART PICTURE • Press to select TV System: Press ▲ ▼ Language : 16:9 Aspect Ratio Mode : Auto Fit Video Smart Picture Standard Bright Rating Soft Dynamic Misc Smart Picture enables you to provide personalised image settings. Standard: This is the default setting. Oter settings can be chosen to enhance the program experience, e.g Dynamic for sport and action movies and so on. -
Page 21: Changing The Password
CHANGING THE PASSWORD • Press to highlight ‘SET PASSWORD’ : Press ▲ ▼ Parental control Language Set Password Video Last Memory You will be prompted to enter the password. The default password is 9653 Rating • Enter 9653 Misc Parental control Language Set Password •... - Page 22 MISCELLANEOUS SETUP ITEMS • Press SETUP to enter Setup. Press to move to the Misc page ▼ • Press to highlight “Use Default Settings” ► Use Default Settings Language Screen Saver • Press Video Us e D efault Settings Rating Do you want to use default setting ? Misc •...
-
Page 23: Troubleshooting
TROUBLESHOOTING If your DVD player is not working properly use this guide before contacting Tesco. Before investigating a problem, always switch off the player and any connected units. SYMPTOM CORRECTIVE ACTION No power Check if the power adapter is connected securely. No Sound Is the volume control turned up? No sound or picture... - Page 24 Calls cost up to 4p per minute from a BT landline, other providers may vary) WARRANTY Your Technika appliance is covered by a warranty for 12 months from the date of purchase. If a fault develops during this period, please contact the TESCO electrical help line on 0845 456 6767.
Need help?
Do you have a question about the PDVDTWINSS10 and is the answer not in the manual?
Questions and answers