Table of Contents
Advertisement
Quick Links
Advertisement
Table of Contents

Related Manuals for Opus Technologies OP-6507/B


Summary of Contents for Opus Technologies OP-6507/B
- Page 1 Digital Window Intercom OP-6507/B User Guide 2020...
-
Page 3: Table Of Contents
Contents Summary…………………………………………………………………………………………….……. Safety precautions………………………………………………………………………………………… Product introduction……………………………………………………………………………………. Features………………………………………………………………………………………………….…… Hardware interface instruction……………………………………………………………….…… Packing list……………………………………………………………………………………….………….. Wiring………………………………………………………………….………………………….…….…….. Basic function……………………………………………………………………………………….……… Local intercom……………………………………………………………………………….………….…. Remote intercom………………………………………………………………………….……………… Scene mode adjustment…………………………………………………………….………………… Engineer settings…………..……………………………………………………………………………… Recording…………………………………………………..………………………………….…………….. Fault exclude………………………………………………………………………………………………… Connect OP-6507B……………………………………………………..…………………………… Connection diagram ………………………………………………………………………………….. -
Page 4: Safety Precautions
Summary Warning and Reminding This symbol means there are potential safe troubles, it may cause death or serious injury with incorrect operation. This symbol used to remind the user that this device attached the important operation and maintenance instructions. Setting and Installation •... -
Page 5: Product Introduction
Internal window intercom Internal window intercom Features • Adopt single DSP multi-channel language auto-control technology, avoiding squeaking and disturb to realize real digital full-duplex intercom. • Adopt press button pad). • Recognizing sound source, control environment noise, automatically adjust volume and restore the original sound. -
Page 6: Hardware Interface Instruction
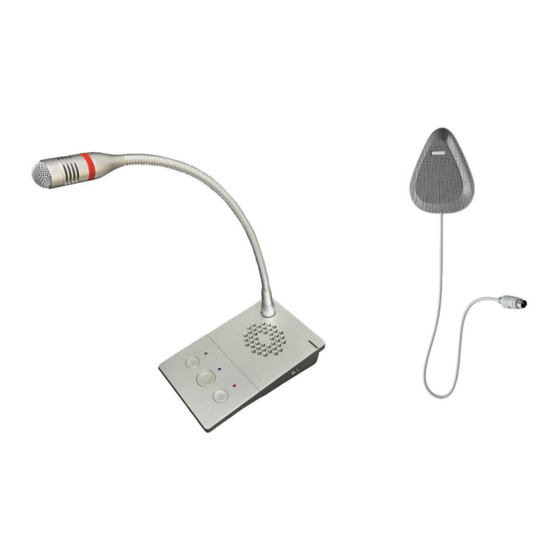
Hardware interface instruction Internal window intercom 【Front view】 ①Working indication light: red light ②Loudspeaker: amplify the audio from the external window intercom. ③Indicator light: The three indicators light correspond to the recording button, intercom button, Voice Broadcast button ④ Recording Button: During conversation , pressing it to record , press again to end record. When recording, the corresponding indicator light will flash red (After intercom part and external part are connected) ⑤... -
Page 7: Packing List
【connection wiring】 ①Power interface: connect with DC12/1,5A power. ②Communication interface:connect with the network HD recording host. ③Analog audio output interface: output analog audio, connect with DVR or IP camera. ④External window intercom speaker. 【External window intercom】 ①Loudspeaker/MIC: Loudspeaker:amplify the local intercom audio; MIC:pick up the local intercom audio; ②Internal window intercom interface Introduction Packing list... -
Page 8: Wiring
(1) Microphone pole 1 pcs (2) Power adapter 1 pcs (3) Wiring harness (3*100mm)3 pcs (4) Cable clamp (HC-100) 3 pcs (5) Wiring connector (3.81-2P) 1 pcs (6) Quick installation manual 1 pcs Wiring (1) Connect the one port of power adapter to the power interface of internal window intercom, the other port connect with power socket. -
Page 9: Basic Function
Basic function Local intercom After connected internal window intercom and external window intercom, then power-on. Press the intercom key of internal window intercom, it can digital full duplex HD intercom with external window intercom, press again to stop intercom. Remote intercom Used with HD recording host, under the online status, press remote intercom key to call the server pointed terminal. -
Page 10: Recording
Recording Analog recording Window internal intercom can output analog audio. Connect this audio output to a DVR recorder pluggin in a block connector 2pt male to the audio output and either jack 3,5mm or RCA to the the DVR to make auto-recording. Connect DCL20-65 Loop Amplifier (for OP-6507B Versions) The DCL20-65 is an induction loop kit that can be used to equip counters or reception desks. -
Page 11: Connect Op-6507B
Installation Note: The wire supplied in the DLC20-65 kit ensures the quick installation of a magnetic loop system in a reception desk, counter or cash desk. In order to optimize the radiation of the magnetic field and to guarantee a better result he wire should be placed close to the customer. - Page 12 amplifier Loop1 Position the loop on the horizontal counter- top by positionning the cable closest to the Loop2 customer. Install the loop on the vertical countertop by Figure 2. positioning the cable closest to the customer. Set the loop using the binding clips supplied for this purpose. For better durability, it may be ap- propriate to install the loop in a plasticchute.
- Page 13 Connect DCL20-65 to the main unit Loop General connection To connect the supplied microphone with the kit, insert the 3.5 jack into the microphone input Connecting to an intercom or specific source: Connect your source to input 2 of the DCL20. This input supports the following sources: line, low impedance and 100V with an adapter.
-
Page 14: Connection Diagram
Conversion tables In this manual, SI units are used to expresslengths, masses, temperatures etc. These can be converted to non-metric units using the following information. Table 1: lenght units conversion Table 2: Mass units conversion 1 lb = 0,4536 kg 1 kg = 2,2046 lb 25,40 mm = 25,4 mm 1 mm = 1,00000 25,40 mm = 2,54 cm... - Page 15 Notes:...
- Page 16 Tél : 09.81.24.00.06 Mail: contact@opus-technologies.fr Opus Technologies — ZI Lagrange II — 9 Chemin de la Vieille Ferme — 33650 MARTILLAC...
Need help?
Do you have a question about the OP-6507/B and is the answer not in the manual?
Questions and answers