Table of Contents
Advertisement
Available languages
Available languages
Quick Links
Advertisement
Chapters
Table of Contents

Related Manuals for Opus Technologies OP-6507


Summary of Contents for Opus Technologies OP-6507
- Page 1 Window Intercom System OP-6507 User Guide 2021...
-
Page 3: Table Of Contents
EN |Contents Summary…………………………………………………………..…………….……. Safety precautions……………………………………….………………..………… Product introduction……………………………………………………….………. Main features……………………………………………………………….…….…… Hardware interface introduction……………………………………..….…… Introduction……………………………………………………….………………… Packing list…………………………………………………………….…….………….. Wiring……………………………………………………….………………..…………... Basic functions…….……………………………………………………………..… Local intercom………………………………………………………….……….….…. Warm prompt………………………………………………………….………….…… Recording…………………….………………………….……………………………..…... -
Page 4: Safety Precautions
• Should the following irregularity be found during use, immediately disconnect the power supply plug from the AC outlet and contact your nearest OPUS Technologies dealer. Make no further attempt to operate the unit in this condition as this may cause fire or electric shock. - Page 5 Safety precautions Caution While using the unit • Never plug in nor remove the power supply plug with wet hands, as doing so may cause electric shock. • When unplugging the power supply cord, be sure to grasp the power supply plug; never pull on the cord itself.
-
Page 6: Product Introduction
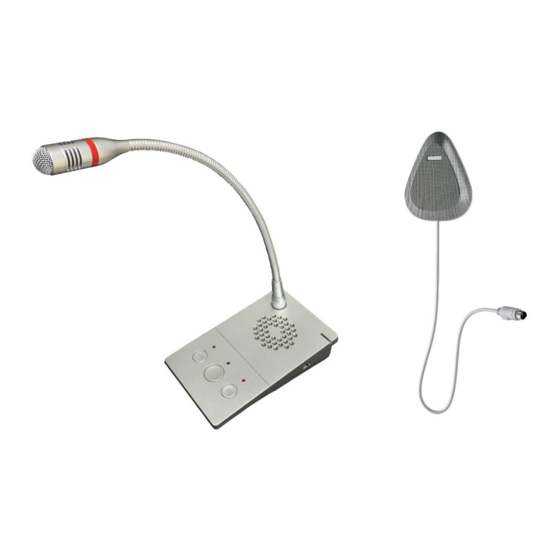
Product introduction Internal window intercom Internal window intercom Main Features • The intercom integrates a Digital Signal Processing (DSP) avoiding squeaking and providing real digital full-duplex. • Using physical button (press button pad). • Auto recognition of sound source, control of environment noises and automatic volume adjustment for a pristine reproduction of original sound. -
Page 7: Hardware Interface Introduction
Hardware interface instruction Internal window intercom 【Front view】 ①Working indication light: red light ②Loudspeaker: amplify the audio from the external window intercom. ③Indicator light: The three indicators light correspond to the recording button, intercom button, Voice Broadcast button Recording Button: During conversation , pressing it to record , press again to end record. ④... -
Page 8: Introduction
【connection wiring】 ①Power interface: connect with DC12/1,5A power. ②Communication interface:connect with the network HD recording host. ③Analog audio output interface: output analog audio, connect with DVR or IP camera. ④External window intercom speaker. 【External window intercom】 ①Loudspeaker/MIC: Loudspeaker:amplify the local intercom audio; MIC:pick up the local intercom audio; ②Internal window intercom interface Introduction Packing list... - Page 9 External speaker 1 set (2) Gooseneck microphone (IM-300BY) (3) Power adapter 1 pcs (2) Wire binder (3*100mm)3 pcs (3) Self adhesive clamp 3 pcs (4) Wiring connector (3.81-2P) 1 pcs (5) Quick installation manual 1 pcs (6)...
-
Page 10: Wiring
Wiring Connect the power adapter connector to the power interface of central unit (1) (red colored connector). Connect the speaker customer side with the intercom central unit (2) Basic function Local intercom After connecting the internal and external window intercom modules, turn on the power. Press the intercom button of internal window intercom. -
Page 11: Recording
Recording Analog recording The internal window intercom can output analog audio and be connected to a DVR to automatically record on the hard disk of the recorder. - Page 12 Tél : 09.81.24.00.06 Mail: contact@opus-technologies.fr Opus Technologies — ZI Lagrange II — 9 Chemin de la Vieille Ferme — 33650 MARTILLAC...
- Page 13 Interphone de guichet OP-6507 Notice 2021...
- Page 15 FR |Table des matières Sommaire..……..………………………………………………..…………….……. Précautions de sécurité……………………………….………………..………… Introduction produit……………………………………………………….………. Caractéristiques principales………………………………………….…….…… Introduction à l’interface Hardware…………………………………………. Introduction…….………………………………………………….………………… Contenu…..…………………………………………………………….…….………….. Câblage.…………………………………………………….………………..…………... Fonctions de base…….…….…………………………………………………..… Interphone local……………………………………………………….……….….…. Messages automatiques………………………………………….………….…… Enregistrement…..……….………………………….……………………………..…...
-
Page 16: Précautions De Sécurité
Pendant l'utilisation de la machine Si vous constatez l'irrégularité suivante pendant l'utilisation, débranchez immédiatement la fiche d'alimentation de la prise secteur et contactez votre revendeur OPUS Technologies le plus proche. N'essayez plus de faire fonctionner l'appareil dans ces conditions, car cela pourrait provoquer un incendie ou un choc électrique. - Page 17 Précautions de sécurité Attention Pendant l’utilisation de l’appareil • Ne branchez ni ne débranchez jamais la fiche d'alimentation avec des mains mouillées, car cela pourrait provoquer un choc électrique. • Lorsque vous débranchez le cordon d'alimentation, veillez à saisir la fiche d'alimentation ; ne tirez jamais sur le cordon lui-même.
-
Page 18: Introduction Produit
Introduction produit Interphone côté agent Haut-parleur côté public Principales caractéristiques • L'interphone intègre un traitement numérique du signal (DSP) évitant les grésillements et offrant un véritable duplex numérique. • Utilisation de boutons poussoirs. • Reconnaissance automatique de la source sonore, contrôle des bruits ambiants et réglage automatique du volume pour une reproduction fidèle du son original. -
Page 19: Introduction À L'interface Hardware
Introduction à l’interface Hardware Interphone de guichet côté agent 【Vue de face】 ①Témoin de fonctionnement : lumière rouge ②Haut-parleur : amplifie le son de l'interphone. ③Les voyants lumineux : Les trois voyants lumineux correspondent au bouton d'enregistrement, au bouton intercom, au bouton de diffusion vocale. Bouton d'enregistrement : Pendant la conversation, appuyez dessus pour enregistrer, ④... -
Page 20: Introduction
【connection des câbles】 ①Interface d'alimentation : à connecter à une alimentation DC12/1,5A. ②Interface de communication : connexion avec le réseau hôte d'enregistrement HD. ③Interface de sortie audio analogique : sortie audio analogique, connexion avec le DVR ou la caméra IP. ④A brancher sur le haut-parleur côté... - Page 21 Haut-parleur côté public x1 (2) Microphone col de cygne (IM-300BY) (3) Adaptateur secteur x1 (2) Serflex(3*100mm) x3 (3) Pince autocollante x3 (4) Bornier de raccordement (3.81-2P) x1 (5) Manuel d’installation rapide x1 (6)...
-
Page 22: Câblage
Câblage Connectez l'adaptateur d'alimentation à l'interface d'alimentation de l'unité (1) centrale (connecteur de couleur rouge). Connectez le haut-parleur côté client avec l'unité centrale de l'interphone. (2) Fonctions de base Interphone local Après avoir connecté l’interphone côté agent et le haut-parleur côté public, mettez l'appareil sous tension. -
Page 23: Enregistrement
Enregistrement Enregistrement analogique L'interphone de guichet côté agent peut émettre un son analogique et être connecté à un DVR pour enregistrer automatiquement sur le disque dur de l'enregistreur... - Page 24 Tél : 09.81.24.00.06 Mail: contact@opus-technologies.fr Opus Technologies — ZI Lagrange II — 9 Chemin de la Vieille Ferme — 33650 MARTILLAC...
Need help?
Do you have a question about the OP-6507 and is the answer not in the manual?
Questions and answers