Prowise iPro Mobile Lift Assembly Manual
Hide thumbs
Also See for iPro Mobile Lift:
- Assembly manual (32 pages) ,
- Safety manual (48 pages) ,
- User manual (14 pages)
Table of Contents
Advertisement
Available languages
Available languages
Quick Links
Advertisement
Chapters
Table of Contents

Related Manuals for Prowise iPro Mobile Lift


Summary of Contents for Prowise iPro Mobile Lift
- Page 1 Prowise iPro Mobile Lift Assembly Guide www.prowise.com...
-
Page 2: Table Of Contents
Table of Contents Components of the Prowise iPro Mobile Lift Assembly of the touchscreen on the lift Initialisation procedure (Aligning the lift columns) Moving the lift Prowise iPro Mobile Lift www.prowise.com... -
Page 3: Components Of The Prowise Ipro Mobile Lift
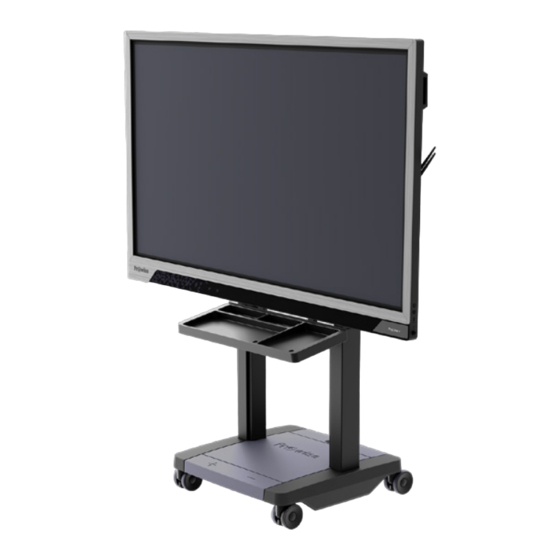
Components of the Prowise iPro Mobile Lift 1. Lift columns 2. VESA box 3. Power cable for touchscreen 4. USB cable 5. AC in 6. Foot controller 7. Wheels with brakes Prowise iPro Mobile Lift www.prowise.com... -
Page 4: Assembly Of The Touchscreen On The Lift
The installation and the assembly of the touchscreen on the Prowise lift should be executed by certified personnel of Prowise or a Prowise certified partner. Please be aware if damage is caused to the lift or touchscreen due to incorrect assembly by third parties, the warranty will be void. - Page 5 6. Connect the power cable of the lift to the AC input of the touchscreen and connect the usb cable from the screen to the lift. 7. Align the lift by following the initialisation procedure. Prowise iPro Mobile Lift www.prowise.com...
-
Page 6: Initialisation Procedure
2. The mobile lift is equipped with anti- collision sensors, which will stop the lift from moving as soon as it meets resistance. This prevents damage to the lift and the touchscreen installed on it. Prowise iPro Mobile Lift www.prowise.com... -
Page 7: Moving The Lift
3. Adjust the screen to the correct height by pressing the + or - button on the foot controller. 4. Connect the lift to the installed Prowise touchscreen using the USB cable to operate the lift directly from Prowise Central. Please note, this functionality is only supported by Prowise touchscreens equipped with Prowise Central. - Page 8 Inhaltsverzeichnis Bestandteile des mobilen Lifts Installation des Touchscreens auf dem Lift Initialisieren Lift (Justieren der Liftsäulen) Liftnutzung Verschieben des Lifts Prowise iPro Mobile Lift www.prowise.com...
-
Page 9: Bestandteile Des Mobilen Lifts
Bestandteile des mobilen Lifts 1. Liftsäulen 2. VESA Box 3. USB Kabel 4. Anschlusskabel 5. AC- Eingang 6. Fußschalter 7. Rollen mit Blockiersystem Prowise iPro Mobile lift www.prowise.com... -
Page 10: Installation Des Touchscreens Auf Dem Lift
Installation des Touchscreens auf dem Lift Lassen Sie die Installation des Lifts und die Montage des Touchscreens auf dem Prowise Lift ausschließlich von Prowise, oder einem durch Prowise zertifizierten Partner ausführen. Prowise kann nicht für Schäden oder Verletzungen, als Folge durch Montage durch Dritte, strafbar gemacht werden. Die Garantie verfällt, wenn der Lift oder Touchscreen durch Dritte installiert, oder montiert wird. - Page 11 Touchscreens an und verbinden Sie den Touchscreen und den Lift mit dem USB Kabel. 6. Schließen Sie den Lift mithilfe des mitgelieferten Anschlusskabels an die geerdete Steckdose an. 7. Justieren Sie die Liftsäulen mithilfe der Prozedur zum “Initialisieren”. Prowise iPro Mobile lift www.prowise.com...
-
Page 12: Initialisieren Lift
Objekten, eingeklemmt werden können. 2. Der Lift ist von einem Anti- Kollisionsschutz versehen. Er hält in seiner Bewegung direkt an, wenn er auf ein Objekt trifft. Dadurch wird eine Beschädigung des Lifts und des darauf installierten Touchscreens vermieden. Prowise iPro Mobile Lift www.prowise.com... -
Page 13: Verschieben Des Lifts
(-) auf die richtige Höhe ein. 4. Verbinden Sie den Lift mithilfe des USB Kabels mit dem darauf installierten Prowise Touchscreen, um die Liftbedienung in Prowise Central zu integrieren. Achtung: Diese Funktion ist nur für die Prowise Touchscreens verfügbar, in welche Prowise Central integriert ist. - Page 14 Inhoudsopgave Onderdelen van de mobiele lift Installatie van touchscreen op lift Initialiseren lift (Uitlijnen van de liftkolommen) Gebruik lift Verplaatsen van de lift Prowise iPro Mobile Lift www.prowise.com...
-
Page 15: Onderdelen Van De Mobiele Lift
Onderdelen van de mobiele lift 1. Liftkolommen 2. VESA box 3. USB kabel 4. Aansluitkabel 5. AC-in 6. Voetbediening 7. Wielen met rem systeem Prowise iPro Mobile Lift www.prowise.com... -
Page 16: Installatie Van Touchscreen Op Lift
Installatie van touchscreen op lift Laat de installatie van de lift en de montage van het touchscreen op de Prowise lift enkel door Prowise of een gecertificeerde partner uitvoeren. Prowise kan niet aansprakelijk worden gesteld voor schade of letsel als gevolg van montage door derden. - Page 17 AC-in van het touchscreen en verbind het touchscreen en de lift met de USB kabel. 6. Sluit de lift met het meegeleverde aansluitkabel aan op een geaard stopcontact. 7. Lijn de liftkolommen uit volgens de procedure ‘initialiseren’. Prowise iPro Mobile Lift www.prowise.com...
-
Page 18: Initialiseren Lift
2. De lift is voorzien van anti-collision sensoren, hierdoor stopt deze met bewegen zodra de lift tegen een object botst. Dit voorkomt schade aan de lift en het daarop geïnstalleerde touchscreen. Prowise iPro Mobile Lift www.prowise.com... -
Page 19: Verplaatsen Van De Lift
4. Verbind de lift door middel van de USB kabel met het daarop geïnstalleerde Prowise touchscreen voor een integratie van de liftbediening in Prowise Central. Let op, deze functie wordt enkel ondersteund door Prowise touchscreens waarbij Prowise Central is geïntegreerd. - Page 20 Let education speak www.prowise.com...
Need help?
Do you have a question about the iPro Mobile Lift and is the answer not in the manual?
Questions and answers