Table of Contents
Advertisement
Quick Links
Advertisement
Table of Contents

Related Manuals for BE HLTT16


Summary of Contents for BE HLTT16
- Page 1 PROPANE TANK TOP HEATER HLTT16 HLTT32 User Manual BEPOWEREQUIPMENT...
-
Page 3: Table Of Contents
Models 11 HLTT16 & HLTT32 Propane (LP) Supply 12 LP Characteristics 12 Operating Pre-Operation 13 Ventilation 13 Assembly Operation 14 Connecting Heater to LP Cylinder 14 Model HLTT16 14 Model HLTT32 Lighting Instructions 15 All Models Shutting Down 17 Procedures Maintenance and Storage 17 Maintenance and Storage Replacement Parts List 18 Replacement Parts List Exploded View 19 ... - Page 4 INTRODUCTION Attention: Read through the complete manual prior to the initial use of your Heater. Using the Operator’s manual The operating manual is an important part of your Heater. It should be read thoroughly before initial use, and referred to often to make sure adequate safety and service concerns are being addressed. Reading the owner’s manual thoroughly will help avoid any personal injury or damage to your pump. By knowing how best to operate this machine you will be better positioned to show others who may also operate the unit. You can refer back to the manual at any time to help troubleshoot any specific operating functions, so store it with the machine at all times.
- Page 5 PRODUCT IDENTIFICATION Record Identification Numbers Heater If you need to contact an Authorized Dealer or Customer Service line (1- 866-850-6662) for information on servicing, always provide the product model and identification numbers. You will need to locate the model and serial number for the pump and record the information in the places provided below. Date of Purchase: Dealer Name: Dealer Phone: Product Identification Numbers Model Number: Serial Number:...
-
Page 6: Safety
SAFETY Save these Instructions SAFETY RULES This is the safety alert symbol. It is used to alert you to potential personal injury hazards. Obey all safety messages that follow this symbol to avoid possible injury or death. The safety alert symbol ( ) is used with a signal word (DANGER, CAUTION, WARNING), a pictorial and/or a safety message to alert you to hazards. DANGER indicates a hazard which, if not avoided, will result in ... - Page 7 SAFETY WARNING • Failure to comply with the precautions and instructions provided with this heater, can result in death, serious bodily injury and property loss or damage from hazards of fire, explosion, burn,asphyxiation, carbon monoxide poisoning, and/or electrical shock. • Only persons who can understand and follow the instructions should use or service this heater. • If you need assistance or heater information such as an instructions manual, labels, etc. contact the manufacturer. WARNING • Keep solid combustibles, such as building materials, paper or cardboard, a safe distance away from the heater as recommended by the instructions. • Never use the heater in spaces which do or may contain volatile or airborne combustibles, or products such as gasoline, solvents, paint thinner, dust particles or unknown chemicals. • Do not store or use gasoline or other flammable vapors and liquids in the vicinity of this or any other appliance. WARNING Carbon monoxide can kill you. • Using a portable gas camping heater inside a tent, RV, camper, vehicle, shelter or other enclosed area can produce deadly carbon monoxide. • Not for use in residential living areas or in non-adequately ventilated enclosed spaces. • Never bring or store a propane cylinder indoors.
- Page 8 SAFETY CAUTION • This is an unvented portable heater. It uses air (oxy- gen) from the area which it is used. Ample combus- tion and ventilation air must be provided. WARNING California Residents: Combustion by-products produced when using this product contain carbon monoxide, a chemical known to the state of California to cause cancer and birth defects (or other reproductive harm). WARNING • Not for home or recreational use. WARNING WHAT TO DO IF THE SMELL OF GAS IS PRESENT: • DO NOT attempt to light heater. • Extinguish any open flame. • Shut off gas to heater. • If odor continues, contact your local gas supplier or fire department. • Do not touch any electric switch, do not use any. Immediately call your gas supplier from a neighbors phone. Follow the gas suppliers instructions. • If you can not reach your gas supplier, call the fire department. • Service must be done by a qualified service agency or the gas supplier. WARNING: This product can expose you to...
-
Page 9: Safety Precautions
SAFETY SAFETY PRECAUTIONS Accidents can be avoided with care and good judgement. The following rules are sound practices you should follow for the safe and comfortable operation of your heater. It is important that you read this entire User’s Manual carefully and thoroughly before operating or servicing this heater. Keep this manual handy to use as a reference. It is your guide to safe and proper operation of this heater. This heater is designed and approved for use as a construction heater in accordance with Standard ANSI Z83.7-2011/CSA 2.14-2011. CHECK WITH YOUR LOCAL FIRE SAFETY AUTHORITY IF YOU HAVE ANY QUESTIONS ABOUT APPLICATIONS. The primary purpose of con- struction heaters is to provide temporary heating of buildings under construction, alteration, or repair. Properly used, the heater provides safe economical heating. This is a direct-fired heater. Direct-fired means that all of the combustion products enter the heated space. This heater is rated at 98% combustion efficiency, but still produces small amounts of carbon monoxide. Carbon monoxide is toxic. Humans can tolerate small amounts of carbon monoxide, and caution should be taken to provide adequate ventilation. Failure to provide adequate in accordance with this manual could result in death. Early signs of carbon monoxide poisoning ... - Page 10 SAFETY • Never operate heater while unattended or sleeping. • Operate heater in a manner that will not directly expose it to water, rain or dripping water. • NEVER leave heater unattended. • Before connecting the heater to the propane cylinder, make sure that the heater regulator knob is in the “OFF” position. • DO NOT modify this heater or operate a heater that has been modified from it’s original state. • Do not use this heater on LP gas cylinders larger than 20 lbs. capacity. • Always disconnect and remove the heater from the LP cylinder after use. • Always attach the heater in an upright (vertical) position. Never attach the heater in a horizontal position. This will lead to dangerous and improper operation. • NEVER handle an operating or hot heater, as severe burns may result. Wing nuts and burner heads become very hot during operation. Do not attempt to adjust burner position while heater is operating. Always allow at least 15 minutes of cooling time before handling the heater. • Be sure that all guards are replaced before use. • The flow of combustion and ventilation air must not be obstructed...
-
Page 11: Models
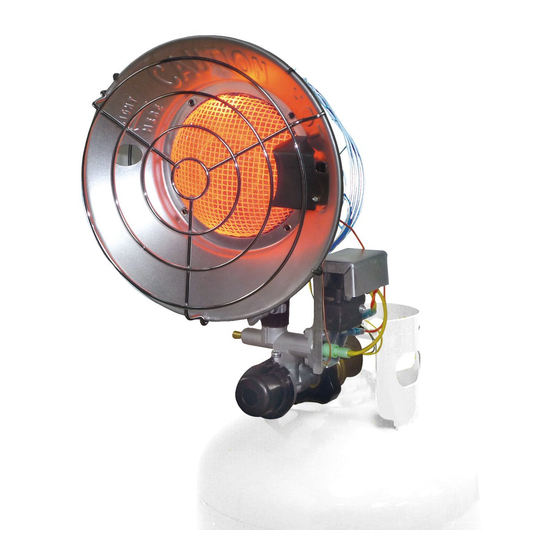
MODELS Models HLTT16 & HLTT32 HLTT32 HLTT16 Figure 1. Product Identification... -
Page 12: Propane (Lp) Supply
Propane (LP) Supply You must provide the propane gas and cylinder(s). Use this heater only with a propane vapor withdrawal supply system. Refer to Chapter 5 of the Standard for Storage and Handling of Liquefied Petroleum Gas , ANSI/NFPA 58. Your local library or fire department will have this book- let. LP CHARACTERISTICS • Flammable, explosive under pressure, heavier than air, and pools in low areas. • In its natural state, propane has no odor, but for your safety an odorant that smells like rotten cabbage has been added. • Contact of propane (LP) gas with the skin can cause freeze burns. • Heater is manufactured for use with LP gas only. DO NOT attempt to convert to any other gas. Such modifications are dangerous, and will void warranty. • When heater is not in use, LP cylinder must be turned OFF • Be sure that the LP cylinder is located on a level and stable surface. • Do not use this heater in a basement or below ground level. Propane (LP) is heavier than air, and will always seek the lowest level. If you suspect a leak, shut off the valve at the LP cylinder immediately. The amount of LPG used with this heater varies. Both factors are: 1. The amount of gas in the cylinder of LPG. 2. The temperature of the LP tank and its surroundings. OPERATING • Do not use a flame to check for leaks! Use a 50/50 solution of dish soap and water to check for leaks. Repair any leaks before attempting to re- light the heater. • Check the “O” ring on the heater inlet fuel connector for damage before each use. Replace if damaged or worn. • Always store the LP cylinder outdoors, but not in an enclosed area. Never ... -
Page 13: Pre-Operation
Single Burner Models Only Pre-Operation ut not in an 1. Be sure that the control knob on the regulator is in the der near high VENTILATION “OFF” position. ver store the LP For this heater, provide a minimum of 48 square inches of space by open- 2. -
Page 14: Operation
OPERATION Operation CONNECTING HEATER TO LP CYLINDER Be sure to read and understand all of the Safety Information in this manual before connecting the heater to the LP cylinder. Installation must conform to local codes and with the Standard for the Storage and Han- dling of Liquefied Petroleum Gases and ANSI/NFPA 58 Inspect the hose and regulator prior to each use of the heater. If there is excessive abrasion or wear, or if the hose is cut, replace it with the proper assembly shown in the parts list prior to using the heater. Model HLTT16 1. Be sure that the control knob on the regulator is in the “OFF” position. 2. Line up the threads on the Fuel Connector Nut with the threads on the LP cylinder valve. Turn Fuel Connector Nut counter- clockwise to tighten. Use a wrench to fully tighten the nut, being careful not to overtighten. 3. Slowly open the LP cylinder valve. 4. Check all connections for leaks using a 50/50 mixture of dish soap and water. Any bubbles appearing show a leak. Remove and reconnect the Connector Nut to the valve. Model HLTT32 1. Be sure that the control knob on the regulator is in the “OFF” position. 2. Line up the slots in the tank collar bracket with the tank collar ring and slide into place. Be sure the mounting knob is to the outside, and tighten. 3. Line up the threads on the Fuel Connector Nut with the threads on the LP cylinder valve. Turn Fuel Connector Nut counter- clockwise to tighten. Use a wrench to fully tighten the nut, being careful not to overtighten. 4. Slowly open the LP cylinder valve. 5. Check all connections for leaks using a 50/50 mixture of dish soap and water. Any bubbles appearing show a leak. Remove ... -
Page 15: Lighting Instructions
LIGHTING INSTRUCTIONS Lighting Instructions ALL MODELS WARNING Be sure to read and understand all of the Safety Information in this manual before lighting this heater. Heater has high surface temperatures. Be sure to keep children, pets and clothing away from the heater. Be sure to keep Burner and Heater Regulator clean and free from any debris. Maintain safe distances from heater. 1. STOP! Be sure to read all of the Safety Instructions. 2. Check that the valve on the propane cylinder is open. 3. Turn the Heater Regulator Knob clockwise to the “OFF” position. 4. Wait five (5) minutes for any gas to clear. Smell for gas around the heater, including near the floor. If you do smell gas, STOP! Follow the Safety Instructions, and check for leaks. If there is no gas smell pro- ceed to the next step. WARNING Never use flame to check for leaks. 5. Turn the Heater Regulator Knob counter-clockwise to the “HI” position, and press in the Safety shut-off Valve Plunger for five (5) seconds. NOTE: When the heater is first connected to the gas supply, the plunger should be depressed for approximately thirty (30) seconds to bleed any air from the hose, and release plunger. 6. Insert a lit match into the Ignition hole in the reflector, and the depress plunger until the burner lights (see Figure 5). 7. Keep the plunger depressed for about thirty (30) seconds after the burner lights. Then release the plunger, and if the burner stays lit, remove and extinguish the match. You will know that the burner is lit when the mesh screen begins to glow red. 8. If the Burner does not stay lit, repeat the lighting process. If the heater does not light after several attempts, be sure you are getting fuel to the to the burner. The faint smell of gas will tell you the fuel is flowing. If not, there may be a problem with your LP cylinder. Take it back to your local dealer for replacement. CAUTION... - Page 16 Heater has high surface first burner. Be sure NOT to point burners at one another. CAUTION temperatures. Be sure to keep NOTE: When the children, pets and clothing away from the heater. Be WARNING supply, the plung sure to keep Burner and Heater Regulator clean and Never look over the top of the heater during ignition. The heater may thirty (30) second free from any debris.
-
Page 17: Shutting Down
SHUTTING DOWN Shutting Down PROCEDURES 1. Turn the valve on the LP cylinder clockwise to stop the flow of fuel. 2. Turn the Heater Regulator Knob to the “OFF” position, and wait at least fifteen (15) minutes for the heater to cool. 3. Remove the heater from the LP cylinder by reversing the steps in Connecting Heater to LP Cylinder on Page 4. Do not store the LP cylinder with the heater still attached, or in an enclosed area. BE SURE TO FOLLOW THE DIRECTIONS OUTLINED IN VENTILATION. ALWAYS INSPECT HEATER BEFORE USE AND AT LEAST ANNUALLY BY A QUALIFIED SERVICE PERSON. Maintenance and Storage 1. Inspect your heater before each use. Check all connections for leaks, following the procedure outlined on Pages 4 and 5. Check the Regula- tor Hose (dual burner models only) for any cracks, breaks or wear. If the hose is damaged replace it with the correct manufacturers part. -
Page 18: Replacement Parts List
REPLACEMENT PARTS Replacement Parts List Part Number for Models: Item Description HLTT16 HLTT32 Regulator Assembly 20-032-0001 20-032-0002 Hose Assembly 20-051-0001 Manifold Assembly 20-111-0020 Safety Valve Assembly 20-013-0001 20-013-0001 Burner Assembly 20-023-0003 20-023-0003 Front Guard 20-101-0001 20-101-0001 Thermocouple 20-091-0002 20-091-0002 Tank Collar Bracket 20-504-0003 Mounting Bolt Knob 20-503-0001 Rear Guard 20-101-0002 20-101-0002 Manifold Bracket - A 20-111-0002 Manifold Spring 20-111-0003 Manifold Bracket - B... -
Page 19: Exploded View
EXPLODED VIEW Radiateurs pour NE JAMAIS LAISSER LE RADIATEUR SANS SURVEILLANCE tête de réservoir ALORS QU’IL BRÛLE OU QU’IL EST RACCORDÉ À UNE de propane SOURCE DE COMBUSTIBLE Exploded View Vue éclatée Figure 4. Vue éclatée du radiateur Figure 6. Exploded view of 16k/32k Tank Top heater Page 7 Pinnacle Products International, Inc. -
Page 20: Warranty
WARRANTY Limited Warranty BE Pressure Supply Inc. warrants this heater to the original retail pur- chaser only, to be free from defects in material and workmanship for a period of one (1) year from the date of initial purchase. This product must be properly installed, maintained and operated in accordance with the instructions provided. BE Pressure Supply Inc. requires reasonable proof of your date of purchase from an authorized retailer or distributor. Therefore, you should keep your sales slip, invoice, or cancelled check from the original pur- chase. This Limited Warranty shall be limited to the repair or replacement of parts, which prove defective under normal use and service within the warranty period, and which BE Pressure Supply Inc. shall determine at its reasonable discretion. This warranty does not apply to products purchased for rental use. This Limited Warranty does not cover any failures or operating difficulties due to normal wear and tear, accident, abuse, misuse, alteration, misap- plication, improper installation or improper maintenance and service by you or any third party. Failure to perform normal and routine maintenance on the heater, shipping damage, damage related to insects, birds, or animals of any kind, and damage due to weather conditions are also not covered. In addition, the Limited Warranty does not cover damage to the finish, such as scratches, dents, discoloration, rust or other weather dam- age, after purchase. All transportation costs for the return of the damaged product or parts will be the responsibility of the purchaser. Upon receipt of damaged item, BE Pressure Supply Inc. will examine the item and determine if defective. BE Pressure Supply Inc. will repair or replace and return the item, freight pre-paid. If BE Pressure Supply Inc. finds the item to be in normal operat- ing condition, or not defective, the item will be returned freight collect. This Limited Warranty is in lieu of all other express warranties. BE Pres- sure Supply Inc. disclaims all warranties for products that are purchased from sellers other than authorized retailers or distributors. AFTER THE PERIOD OF THE ONE (1) YEAR EXPRESS WARRANTY EXPIRES, BE PRESSURE SUPPLY INC. DISCLAIMS ANY AND ALL IMPLIED WARRANTIES, INCLUDING WITHOUT LIMITATION THE IMPLIED WARRANTIES OF MERCHANTABILITY AND FITNESS FOR A PARTICULAR APPLICATION. FURTHER, BE Pressure Supply Inc. SHALL HAVE NO LIABILITY WHATSOEVER TO PURCHASER OR ANY ... - Page 21 WARRANTY specific legal rights; a purchaser may have other rights depending upon where he or she lives. Some states do not allow the exclusion or limita- tion of special, incidental or consequential damages, or limitations on how long a warranty lasts, so the above exclusion and limitations may not apply to you. BE Pressure Supply Inc. does not authorize any person or company to assume for it any other obligation or liability in connection with the sale, installation, use, removal, return, or replacement of its equipment, and no such representations are binding on BE Pressure Supply Inc.. Always be sure to specify model number and serial number when making any claim with BE Pressure Supply Inc.. For your convenience use the space provided below to list this informa- tion: Model #: _________________________ Serial #: __________________________ Date of Purchase: __________________...
- Page 22 THE POWER YOU NEED. If you need assistance with the assembly or operation of your Heater please call 1-866-850-6662...
Need help?
Do you have a question about the HLTT16 and is the answer not in the manual?
Questions and answers