
Related Manuals for Alfano AStrO


Summary of Contents for Alfano AStrO
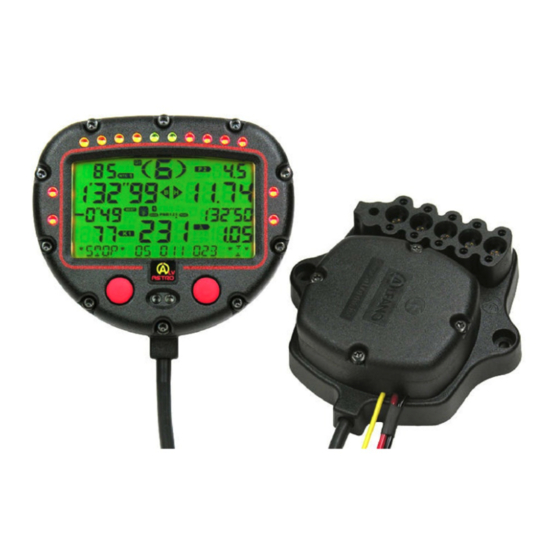
- Page 1 QUICK START GUIDE AStrO Ver.10.309 Toll Free : 1 (877) 462-7296 Visit : www.Alfano-usa.com...
- Page 2 Thank you for purchasing the latest in data acquisition technology, the AStrO. We hope that it surpasses your expectations. This is the Quick Start Manual for the AStrO, please take a few minutes to acquaint yourself with the features this product offers you.
- Page 3 Display Configurable 10 shift lights RPM Graphic RPM 1 or Graphic RPM 1 or Gear position Temperature 2 Display temperature 1 Display Lap time RPM Display Temperature Alarm LED 1 Temperature Alarm LED 2 Configurable lap time difference (between last lap, Temperature 1 best lap or targeted lap) Best lap time...
- Page 4 START High Pre-Set Temperature Alarm 1 High Pre-Set Temperature Alarm 2 Low Pre-Set Temperature Alarm 1 Low Pre-Set Temperature Alarm 2 When both LEDS are off : temperature is between the Low and High Pre-Set Range 2 Flashing LEDS : Temperature is Above the When Bottom LED is on : Pre-Set High Range...
-
Page 5: To Start Recording
Stop Mode. Also, If you delay too long on a cer- tain screen, it will bring you automatically back to Stop Mode, . TO START RECORDING This is the main menu for the AStrO. “174”:Time in minutes available to record data. "C°": Choice that was made between Celcius over Fahrenheit (C°... - Page 6 TO REVIEW BEST LAP TIME "No Best Lap" means you do not have any lap data in your system. If you see "Best Lap" then by pressing the right button it will bring you to your “BestLap”. Wait for “EXIT” &...
- Page 7 Press the right button to pass to the next counter (until you reach a counter on which you want to record). Press the left button to pass to the next menu. Please download EGT, SPEED, G-Force Sensors Installation Guides from our web Site:www.Alfano-usa.com Toll Free:1-877-462-7296...
-
Page 8: Configuration Menus
CONFIGURATION MENUS (10-28) :TO ACCES CONFIGURATION MENUS; AT STOP MODE HOLD THE LEFT BUTTON 3 sec NUMBER of MAGNETIC STRIPS or BEACONS Press the right button to choose the number of strips or beacons that are on the track. - Page 9 LOW / HIGH TEMPERATURE ALARM (Continue) Then that will bring you to your high temperature target for Temp 1. Using the right button you will now set the high Temp target for Temp 1. Left button sets and brings you to low temperature setting for Temp 2.
- Page 10 SPEED **Prior to this configuration, go to Menu 23 and choose either metric (cm) or Imperial (inches) measurements. Press the right button to start speed configuration and press again the right button to choose if you are using a sensor or not.
- Page 11 PITS SPEED LIMIT ALARM Press the right button and wait for the arrows up and down, to set your speed limit alarm. Press the left button to set and pass to the next menu. Tip: When driving and entering the pits, press the right button, then left button to view your speed.
-
Page 12: Bar Graph
BAR GRAPH Press the right button to choose to view the 2 bar graphs; As a display for both RPM , [½ RPM & ½ Temp] or [½ Temp 1 & ½ Temp 2] . Press the left button to set and pass to the next menu. -
Page 13: Backlight On/Off
BACKLIGHT ON/OFF Press the right button to choose wether to make the backlight menu active or not. When on active ("ON" mode), as soon as you start the unit the backlight menu will pop up for a few seconds asking if you will need to have the backlight on or off.
Need help?
Do you have a question about the AStrO and is the answer not in the manual?
Questions and answers