Advertisement
Quick Links
Advertisement

Subscribe to Our Youtube Channel
Related Manuals for Varla EAGLE ONE PRO


Summary of Contents for Varla EAGLE ONE PRO
- Page 1 EAGLE ONE PRO Owner’s Manual varlascooter.com...
- Page 3 Dear Customer, Thanks for choosing Varla Scooter! We sincerely hope you could enjoy the fun and freedom of riding Varla Scooter. Please spend some time reading and understanding this entire manual before you ride. limited obstacles. Here are some key points to keep in mind when riding: 3.
-
Page 4: Table Of Contents
CONTENTS Safety Warnings · · · · · · · · · · · · · · · · · · · · · · · · · · · · · · · · · · · · · · · · · · · · · · · · · · · · · · · · · · · · · · · · · · · · · · · · · · · · · · · · · · · · · · · · · · · · · · · · · · · · · · · · · · · · · · · · · · · · · · · · · · · · · · · · · · 1 ·... -
Page 5: Safety Warnings
Safety Warnings ☆ ☆ ☆ Keep this product away from small children and remember that it is intended for use only by persons who are, at a minimum, completely comfortable and competent while operating the scooter. ☆ ☆ ☆ Obey the local laws or regulations. Always check and obey any local laws or regulations which may affect the locations where the electric scooter may be used. - Page 6 Safety Warnings 1. Please wear a helmet during the 2. Charge the battery with the original 3. Do not ride on bumpy and slippery charger, and someone needs to be as elbow and knee protectors. snow-piled and gathered water road. charging.
- Page 7 Motor 2x1000W Speed 45 MPH Climbing Angle 30+ Degrees Battery 60V/27Ah Battery Range Brake Dual Hydraulic Brake Tire 11 inches Air Tubeless Tires Display NFC Card Frame Material Aluminum Alloy Suspension Dual Hydraulic Suspension Throttle Thumb Throttle Max. 330 lbs Payload Capacity Recommended 250 lbs Self Weight...
-
Page 8: Product Dimensions
Product Dimensions Handlebar Length Standing Height Overall Height Deck Length Folded Height Deck Width Overall Length... -
Page 9: Electric Scooter Parts
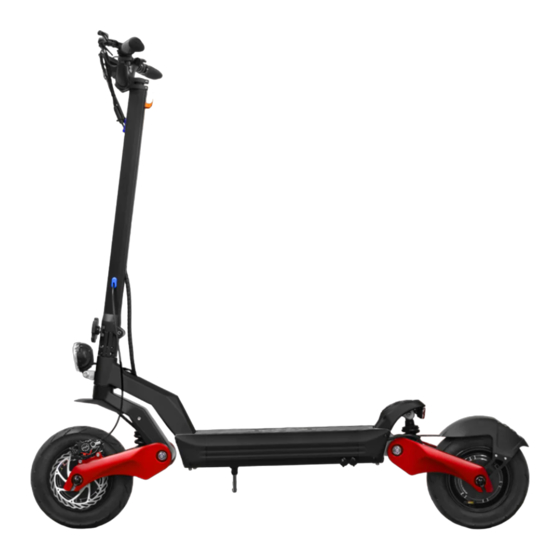
Electric Scooter Parts LCD Display Steering Bar Brake Folding Clamp Deck mat Front light Deck Front Fender Taillight Rear Fender Rear Caliper Front Motor Front Tire Kickstand Rear Motor Charging Port Front Rear Suspension Suspension Rear Tire Front Caliper... -
Page 10: Assembly
Put the handlebar on the stem, align center. - Page 11 When connecting these two connectors, the arrow must be aligned with the arrow.
- Page 12 How to Unfold the Scooter Rotate disc lock to right Insert the insurance pin How to Fold the Scooter Rotate disc lock to left Pull out the insurance pin...
- Page 13 LIGHT INDICATOR BATTERY LEVEL INDICATOR DUAL MOTOR INDICATOR CRUISE CONTROL INDICATOR SPEED INDICATOR SPEED UNIT INDICATOR VOLTAGE OUTPUT INDICATOR 3 LEVELS OF GEAR DISTANCE INDICATOR...
-
Page 14: General Operation
Press the “ + ” button twice, it will show PAS 3, the top speed is 45 mph; ☆ Power Switch Place Varla's card at the designated location on the Press and hold the Power button for 3 seconds to turn on the... - Page 15 General Operation ☆ Dual/Single Motor Switch on the display. *Don't switch Single/Dual-mode during riding! ☆ Light • Taillight: When you brake, the taillight will flash. *Please turn on the headlights for night riding! Press and hold the thumb throttle to maintain a fixed speed for more than 8 seconds to automatically enter cruise mode. Then, you will see " "...
- Page 16 General Operation ☆ Battery cause the battery to not be used normally. • Short circuit protection: when the battery detects a short circuit, it will cut output to protect the battery. • Please only use the recommended charger. Make sure the power is turned OFF before you charge it. ☆...
- Page 17 General Operation Charger getting warm during use is normal. If your charger does not get warm during use, it does not mean that it is not working properly. ☆ Note: Don’t charge the scooter immediately after a long-distance ride. Please wait for at least 30 minutes. run out.
-
Page 18: Accessing Settings
Accessing Settings • • Press the Power button to toggle through P-settings. • •... - Page 19 P-Setting Instruction Setting Feature Notes From 0-99 Default: 11 Default: 60V Default: 30 Speed signal Default: 0 0: kph Speedometer units 1: mph Default: 0 Start mode 1: kick to start Default: 0...
- Page 20 P-Setting Instruction Setting Feature Notes 0: off Cruise control 1: on Default: 0 From 1-5 1: weak 5: strong Default: 3 5: slowest 100: fastest Default: 100 km/h From 0-2 Default: 1 Card: 000 Safety setting Default: 002...
- Page 21 LCD Display Error Code: 007 Motor faulty 008 Throttle faulty 009 Controller faulty 011 Communication sending faulty ERROR CODE INDICATOR...
-
Page 22: Pre-Ride Checklist
Pre-Ride Checklist ☆ Brake *When riding in gear 2 or above, the front and rear brakes must be braked together when you brake! ☆ Tire ☆ Battery ☆ or break a frame. ☆ Safety gear Always check and obey any local laws or regulations. ☆... -
Page 23: Warranty And Contact Information
Warranty and Contact Information Affected Part Warranty Period Throttle 24 months Free maintenance Controller 24 months Free maintenance Frame 24 months Free maintenance Motor 12 months Free maintenance Battery 12 months Free maintenance Charger 12 months Free maintenance Kickstand 1 Month or 100KM Free replacement Fenders 1 Month or 100KM... - Page 24 HOW TO MAKE A WARRANTY CLAIM Warranty Notes 1. Failure to follow this instruction manual for maintenance. tion of this product.
- Page 26 WARRANTY CARD WARRANTY CARD Please complete the following details. Owner’s Name: Address: City: State: Zip Code: Order Number(s): Serial number(s): Date of Purchase: Phone number: Email:...
- Page 28 varlascooter.com...
Need help?
Do you have a question about the EAGLE ONE PRO and is the answer not in the manual?
Questions and answers